
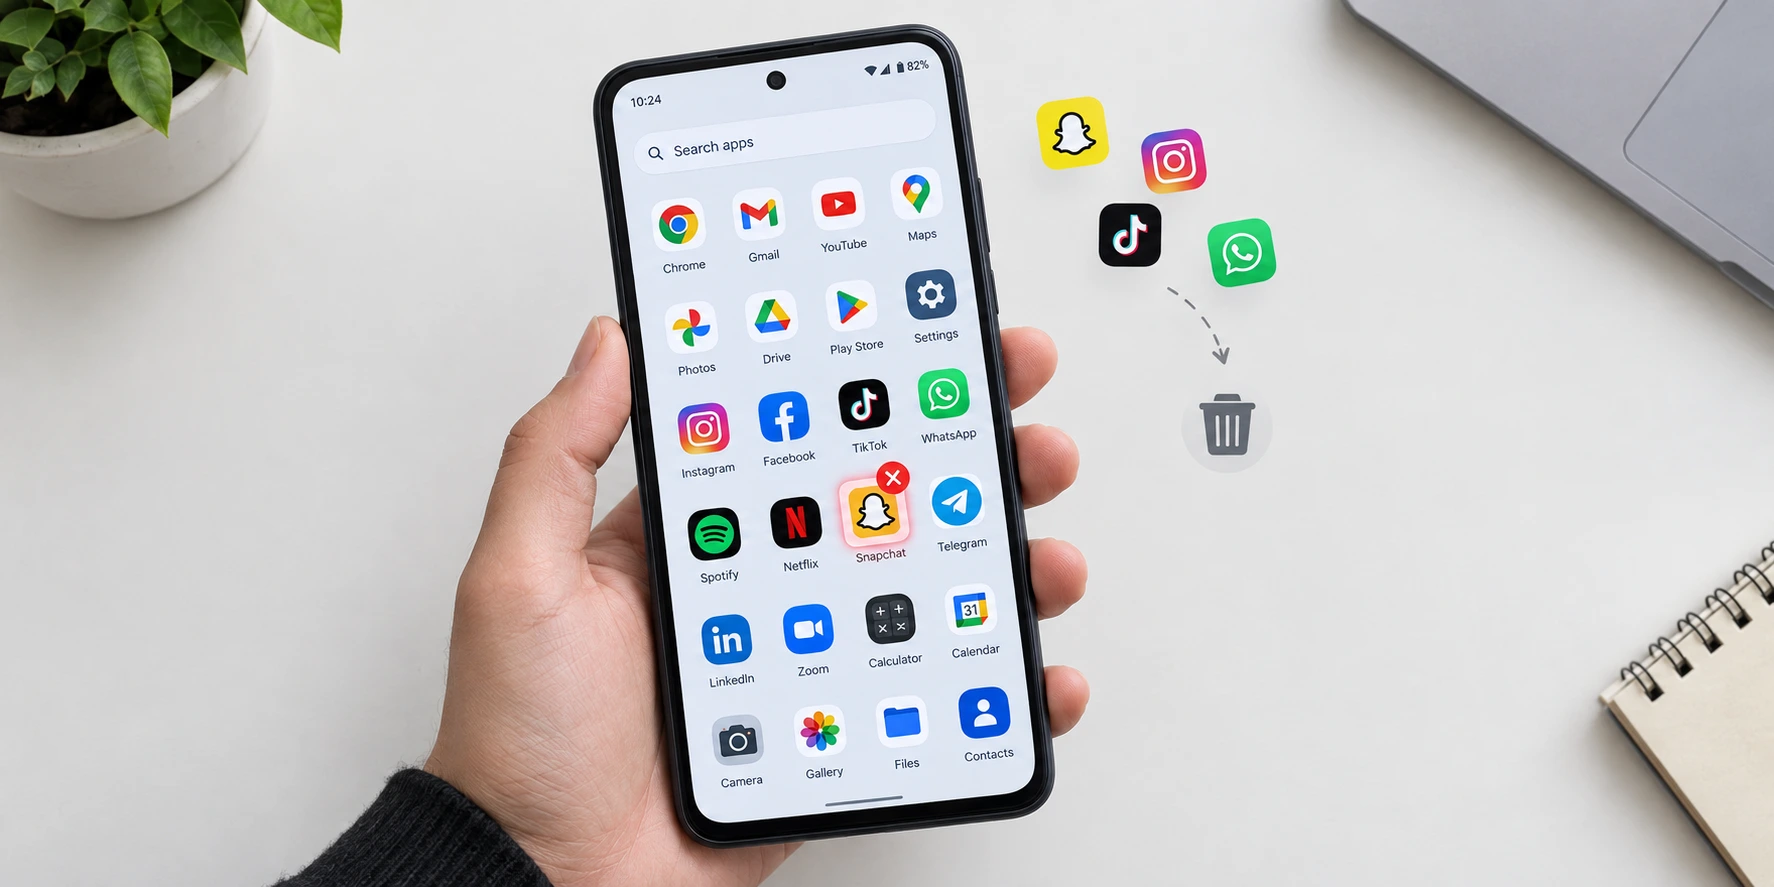
Why Deleting Apps on Android Isn’t as Simple as You Think
Most people tap Uninstall and assume the job is done. I thought the same thing for a long time. But the reality is that standard uninstalling on Android leaves more behind than most users realize, and that gap between what you expect and what actually happens is exactly why this guide exists.
There are three main reasons people want to delete apps on their Android phone. Some want to free up storage space because their device is running low. Others want to remove bloatware, those pre-installed apps that came with the phone, and just sit there eating resources. And some people want to do a clean, fresh install to troubleshoot a buggy app. All three are completely valid goals. The problem is that the standard uninstall button often fails to fully achieve any of them.
Here is what most guides never tell you. Uninstalling an app does not always delete all its data. Hidden folders can hold onto leftover files long after the app itself is gone. I have seen a single uninstalled game leave behind over a gigabyte of orphaned data on a phone. That is why deleting unused apps sometimes barely moves the storage needle.
And that is not the only surprise waiting for you.
Deleting an app also does not cancel any active subscriptions tied to it. The billing continues through Google Play regardless of whether the app is still installed. That is the kind of detail that quietly costs people money every month.
Not every app can be removed the same way either. Android actually gives you three different approaches: uninstall, disable, and archive. Each one produces a different outcome, and choosing the wrong one for your goal wastes your time. I will break down exactly what each method does in a dedicated section later.
This guide covers everything from the fastest 5-second deletion method to advanced techniques for removing pre-installed apps that normally refuse to budge. Whether you want to remove apps from Android quickly or do a thorough cleanup that actually recovers your phone performance and storage space, you will find the right method here.
The Fastest Way to Delete Apps on Android (Takes 5 Seconds)
If you just want an app gone right now, the long-press method is what you need. Press and hold the app icon on your home screen or inside the app drawer until a small menu appears, then tap Uninstall and confirm with OK. That is genuinely it. Five seconds, maybe less.
Here is the exact sequence:
- Swipe up on your home screen to open the app drawer, or find the app directly on your home screen
- Long-press the app icon until options appear above it
- Tap Uninstall (not Remove, and that distinction matters more than you might expect)
- Tap OK to confirm uninstall
The app is gone.
But here is what I want you to know before you call it done. This method is fast, and that is its only real advantage. The long-press approach does not clear the app’s stored data before removing it. So if you are deleting apps to free up storage space, you may get less back than you expected. The quick method works, but it is not thorough. I cover the full cleanup process later in this guide if you need every byte recovered.
On most Android devices you can also drag the app icon toward the top of the screen where a trash icon appears, then release to uninstall. Both approaches reach the same result.
Security Apps: Why Some Ask for a PIN Before Deletion
Some apps, particularly security and lock apps like AppLock Pro, will prompt you for a PIN when you try to uninstall them. This is not a glitch. These apps intentionally protect themselves from being deleted without authorization, which is actually the whole point of installing them in the first place.
The app uses administrator privileges on your device to block unauthorized removal. If you hit a PIN prompt and you know the code, enter it and the uninstall will proceed normally. If you do not remember the PIN, you will need to handle the administrator permission separately before Android lets you delete the app. I explain exactly how to do that in the troubleshooting section later.
Delete vs. Disable vs. Archive: What’s the Difference?
Choosing the wrong method here is where most people waste time and then wonder why their phone still feels sluggish or full. On Android, you have three distinct options for dealing with an unwanted app, and each one produces a genuinely different outcome.
Not the same outcome with different names. Actually different results.
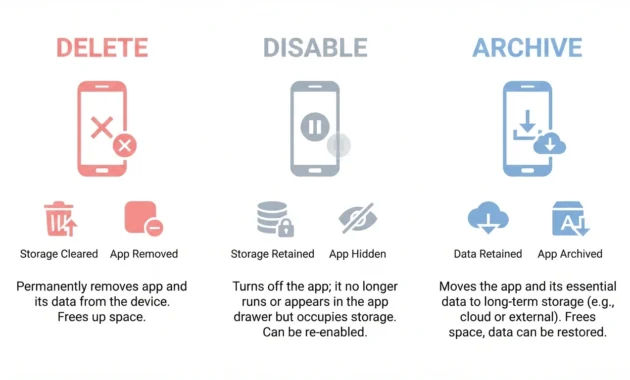
Uninstall (Delete) removes the app from your device and frees up the storage space the app was using. Most of the app’s private data gets cleared out too. This is what you want when you are done with an app permanently and need that storage back.
Disable is a different story entirely. Disabling an app on Android hides the app icon, stops the app from running in the background, and prevents it from updating. But the app itself stays installed on your device and continues to occupy the same storage space it always did. Disabling an app does not free up storage space at all. I see this misconception constantly, and it costs people real confusion when they disable ten apps expecting to recover gigabytes and nothing changes.
Disabling only frees RAM, not storage. That is the distinction that matters.
Archive is a newer Android feature that sits somewhere between the two. Archiving removes the app’s core files to recover most of the storage space but keeps the app icon on your home screen along with your saved data. When you tap the icon again, Android reinstalls the app, and your data picks up where you left off. Not every app supports archiving yet, and the option only appears where Google Play enables it.
So which one should you actually use? Uninstall when you want the app and its storage gone for good. Disable when you cannot uninstall a system app but want to stop it running. Archive when you want the storage back but know you will probably use the app again someday.
Quick Comparison Table: Delete vs. Disable vs. Archive
| What It Does | Uninstall | Disable | Archive |
|---|---|---|---|
| Frees storage space | Yes. | No | Mostly yes |
| Frees RAM | Yes. | Yes. | Yes. |
| Reversible | Yes. | Yes. | Yes. |
| Works on system apps | Sometimes | Yes. | No |
| Keeps your app data | No | Yes. | Yes. |
| When to use | Done with app permanently | Bloatware you cannot remove | App you use occasionally |
The table makes the app uninstall vs. disable distinction obvious once you see it laid out. Disable looks appealing because it feels safer and reversible, and it is, but it does nothing for your storage situation. Google’s own guidance actually recommends disabling pre-installed system apps rather than forcing removal, specifically because system apps can sometimes affect other features if deleted incorrectly.
Archive is the option most people have not heard of yet. But for apps you open once every few months, it is genuinely the smartest choice of the three.
How to Delete Apps Through Settings (The Detailed Method)
The long-press method is fast, but the Settings app method is smarter. This is the approach I use when I actually want to make an informed decision about what to remove, because it shows you exactly how much storage space each app is consuming before you delete anything.
Here is the step-by-step process:
- Open the Settings app on your Android device
- Scroll down and tap Apps (some Android versions label this as Applications or App Manager)
- Tap See all apps to view your complete app list
- Find and tap the app you want to remove
- Tap Uninstall
- Confirm by tapping OK
The app is removed.
What makes this method genuinely useful is the information it gives you before you commit. When you tap into any app through Settings, you can see the total storage space the app uses, how much of that is cached data, and what permissions the app holds. That extra layer of detail helps you prioritize which apps are actually worth removing, especially when you are trying to recover meaningful storage.
One thing to watch for here. Some apps will show a Disable button instead of an Uninstall button. That means the app is a system app that Android protects from standard deletion. Disabling is your only built-in option for those, but there is a more thorough method for removing stubborn pre-installed apps that I cover in the next section.
Menu paths vary slightly depending on your Android version and device brand, so the exact labels may look a little different on your phone. But the core path through Settings into Apps stays consistent across devices.
How to Delete Multiple Apps on Android at Once (Bulk Uninstall)
Most people delete apps one at a time and don’t realize there is a faster way built right into Android. If you want to mass delete apps in a single session, the Google Play Store has a batch deletion feature that almost nobody talks about. And yet it is the only native Android method that lets you select and remove multiple apps at once.
Settings does not support multi-select. The home screen long-press method does not either. The Play Store is the only place this works natively.
Here is exactly how to do it:
- Open the Google Play Store on your Android device
- Tap your profile icon in the top right corner
- Select Manage apps & device
- Tap the Manage tab at the top of the screen
- You will see your full list of installed apps. Tap the checkbox next to each app you want to remove. You can select as many as you want
- Once you have made your selections, tap the trash icon in the top right corner
- Tap Uninstall to confirm and remove all selected apps at once
That is the entire process. What would take fifteen minutes of individual long-pressing and confirming gets done in under two minutes.
This feature is genuinely useful when you are doing a proper cleanup of unused apps that have been sitting on your device for months. I find it especially handy after switching to a new phone setup and realizing how many apps accumulated without much thought.
One thing to keep in mind. Batch deletion through the Play Store still uses the standard uninstall method under the hood. So leftover data from those apps may still sit on your device afterward. If recovering every bit of storage matters, the thorough cleanup method in the next section is worth reading before you start.
How to Delete Pre-Installed Apps on Android Without Rooting (2026 Method)
You do not need to root your phone to remove bloatware. I know that is what most people assume, and honestly I assumed the same thing for a long time. But there is a method that works without rooting, without connecting to a PC, and without voiding your warranty. It uses two free tools called Shizuku and Canta, and once you get them set up, removing pre-installed apps that cannot be uninstalled through normal means takes about thirty seconds per app.
This method has been tested and confirmed working on Xiaomi, Redmi, Poco, Vivo, iQOO, Oppo, Realme, and Infinix devices. If you own one of those brands, this is exactly what you need.
Step 1: Install Shizuku.
Download Shizuku directly from the Google Play Store. Shizuku is a tool that grants other apps elevated permissions without requiring root access.
Step 2: Install Canta.
Canta is not on the Play Store. You can find the download link in the Shizuku app description or through the official Canta Telegram channel. Install the APK file directly on your device.
Step 3: Enable Developer Options
Go to Settings → About Phone and tap Build Number seven times in a row. You will see a message confirming that Developer Options are now enabled.
Step 4: Turn on Wireless Debugging
Connect your phone to any Wi-Fi network. An active internet connection is not required, but Wi-Fi mode needs to be on. Then go to Settings → Developer Options and toggle on Wireless Debugging.
Step 5: Pair Shizuku with Your Device
Open Shizuku and tap Pairing. Allow notifications when prompted. Then go back to Developer Options and select Pair device with pairing code. A six-digit code will appear on screen. Enter that code into the Shizuku pairing notification.
Step 6: Start Shizuku
Tap Start inside the Shizuku app. If you are using a Xiaomi or MIUI or HyperOS device, also go into battery settings and set Shizuku to No restrictions so the system does not kill it in the background.
Step 7: Use Canta to Remove System Apps
Open Canta and search for the pre-installed app or bloatware you want to remove. Select the app and tap the delete icon. The system app is removed immediately without any reboot required.
And if you make a mistake? Canta has a built-in restore feature. You can bring back any app you removed directly from within the app itself. That safety net makes the whole process much less stressful.
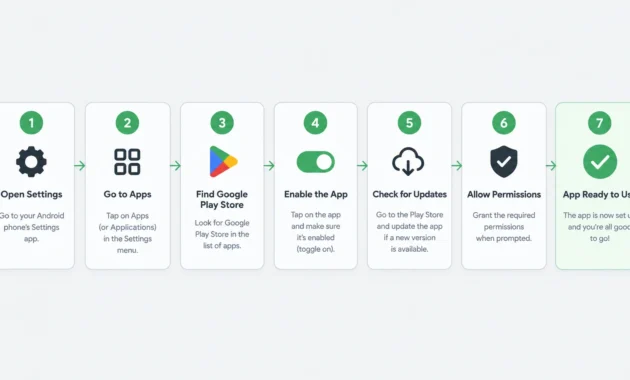
Alternative: PC-Based Bloatware Removal (Universal Android Debloater)
If you prefer working from a computer, Universal Android Debloater is the PC-based option worth knowing about. The workflow goes like this:
- Download the Universal Android Debloater from its GitHub repository
- Download Android Platform Tools from Google’s official developer site
- Extract Platform Tools to a folder on your C: drive
- On your Android device, enable USB Debugging inside Developer Options
- Connect your phone to your PC via USB cable
- Run the Universal Android Debloater application
- Select the system apps you want to remove and click Uninstall
The tool uses Android Debug Bridge (ADB) in the background to communicate with your device. It gives you a categorized list of apps with recommendations about which ones are generally safe to remove. For people comfortable with basic PC tasks, this approach gives you a clear overview of everything installed on your device before you touch anything.
Safety Warning: Which Apps Are Safe to Remove?
Not every pre-installed app is safe to delete. Some system apps handle functions that other parts of Android depend on quietly in the background, and removing the wrong one can cause features to stop working or, in rare cases, cause the device to behave unpredictably.
Before removing any system app, check the Universal Android Debloater community on GitHub, where contributors maintain detailed and regularly updated lists of which apps are safe to remove on specific devices and brands. The Canta restoration feature gives you a fallback if something goes wrong, but it is much better to research first than to restore after the fact
When in doubt about a particular app, disable it rather than delete it. That way you can test whether anything breaks before committing to full removal.
How to Completely Delete an App (Including Hidden Leftover Data)
Here is something that surprises most people. Uninstalling an app does not delete all of its data. A developer on Reddit demonstrated this with a real example: after uninstalling a large mobile game, over 1.5GB of leftover files remained sitting on the device in folders the standard uninstall process never touches. The app was gone. The storage was not recovered.
This is not a bug. It is how Android’s storage system works. And it is why so many people delete apps and then wonder why their storage space barely changed.
The fix requires a few extra steps, but each one matters.
Step 1: Clear Cache and App Data Before You Uninstall
Most people skip this part entirely, and that is exactly where the leftover data problem starts. Before tapping Uninstall, go to:
Settings → Apps → Select the app → Storage → Clear Cache → Clear Data
Clearing the app cache removes temporary files the app stored during normal use. Clearing app data wipes everything the app saved privately on your device. Do both before uninstalling. This gives the standard uninstall process much less to leave behind.
Step 2: Uninstall the App
After clearing the cache and data, go back to the App Info screen and tap Uninstall. Confirm with OK.
Step 3: Remove Any Linked Accounts
Some apps, particularly social media and email apps, create a linked account entry on your Android device that persists even after the app is gone. Go to:
Settings → Accounts and Backup → Manage Accounts
Check whether the uninstalled app left an account entry behind. If it did, tap it and select Remove Account. This step is easy to miss and worth checking every time.
Step 4: Run Files by Google to Clear Orphan Data
Even after all of the above, some junk files can remain in shared storage folders. Open Files by Google (download it from the Play Store if you do not have it), tap the Menu icon in the top left, select Clean, and then tap Clear under the junk files section. Files by Google scans for leftover temp files and orphaned app data and removes them in one action.
That four-step process is the difference between a quick uninstall and a thorough one that actually recovers your internal storage.
Why Uninstalling Doesn’t Free as Much Storage as You Expect (Technical Explanation)
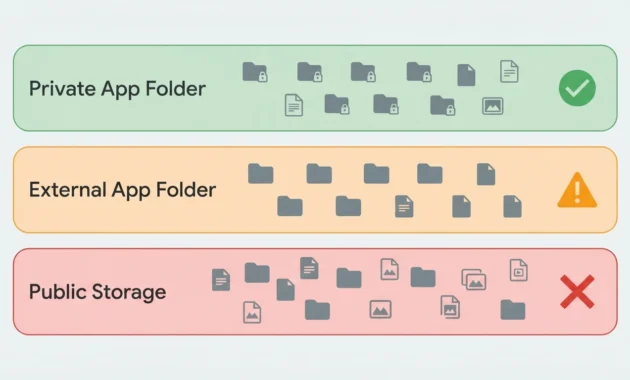
Android stores app data across three different locations, and the standard uninstall only clears one of them automatically.
The first location is the app’s private internal folder, which Android deletes automatically when you uninstall. That part works as expected.
The second location is an external app folder on your storage partition. This area is less protected, and Android does not always clear it during a standard uninstall, especially if the app wrote data there across multiple sessions.
The third location is public storage, which includes folders like Downloads, Pictures, and shared media directories. Android never auto-deletes anything from public folders during an uninstall. Whatever the app saved, it stays there indefinitely until you manually remove it.
This three-tier storage architecture is why uninstalling a large game or a heavily used social app often recovers far less space than you expected. The app’s private sandbox gets cleared. Everything else does not.
Use Files by Google to Find and Remove Leftover Junk
Files by Google is Google’s official storage management tool for Android, and the clean feature inside it does something the standard uninstall cannot: it finds and removes orphaned files that no longer belong to any installed app.
Here is the exact process:
- Open Files by Google
- Tap the Menu icon (three horizontal lines) in the top left
- Select Clean
- Under the junk files section, tap Clear
Files by Google will show you exactly how much space the junk files are occupying before you clear them. Running this after every major uninstall is a habit worth building, especially if free up storage is the main reason you deleted the app in the first place.
How to Delete Apps on Android: Device-Specific Steps
Android runs on hundreds of different devices, and while the core deletion process stays consistent, a few brands handle the interface differently enough to cause real confusion. Samsung is the biggest example. If you have ever long-pressed an app on a Samsung phone and wondered which option to tap, this section is for you.
Samsung Galaxy Users: Remove vs. Uninstall (Don’t Make This Mistake)
This is the most common deletion mistake I see Samsung users make, and it is completely understandable because the two options look almost identical at first glance.
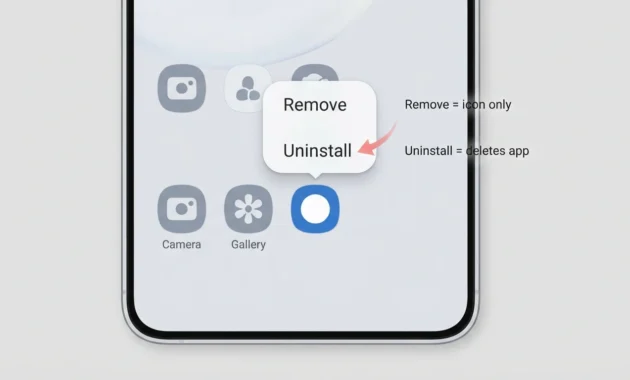
When you long-press an app icon on a Samsung Galaxy device running on the One UI, you will see two options appear: Remove and Uninstall. These do completely different things.
Remove only deletes the app icon from your home screen. The app itself stays fully installed on your device, still occupying the same storage space, still running in the background if it has permission to do so. Nothing is actually deleted.
Uninstall is what you actually want. Tapping Uninstall removes the app from your device entirely and frees up the storage space it was using.
The confusion happens because on most other Android devices, long-pressing only shows one relevant option. Samsung showing two options side by side catches people off guard, and many tap Remove thinking it means delete.
If you are unsure whether an app was truly removed, go to Settings → Apps and search for the app name. If it still appears in the list, it is still installed. That is your confirmation check.
This distinction applies across the Samsung Galaxy S series, A series, and other Samsung devices running current One UI versions.
Google Pixel and Stock Android Devices
Google Pixel phones run stock Android, which means no manufacturer customization layered on top. The deletion process on a Pixel follows the standard methods exactly as described in the earlier sections of this guide.
Long-press the app icon and tap Uninstall, or go through Settings → Apps, or use the Google Play Store batch method. All three work identically on Pixel devices with no brand-specific variations to watch out for. Menu labels and paths stay consistent regardless of which Android version the Pixel is running.
Motorola and Other Android Brands
Motorola devices also stay close to the standard Android experience with minimal UI customization. The core deletion methods work the same way across Motorola phones, though the exact visual styling of menus may look slightly different from one Android version to another.
The same applies to most other Android brands outside of Samsung. Minor label differences or menu layout variations are possible, but the underlying path through Settings → Apps → Uninstall remains consistent across the Android ecosystem.
Why Can’t I Delete This App? (Troubleshooting Guide)
If you are staring at an app that refuses to uninstall, there is always a specific reason. Android does not block deletion randomly. Each scenario has its own cause and its own fix, and once you know which one you are dealing with, the solution is usually straightforward.
Here are the four most common reasons apps that cannot be uninstalled stay stuck on your device.
Reason 1: It Is a System App
System apps and manufacturer pre-installed bloatware only show a Disable button instead of Uninstall. Android protects these apps from standard deletion. Disabling stops the app from running but keeps it installed. If you need to fully remove a system app, the Shizuku and Canta method covered in Section 6 is the solution designed for exactly this situation.
Reason 2: The App Has Device Administrator Privileges
This one catches people off guard. Some apps, particularly security apps, device management tools, and certain parental control apps, request device administrator privileges during setup. Android will not let you uninstall any app that currently holds administrator privileges. The Uninstall button either grays out or does nothing.
The fix is in the next subsection below.
Reason 3: Multiple User Accounts on the Same Device
This is the least known cause, and a Reddit developer (AD-LB) identified it clearly. If your Android device has multiple user profiles set up, an app installed under one profile can appear to resist deletion from another. You need to remove the app from every user profile on the device before Android will fully uninstall it. Go to Settings → System → Multiple Users to check whether other profiles exist.
Reason 4: The App Is Actively Running
Sometimes Android blocks uninstallation simply because the app is currently active. Force stop the app first by going to Settings → Apps → select the app → Force Stop, then attempt the uninstall again.
Apps with Administrator Privileges: How to Remove Permissions First
Before Android will let you uninstall an app that holds administrator privileges, you need to manually revoke those permissions. Here is how:
- Go to Settings
- Tap Security (or Biometrics and Security on Samsung devices)
- Select Device Admin Apps or Device Administrators
- Find the app in the list and tap it
- Toggle off or deactivate its administrator access
- Confirm the change
Once you remove the administrator privileges, go back to Settings → Apps, find the app, and tap Uninstall. The button will now work normally. This applies to any security app, lock app, or management tool that requested elevated permissions during installation. Google Play Protect also uses device-level permissions, though Google Play Protect itself cannot be removed this way.
Why Your Deleted App Shows “Open” Instead of Downloading
This one confuses a lot of people. You uninstall an app, then search for it in the Play Store to reinstall it, and instead of showing an Install button, it shows Open. The app seems to already be installed even though you just deleted it.
The reason is leftover app data. When you uninstall without clearing data first, Android removes the app itself but leaves its stored data behind on your device. When you reinstall, Android finds that existing data and treats the app as already active rather than starting fresh.
The solution is the thorough deletion method from Section 7: clear the app cache and app data through Settings before uninstalling, then run Files by Google afterward to catch anything remaining. Do that sequence, and the reinstall will behave exactly as expected.
Before You Delete: Two Critical Things You Must Do First
Most deletion guides jump straight to the how. This section is about what to do before you get there, because skipping these two steps has real consequences. One costs people money every month without them realizing it. The other causes permanent data loss that no reinstall can fix.
Neither takes long. But both matter.
Warning: Deleting an App Doesn’t Cancel Your Subscription
This is the mistake I see most often, and it is an expensive one. Deleting an app from your Android device does not cancel any subscription attached to that app. Not automatically. Not partially. Not at all.
The reason is straightforward. Subscriptions are billed through the Google Play Store’s payment system, not through the app itself. When you delete the app, the app is gone, but the billing agreement with Google Play remains completely active. Your card gets charged next month exactly as if the app were still installed.
To actually cancel a subscription, you need to do it separately:
- Open the Google Play Store
- Tap your profile icon in the top right corner
- Select Payments and Subscriptions
- Tap Subscriptions
- Find the subscription you want to cancel
- Tap Cancel subscription and follow the prompts
Do this before deleting the app. Once you cancel, you can still use the app until the current billing period ends, and you can always reinstall an app later without losing your purchase history on paid apps.
Back Up App Data Before Deletion (Prevent Permanent Loss)
Some apps store data locally on your device rather than syncing it to the cloud. Game progress is the most common example. Certain note-taking apps, offline reading apps, and photo editing apps also save files locally by default.
If you delete one of these apps without backing up first, that data is gone permanently. Reinstalling the app brings back a fresh installation, not your saved progress or files.
Before deleting any app you have used regularly, check whether the app offers a backup or export option inside its own settings. If local data exists, back it up to Google Drive or your preferred cloud storage before uninstalling. It takes two minutes, and it is the only way to guarantee your app data survives the deletion.
How to Remove Apps from Your Google Play Store Install History (Privacy Cleanup)
Uninstalling an app from your Android device does not remove it from your Google account history. Every app you have ever downloaded through the Google Play Store stays logged to your account permanently in a “Not Installed” list, even years after you deleted the app from your phone.
Most people have no idea this list exists.
This is not a storage issue. Those historical entries do not take up space on your device. But if you want a clean account, if you share a Google account with family members, or if you simply do not want a record of every app you have ever tried sitting in your Play Store library, removing these entries is worth doing.
Here is exactly how to clear your Play Store install history:
- Open the Google Play Store
- Tap your profile icon in the top right corner
- Select Manage apps and devices
- Tap the Manage tab at the top of the screen
- Tap the Installed dropdown button
- Select Not Installed from the options that appear
- You will now see a complete list of every app previously downloaded to your Google account that is no longer installed on your device
- Tap the checkbox next to each app you want to permanently remove from your history
- Tap the trash icon in the top right corner
- Tap Remove on the confirmation prompt
The selected apps are now completely erased from your Google account library. They will no longer appear in your install history or your Play Store app list.
One thing worth knowing. Removing an app from your Play Store history does not affect paid app purchases. If you bought an app and then remove it from your history this way, you can still search for it and reinstall it without paying again. Your purchase record is stored separately from your install history.
Frequently Asked Questions About Deleting Android Apps
Can I delete the YouTube app on Android?
On most Android devices, YouTube comes pre-installed as a system app, which means the standard uninstall option is not available. You can disable the YouTube app through Settings → Apps → YouTube → Disable, which removes it from your home screen and stops it running, or use the Shizuku and Canta method from Section 6 to remove it completely.
What happens if I delete an app I paid for?
Deleting a paid app from your device does not mean you lose it forever. Your purchase is tied to your Google account, so you can reinstall the app at any time by going to the Google Play Store, tapping your profile icon, selecting Manage apps and devices, switching to the Not Installed tab, finding the app, and tapping Install with no additional charge.
How do I delete multiple apps at once on my phone?
The only native Android method for bulk deletion is through the Google Play Store. Open the Play Store, tap your profile icon, select Manage apps and devices, go to the Manage tab, check the boxes next to the apps you want to remove, then tap the trash icon and confirm.
Why does my deleted app still show up when I search for it?
The app is still sitting in your Play Store install history under the Not Installed list, which is tied to your Google account rather than your device. Go to Play Store → Profile → Manage apps and devices → Manage → Not Installed, select the app, and tap the trash icon to remove it permanently from your account history.
Can I recover an app I accidentally deleted?
Yes. For any regular third-party app, simply search for it in the Google Play Store and tap Install to get it back. If you removed a system app using Shizuku and Canta, open the Canta app directly and use the built-in restore feature to bring the system app back without any additional setup required.