
I spent years using Google Voice before I finally decided to delete it. And right away, I hit the first problem most people run into.
There’s no “delete account” button. Because technically, you can’t delete a Google Voice account at all.
That confused me at first. I clicked through every settings menu trying to find the option, and it wasn’t there. Turns out I was looking for the wrong thing entirely.
Can You Actually Delete a Google Voice Account? Here’s the Truth.
You cannot delete a Google Voice account because Google Voice isn’t a standalone account. It’s a service that lives inside your Google Account, the same one you use for Gmail and everything else.
What you’re actually deleting is your Google Voice number. The service itself stays attached to your Google Account, just sitting there empty once the number is gone. I learned this the hard way after assuming I could wipe the whole thing clean in one step.
Think of it this way. Your Google Account is the house. Google Voice is just one room inside that house. When you “delete Google Voice,” you’re really just clearing out that one room and locking the door. The room still exists. You just don’t have a phone number in it anymore.
Most guides skip this explanation completely. They just say “go to settings and click delete” without clarifying what you’re actually deleting. That’s why people end up confused when they still see Google Voice listed under their account services after deletion.
The number goes away. The service connection doesn’t.
So if you’re searching for how to delete a Google Voice account, what you really need is how to delete your Google Voice number. And that’s what I’m walking through here, step by step, exactly how I did it across different devices.
Should You Delete or Just Disable? Here’s How to Decide
Before you delete anything, you need to know there’s another option most people never consider.
You can disable Google Voice without deleting your number. And for a lot of situations, that’s the smarter move.
I almost deleted mine completely before I realized I just needed it to stop ringing my phone. Disabling would have done that. Once I understood the difference, the choice got a lot easier.
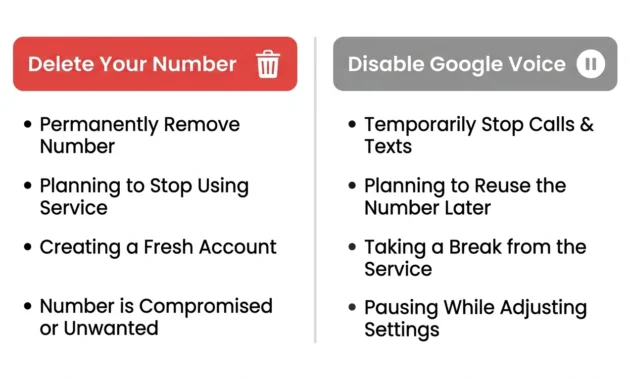
When to Delete Your Number
Delete your Google Voice number if you’re done with it for good.
You’re switching to a different service. You don’t want that phone number anymore. You’re cleaning up old accounts you never use. You’re absolutely certain you won’t come back to Google Voice.
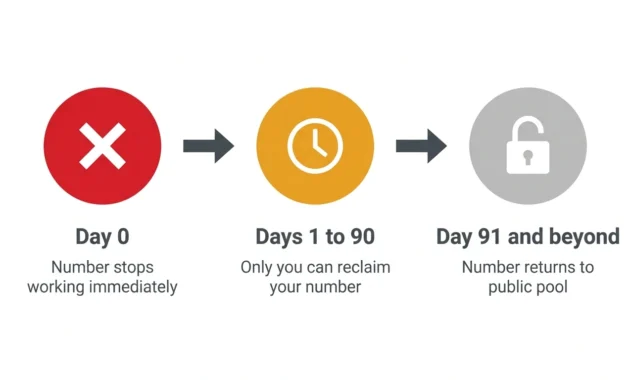
Here’s the thing you need to know upfront. Once you delete your number, Google holds onto it for 90 days. During that time, only you can reclaim it. After 90 days, it’s gone. Google releases it back into the pool, and someone else can grab it.
So if there’s even a small chance you’ll want that number again, don’t delete it yet.
If you’re deleting Google Voice because you need something more reliable or feature-rich, a virtual phone number might be exactly what you’re looking for next. I wrote a full guide on how to get a virtual phone number that covers the best options available right now, including free and paid services that work better than Google Voice for most people.
When to Disable Instead
Disable Google Voice if you just want calls and texts to stop but you’re not ready to lose the number permanently.
I see this all the time. Someone gets tired of spam calls coming through their Google Voice number, so they think they need to delete the whole thing. They don’t. They just need to turn off Do Not Disturb, stop call forwarding, and unlink their phones.
The number stays in your account. Calls stop coming through. Texts stop. Everything goes quiet. And if you ever need it again, it’s still sitting there ready to go.
That’s the key difference. Deletion is permanent after 90 days. Disabling is reversible anytime.
I kept mine disabled for almost a year before I finally decided to delete it. And I’m glad I waited, because I needed to access old voicemails twice during that time. If I had deleted it right away, those would have been harder to get to.
So here’s how I decide. If I’m 100% sure I’m done, I delete. If there’s any doubt at all, I disable first and delete later if I still don’t need it.
How to Delete Your Google Voice Number (Step-by-Step)
Deleting your Google Voice number takes about two minutes once you know where to go. The steps are almost identical across devices, with a couple of small differences I’ll point out.
I’ve done this on desktop, Android, and iPhone. Desktop is the most straightforward, but all three work fine.
On Desktop (Web Browser)
This is the cleanest way to delete your Google Voice number. The desktop interface shows you everything in one place, and you don’t have to hunt through menus.
Here’s exactly what I do.
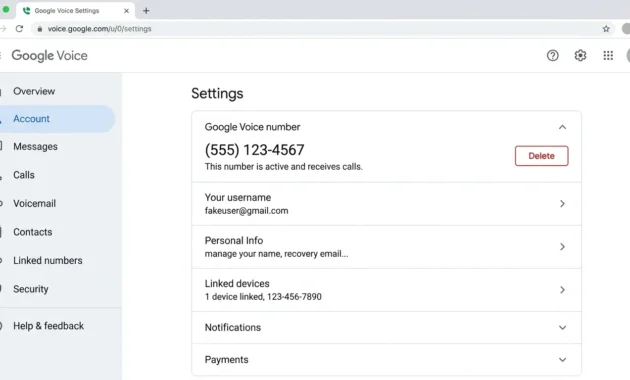
First, I go to voice.google.com and make sure I’m signed into the right Google Account. If you have multiple accounts, this matters. You need to be in the one that has the Google Voice number you want to delete.
Then I click the settings gear icon in the top right corner. It’s small, but it’s always in the same spot.
On the left side of the settings page, I click Account. That’s where all the important stuff lives. Phone numbers, linked devices, all of it.
Scroll down a little and you’ll see your Google Voice number listed under a section that just says “Google Voice number.” Right next to it, there’s a Delete button.
Click Delete.
A confirmation window pops up. It’ll remind you that deleting your number means you can’t get calls or texts anymore, and it might mention something about reverting your voicemail back to your carrier if you set up call forwarding. That second part is important, and I’ll come back to it in the cleanup section.
Check the box if there is one, then click Delete number to confirm.
That’s it. The number is gone immediately.
I always sign out and sign back in after this just to make sure it actually processed. Every time I’ve done it, the number disappears from the account page right away.
On Android (Mobile App)
The Android app works just as well as the desktop, but the delete option is hidden behind a menu you might not notice if you’re clicking too fast.
Open the Google Voice app. Make sure you’re signed into the correct account.
Tap the menu icon in the top left. It’s the three horizontal lines.
Tap Settings.
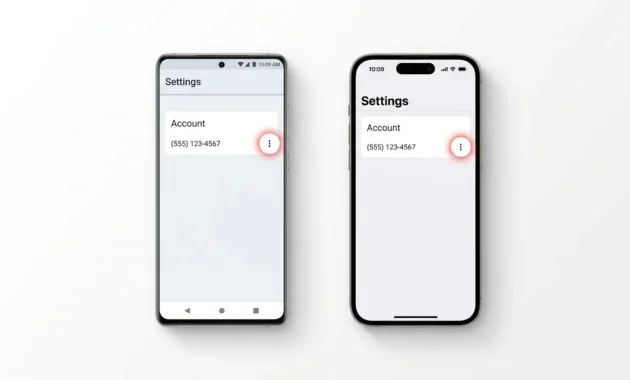
Under the Account section, you’ll see your Google Voice number listed. Next to it, there are three dots. That’s the key. Most people miss those dots and think there’s no delete option in the app. The dots are small, but they’re there.
Tap the three dots next to your number.
Tap Delete from the menu that appears.
A confirmation screen pops up. It’ll remind you to revert your phone’s voicemail back to your carrier if you had Google Voice handling it. If you set up conditional call forwarding when you first got Google Voice, this is the step where you make sure your regular carrier voicemail works again after deletion. I’ll cover exactly how to do that in the cleanup section.
Check the box that says you understand, then tap Delete number.
Done. The number is removed immediately, just like on desktop.
On iPhone (Mobile App)
The iPhone app follows the exact same process as Android. Same menu, same three dots, same confirmation screen.
Open the Google Voice app and sign in.
Tap the menu icon (three horizontal lines) in the top left.
Tap Settings.
Find your Google Voice number under the Account section. Tap the three dots next to it.
Tap Delete.
Confirm by checking the box and tapping Delete number.
The app will process it right away, and your number is gone.
One thing I noticed on iPhone specifically. Sometimes the app takes a second or two longer to refresh after deletion. If you back out to the main screen and the number still shows up, close the app completely and reopen it. It’ll be gone.
The important thing on any device is making sure you’re signed into the right account before you start. I’ve seen people delete a number from the wrong Google Account and then panic because the number they actually wanted to delete is still there. Double-check the account first.
What Happens After You Delete Your Google Voice Number
Your Google Voice number stops working the second you confirm deletion. Calls won’t go through. Texts won’t deliver. Anyone trying to reach you at that number will get nothing.
But here’s what most people don’t realize. Your voicemails, call logs, and text message history don’t disappear.
I deleted my number thinking everything would be wiped clean. It wasn’t. I could still see every voicemail, every call record, every text conversation. All of it was sitting in my Google Account exactly where it had always been.
That’s because Google Voice data and your Google Voice number are two separate things. Deleting the number removes your access to that phone number. It doesn’t touch the data tied to your account.
And that data stays there forever unless you manually delete it. I’ll show you how to do that in the next section, but you need to know upfront that deletion doesn’t mean your information is gone.
There’s also a 90-day window where you can reclaim your deleted number. During those 90 days, Google holds onto it. Only you can get it back. No one else can claim it during that time.
If you want to go deeper on Google’s official policies around number deletion, porting, and data retention, I’d recommend reading the Google Voice Help Center directly. Everything I covered about the 90-day reclaim window, the porting process, and what happens to your data after deletion is documented there. Google updates that page regularly, so if anything changes after this article was written, that’s the first place I’d check.
After 90 days, it’s released. Google puts it back into the pool of available numbers, and anyone setting up a new Google Voice account might get assigned the number that used to be yours.
That’s the part that surprised me. I assumed once I deleted it, the number was forever mine or dead forever. Neither is true. It’s mine for 90 days, then it’s fair game.
One more thing. Even after you delete the number and the 90 days pass, residual copies of your data might stick around in Google’s backup systems for a little while longer. According to Google’s policy, data can remain in backups for up to 90 days after deletion before it’s fully purged.
So if you’re deleting for privacy reasons, just know that it’s not instant erasure across every server. It takes time.
How to Fully Stop Google Voice Activity After Deleting
Deleting your Google Voice number stops calls and texts. But it doesn’t shut down everything Google Voice touches.
If you set up call forwarding, voicemail routing, or linked devices when you first got Google Voice, those connections are still active until you manually disconnect them. And if you don’t, weird things can happen.
I’ve seen people delete their number and then wonder why their regular phone’s voicemail stopped working. Or why their phone still rings when someone calls a number that’s supposed to be gone. It’s because the cleanup steps got skipped.
Here’s what I do every time to make sure Google Voice is completely disconnected.
Unlink Your Forwarding Phone Numbers
When you set up Google Voice, you probably linked your personal cell phone so calls could forward to it. That link doesn’t disappear when you delete your Google Voice number.
Go to voice.google.com and sign in. Click Settings, then go to the Linked numbers section. You’ll see every phone number you ever connected to Google Voice.
Click the X next to each one to remove it.
This step matters more than people think. If you leave a phone number linked, it can cause issues if you ever try to use that same phone number with a different Google Voice account later. Clean it out now.
Deactivate Carrier Voicemail Forwarding
If you set up conditional call forwarding when you got Google Voice, your carrier is still routing voicemail calls to Google instead of to your carrier’s voicemail system. And once your Google Voice number is deleted, that means your voicemail just doesn’t work.
You fix this by dialing a deactivation code on your phone. The exact code depends on your carrier, but the two most common ones are *73 and *70.
Pick up your phone. Dial *73. Wait for the confirmation tone. Hang up.
That resets your voicemail back to your carrier’s default system. If *73 doesn’t work, try *70.
I missed this step the first time I deleted a Google Voice number, and I didn’t get voicemails for three days before I figured out what was wrong. Don’t skip it.
Revoke Third-Party App Permissions (Advanced)
This one’s optional, but if you used Google Voice with other apps or services, those apps might still have permission to access your Google Voice data even after the number is deleted.
Go to your Google Account settings. Click on Security, then scroll down to Third-party apps with account access.
Look for anything related to Google Voice. If you see it, click on it and revoke access.
Most people don’t need this step. But if you integrated Google Voice with something like Zapier, IFTTT, or a CRM tool, this is how you clean up those connections.
Once all of that is done, Google Voice is fully disconnected. The number is gone, the forwarding is turned off, the linked phones are removed, and your regular phone works exactly like it did before you ever set up Google Voice.
Your Number Is Gone, But Your Voicemails Aren’t—Here’s How to Delete Them
I thought deleting my Google Voice number would wipe out my voicemails. It didn’t.
Months after deletion, I logged into voice.google.com just to check, and every single voicemail was still sitting there. Same with my call history and old text messages. None of it disappeared when the number got deleted.
That’s because Google Voice stores your data separately from your phone number. Deleting the number only removes your ability to receive new calls and texts. It doesn’t touch anything you already received.
If you want that data gone, you have to delete it manually. And if you care about privacy, this step isn’t optional.
Here’s how I do it.
Log into voice.google.com. Even though your number is deleted, you can still access your Google Voice data as long as you’re signed into the same Google Account.
Click on Voicemail in the left menu. Every voicemail you’ve ever received will be listed there. You can delete them one by one, or you can select multiple and delete them in batches.
Same thing for text messages. Click Messages, select the conversations you want gone, and delete them.
Call history is a little different. Google Voice doesn’t give you a one-click delete-all option for call logs, but you can clear them out by going to your account settings and looking for the option to remove all calling history. It’s buried, but it’s there.
If you want to download everything before you delete it, use Google Takeout. Go to takeout.google.com, select Google Voice, and export all your data. You’ll get a ZIP file with your voicemails, texts, and call logs. Then you can delete the originals knowing you have a backup.
The important thing to understand is this. Even after you delete everything manually, Google’s backup systems might keep copies for up to 90 days before they’re completely purged.
So if you’re deleting for privacy reasons, just know that it’s not instant. It’s a process, and it takes time before every copy is wiped from every server.
Can You Get Your Number Back? How to Reclaim a Deleted Google Voice Number
You have 90 days to reclaim a deleted Google Voice number. After that, it’s gone for good.
I’ve tested this myself, and the process is simple as long as you’re still inside that 90-day window.
Log into voice.google.com with the same Google Account you used when you had the number. This only works if you use the exact same account. If you try to reclaim it from a different account, it won’t show up.
Go to Settings, then click on Account.
Under the Google Voice number section, you’ll see a button that says Get a number. Click it.
If your old number is still in the reclaim window, Google will show it as an option. You can select it and reclaim it right there.
Once you reclaim it, everything goes back to normal. The number works again, calls and texts come through, and it’s like you never deleted it.
But if more than 90 days have passed, that button won’t show your old number. It’ll just show you new available numbers like you’re signing up for the first time. At that point, your old number is released back into Google’s pool, and someone else might already have it.
I’ve seen people wait 91 days and then panic when they realize they can’t get their number back. The 90-day window is firm. Google doesn’t extend it.
So if there’s any chance you’ll regret deleting your number, reclaim it before the deadline.
How to Delete Your Number and Get a New One
If you want a different Google Voice number but you still want to use Google Voice, the process is simple. Delete your current number, then get a new one.
Here’s how I do it.
First, delete your current Google Voice number using the steps I covered earlier. Go to Settings, click Account, find your number, click Delete, and confirm.
Once the number is deleted, go back to the Account section. You’ll see a message that says “You don’t have a Google Voice number” with a button that says Get a number.
Click Get a number. Google will show you a list of available numbers based on your area code or the area code you choose. Pick one, confirm it, and you’re done.
But here’s the part most people don’t know. You cannot use the same personal phone number to verify a new Google Voice number if you already used it once.
Google allows one free Google Voice number per personal phone number. That’s the rule. If you used your cell phone to verify your first Google Voice number, you can’t use that same cell phone to verify a second one.
I learned this from someone on Reddit who deleted their number thinking they could immediately get another one with the same phone. They couldn’t. Google blocked it and told them the phone number wasn’t eligible.
The only way around it is to use a different phone number for verification. Borrow a friend’s phone, use a family member’s number, or get a cheap prepaid SIM just for verification.
Or, instead of deleting and getting a new number, you can pay the number change fee. Google offers an in-platform option to change your Google Voice number without deleting it first. It costs a small fee, but it’s cheaper than dealing with the phone verification limitation.
That option is buried in the settings under the same Account section. Look for “Change number” instead of “Delete.” If it’s available, it’ll show up there.
So if you just want a different number and you don’t want to deal with phone verification issues, pay the fee and change it directly. If you’re fine using a different phone for verification, delete and get a new number for free.
Don’t Want to Lose Your Number? How to Port It Out for $3
If you want to keep your Google Voice number but you don’t want to use Google Voice anymore, you can port it out to a different carrier for $3.
That’s the current fee as of 2026. A lot of older guides still say it costs $10, but that’s outdated. Google dropped the price, and now it’s $3.
I’ve ported numbers out before, and the process isn’t hard. It just requires coordination with the carrier you’re moving to.
Here’s how it works.
First, contact the carrier you want to move your Google Voice number to. This could be your cell phone carrier, a VoIP service, or any other provider that accepts ported numbers.
Tell them you want to port a number from Google Voice. They’ll ask for your Google Voice account number and a PIN. Google Voice generates these for you during the porting process.
Go to voice.google.com and sign in. Click Settings, then go to the Account section.
Look for an option that says “Unlock my number” or “Port my number.” The exact wording changes depending on Google’s interface updates, but it’s always in the Account section.
Click it. Google will charge you $3 and generate the account number and PIN you need. Write those down or screenshot them, because you’ll need to give them to your new carrier.
Give your new carrier the account number and PIN. They’ll submit the port request to Google.
The port usually takes 24 to 48 hours to complete, but sometimes it takes longer depending on the carrier. Once it’s done, your Google Voice number will show up on your new carrier’s system, and it’ll stop working in Google Voice.
Here’s the part people mess up. Don’t delete your Google Voice number before the port is finished.
If you delete it, the port will fail. The number has to still exist in your Google Voice account for the carrier to pull it out. Once the port completes, Google will automatically remove it from your account.
Also, make sure your new carrier is ready to receive the number before you pay the $3 and unlock it. I’ve seen people unlock their number, pay the fee, and then realize their carrier wasn’t ready to process the port. That causes delays and sometimes the port fails entirely.
Coordinate first. Unlock second. Port third.
If you have an established business number or a number tied to a lot of contacts, porting is worth the $3. You keep the number, you leave Google Voice, and you don’t have to notify everyone that your number changed.
While you’re making this switch, it’s also worth moving your contacts over if you stored any in Google Voice or the Google account you’re cleaning up. I put together a straightforward guide on how to transfer contacts to a new phone that walks through every method, whether you’re switching between Android devices, moving from Android to iPhone, or the other way around.
Unable to Delete? Common Problems and Fixes
Sometimes the delete button doesn’t work. Or it’s missing entirely. Or it redirects you to the wrong page.
I’ve run into all of these, and every time, there’s a specific reason.
Delete Button Missing or Grayed Out
If you don’t see a delete button next to your Google Voice number, the first thing to check is whether you’re signed into the right Google Account.
Open voice.google.com and look at the account email in the top right corner. If that’s not the account that has the Google Voice number, sign out and sign back in with the correct one.
If you are signed into the right account and the delete button still isn’t there, you might be on a Google Workspace account. Business accounts work differently. Individual users can’t delete their own Google Voice numbers if the account is managed by an organization.
Check your email address. If it ends in a company domain instead of @gmail.com, that’s a Workspace account. You’ll need to contact your organization’s admin to delete the number. There’s no self-service option.
There’s also a newer issue starting in 2026 where some accounts with KYC verification are seeing the delete button grayed out or disabled. This is an emerging problem, and there’s no clear fix yet. If you’re stuck in this situation, your best option is to contact Google Support and ask them to manually review the account.
Delete Button Redirects to Wrong Page
If you click Delete and it sends you to a billing page or a subscription page instead of confirming deletion, you’re probably on the legacy Google Voice interface instead of the current one.
This happens when Google’s system hasn’t fully migrated your account to the new interface yet. It’s rare, but it still happens.
The fix is to navigate to the “Phones” tab instead of the “Account” tab. In the legacy interface, there’s a separate delete option under Phones. Look for it there, and the delete button should work.
If that still doesn’t work, try accessing Google Voice from a different browser. Sometimes the interface gets stuck in a cached state, and switching browsers forces it to load the correct version.
Can’t Delete Without Your Password? Here’s What to Do
You cannot delete a Google Voice number without signing into the Google Account that owns it. And you can’t sign in without the password.
If you forgot your password, you need to recover your Google Account first. Go to accounts.google.com and click “Forgot password.” Follow the account recovery process.
Google will ask you security questions, send a code to a recovery email, or use your phone number to verify your identity. Once you’re back in, you can delete the Google Voice number.
There’s no workaround. Google Support will not delete the number for you. They can’t bypass account access for security reasons, even if you explain the situation.
So if you’re locked out, account recovery is the only path. And if you can’t recover the account, the number stays active until Google eventually reclaims it due to inactivity.
Browser or App Issues
Sometimes the delete button just doesn’t respond when you click it. Or the confirmation window doesn’t load.
This is usually a browser cache issue. Clear your browser cache, close the browser completely, and try again.
If that doesn’t work, try a different browser. I’ve had Google Voice settings work fine in Chrome but completely break in Safari, and I’ve had it work the other way around too.
You can also try the mobile app instead of the web version. Sometimes the app processes deletion requests more reliably than the browser, especially if there’s a temporary server-side issue.
And if none of that works, wait a few hours and try again. Google Voice occasionally has backend issues that block deletion temporarily. They usually resolve on their own within a day.
Google Workspace Users: You Can’t Delete Your Own Number
If your Google Voice account is part of a Google Workspace organization, you don’t have permission to delete your own number.
Only your organization’s admin can do it.
This is one of the most frustrating things for business users, because the interface looks exactly the same. The settings are there. The delete button might even be there. But when you click it, nothing happens, or you get an error message.
That’s because Workspace accounts are controlled at the admin level. Google Voice for business is managed centrally through the Google Admin console, not through individual user settings.
So if you need to delete a Google Voice number on a Workspace account, you have to contact your IT department or whoever manages your organization’s Google account. They can delete it for you through the admin panel.
There’s no self-service workaround. Even if you’re the account owner, if the account is under a Workspace domain, the admin controls it.
This is one of the reasons I always recommend people check their account type before trying to delete anything. If your email ends in a company domain instead of @gmail.com, assume it’s a Workspace account and go straight to your admin.
The Nuclear Option: Deleting Your Entire Google Account to Remove Google Voice
You can delete your entire Google Account if you want every trace of Google Voice completely gone. But this is permanent, and it’s catastrophic if you’re not ready for it.
When you delete your Google Account, you lose everything. Gmail, Google Drive, Google Photos, YouTube subscriptions, Google Calendar, every app connected to that account. All of it disappears.
I’ve seen people delete their entire Google Account thinking it was the only way to remove Google Voice. It’s not. Deleting just the Google Voice number is enough for most people.
But if you genuinely want to erase every connection to Google, here’s how you do it.
Go to myaccount.google.com and sign in.
Click on Data & Privacy in the left menu.
Scroll down until you see “More options.” Under that section, there’s an option that says Delete your Google Account.
Click it. Google will ask you to confirm by entering your password again.
Once you confirm, the account is scheduled for deletion. Google gives you a short grace period, usually a few days, where you can still sign in and cancel the deletion if you change your mind. After that, it’s permanent.
And once it’s gone, you can’t get it back. Not the emails, not the files, not the photos. Nothing.
So unless you’re absolutely certain you want to delete everything, do not use this option just to remove Google Voice. Delete the Google Voice number instead. It takes two minutes, and you keep everything else.
Frequently Asked Questions
Why can’t I delete my Google Voice account?
Google Voice isn’t a standalone account, so there’s nothing to delete. It’s a service inside your Google Account. You can delete your Google Voice number, which removes the phone number from your account, but the Google Voice service itself stays connected to your Google Account. If you’re on a Google Workspace account, only your organization’s admin can delete your number.
Will I lose my voicemails when I delete my Google Voice number?
No. Deleting your Google Voice number does not delete your voicemails, call logs, or text messages. All of that data stays in your Google Account unless you manually delete it. Your number stops working, but your message history remains accessible at voice.google.com.
Can I get my Google Voice number back after deleting it?
Yes, but only within 90 days. Log into voice.google.com with the same Google Account, go to Settings, click Account, then click “Get a number.” If you’re still inside the 90-day window, your old number will appear as an option to reclaim. After 90 days, the number is released and you can’t get it back.
Can I use my phone number again to get a new Google Voice number after deleting?
No. Google only allows one free Google Voice number per personal phone number. If you already used your cell phone to verify a Google Voice number, you can’t use that same phone to verify a new one. You’ll need to use a different phone number for verification, or pay the in-platform number change fee instead of deleting and starting over.
How do I delete Google Voice without my password?
You can’t. You must sign into the Google Account to delete the number. If you forgot your password, go to accounts.google.com and use the account recovery process. Google Support cannot delete the number for you without account access.
You’re Done—Here’s What to Remember
Deleting a Google Voice number is straightforward once you know what you’re actually deleting.
You’re not deleting an account. You’re removing a phone number from a service that lives inside your Google Account. That distinction matters because it changes where you look, what you click, and what happens afterward.
The steps are simple. Go to voice.google.com, open Settings, click Account, find your number, and hit Delete. Two minutes on desktop. Same on mobile, just with the three-dot menu instead of a direct button.
But the stuff after deletion is what most guides skip entirely.
Your voicemails don’t disappear. Your call history stays. Your linked phones stay connected until you manually remove them. Your carrier voicemail might stop working if you set up call forwarding and never turned it off. None of that cleans itself up automatically.
So if you want Google Voice truly gone, run through the cleanup steps. Unlink your forwarding numbers. Dial *73 to restore your carrier voicemail. Delete your call history and voicemails manually if privacy matters to you.
And remember the 90-day window. If you delete your number today and regret it next week, you can still get it back. After 90 days, that option closes.
If you’re not completely sure you want the number gone permanently, disable Google Voice instead of deleting it. The number stays. The calls stop. You can always come back to it later.
But if you’re ready to close that chapter, you now have everything you need to do it right.
1 comment