
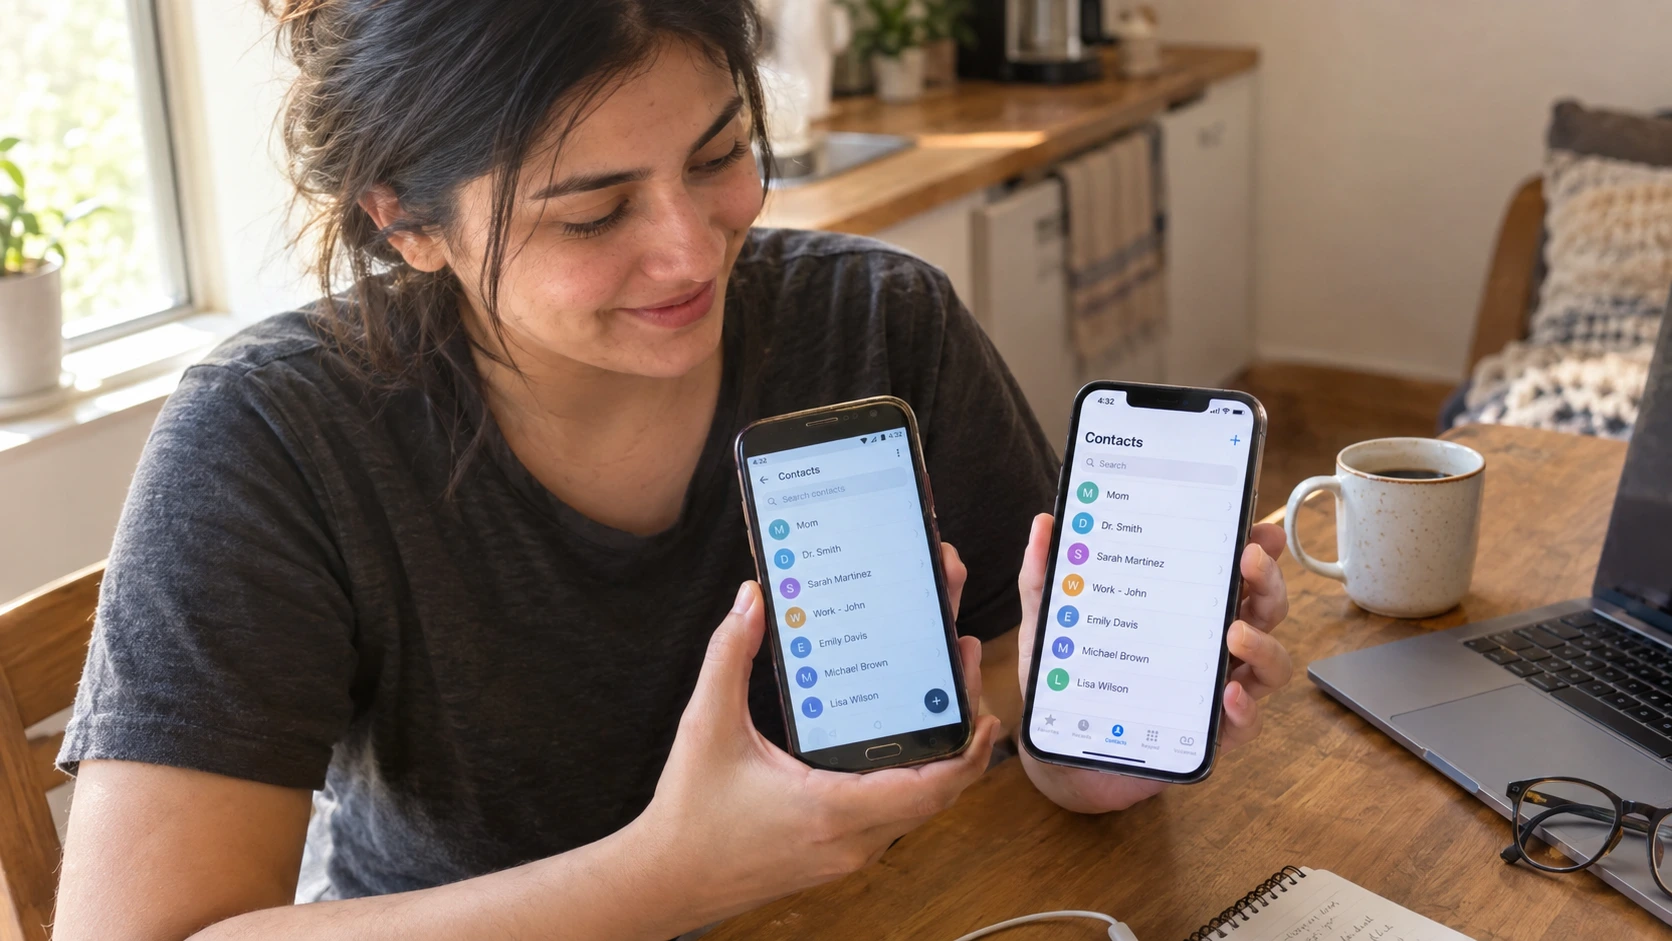
Your Contacts Might Already Be Waiting on Your New Phone (Check This First)
I know how stressful it feels when you get a new phone and realize you have hundreds of contacts that need to move over. The thought of losing important numbers or spending hours typing them in manually is enough to make anyone panic.
Here’s the thing most people don’t realize. If you’ve been using your phone normally for the past year or two, your contacts are probably already backed up to the cloud without you even knowing it. And that means they’re already waiting on your new phone right now.
When you sign into your Google account on a new Android phone or your Apple ID on a new iPhone, your contacts should appear automatically within a few minutes. No export, no transfer app, no manual steps. They just show up.
This happens because modern phones turn on cloud sync by default during initial setup. Your contacts are saved to your Google account on Android or your iCloud account on iPhone every time you add or edit one. So switching to a new phone is really just signing into the same account and letting everything download again.
But here’s where it gets tricky. That automatic sync only works if your contacts were saved to your account in the first place. Some people save contacts directly to their phone’s internal storage instead of their Google or iCloud account. If that’s what happened on your old phone, those contacts never made it to the cloud.
And if you’re switching from Android to iPhone or iPhone to Android, the process is a bit different. Google and iCloud don’t talk to each other, so moving between those two systems requires an extra step or two.
So before you do anything else, the first thing to check is whether your old phone was actually syncing your contacts to the cloud. Most of the time it was. But if it wasn’t, you’ll need to use one of the manual transfer methods I’ll walk through in the next sections.
And if you’re one of those people who just assumed transferring contacts meant retyping everything by hand, I have good news. You won’t have to enter a single contact manually. Every method I’m covering here moves all your contacts at once, exactly as they are, with names, numbers, emails, and photos intact.
Before You Transfer: The One Thing You Must Check First
The biggest mistake people make when transferring contacts is not checking whether sync was turned on in the first place. I see this constantly. Someone gets a new phone, signs in with their Google or Apple account, opens the Contacts app, and finds it completely empty. Then they assume the transfer failed or their contacts are gone.
But most of the time the contacts aren’t gone. They were just never synced to the cloud to begin with.
Here’s what actually happens. When you save a contact on your phone, you have two options for where that contact gets stored. You can save it to your Google account or Apple ID, which uploads it to the cloud and keeps it backed up. Or you can save it to “Device” or “Phone,” which stores it only in your phone’s internal memory.
If your contacts are saved to a device, they never leave that phone. Cloud sync doesn’t touch them. And when you sign into your account on a new phone, those device-only contacts don’t appear because they were never part of your account in the first place.
The problem is that some phones default to saving contacts to the device instead of your account. And most people never notice which option is selected when they add a contact. So you can end up with a contact list that lives entirely on your phone without realizing it.
That’s why the first thing you need to do, right now, before you touch your new phone, is verify that contact sync is actually turned on and working on your old phone.
This takes about 30 seconds. But skipping it is the number one reason people think their contacts disappeared.
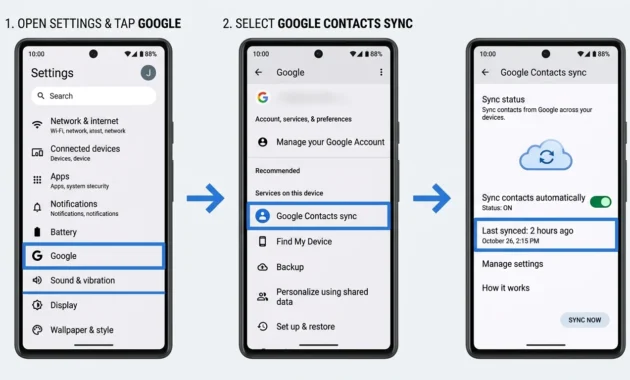
How to Check Contact Sync on Android
Open the Settings app on your Android phone. Scroll down and tap Google. You might see a list of Google services here. Look for the option that says “Google Contacts sync” or “Settings for Google apps.” Tap it.
Inside that menu, you’ll see a setting called Status or Auto-sync. Tap on it.
If it says “Auto-sync is off,” that means your contacts have not been syncing to your Google account. They’ve been sitting on your phone this whole time with no backup. You’ll need to turn that toggle on right now and give it a few minutes to upload everything.
If it says “Auto-sync is on” and shows a recent sync time, like “Last synced 2 hours ago,” then you’re good. Your contacts are already backed up to your Google account, and they’ll appear automatically when you sign into your new phone.
Some Android phones have a slightly different path to this setting depending on the manufacturer. If you don’t see Google Contacts sync under the Google menu, try this alternate route. Go to Settings, then tap your name or profile icon at the top. Tap Google Account, then navigate to the People & Sharing tab. Tap Contacts and check if sync is enabled there.
Either way works. You just need to confirm that the toggle is on and that your phone has synced recently.
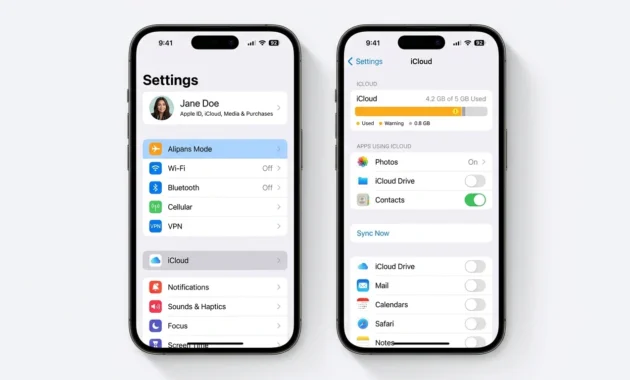
How to Check Contact Sync on iPhone
On an iPhone the process is even simpler. Open the Settings app and tap your name at the very top. That opens your Apple ID settings.
Tap iCloud. You’ll see a list of apps and data types that can sync to iCloud. Scroll down until you see Contacts.
If the toggle next to Contacts is green, your contacts are syncing to iCloud, and they’re backed up. When you sign into your new iPhone with the same Apple ID, your contacts will restore automatically.
If the toggle is off, your contacts are saved only to your iPhone, and they won’t transfer until you turn that toggle on. Once you turn it on, give it a minute or two to upload everything to iCloud. You can check the sync status by opening the Contacts app. If you see a spinning circle or “Updating” message, the sync is in progress.
One more thing to check on iPhone. Make sure you’re not running out of iCloud storage. Apple gives you 5 GB of free storage, and if that fills up with photos and backups, iCloud stops syncing new data, including contacts. You can check your storage by going back to the main iCloud settings screen and tapping Manage Storage at the bottom. If you’re at or near the limit, you’ll need to free up space or upgrade your plan before contacts can sync.
That’s it. That’s the one thing you need to verify before anything else. If sync is on and working, your contacts are already backed up, and the transfer to your new phone will be automatic. If sync was off, turn it on now and let it finish before you move to the next step.
Before you dive into the transfer process, it’s worth understanding how Google’s cloud infrastructure actually stores and syncs your data across devices. Google’s support documentation explains that when you enable contact sync, your information uploads to Google’s servers using industry-standard encryption protocols to protect your privacy. The sync process happens automatically in the background, but if you want more control over what data Google stores, you can review your Google Account privacy settings at any time to manage which services have access to your contacts. For iPhone users, Apple provides similar transparency through their iCloud security overview, which details exactly how contact data is encrypted both in transit and at rest on Apple’s servers.
How to Transfer Contacts from Android to iPhone (Move to iOS Method)
How to transfer contacts to new phone? Switching from Android to iPhone used to be a nightmare. I remember when people would just accept that they’d lose half their data in the process. But that changed a few years ago when Apple released the Move to iOS app, and it’s gotten even better in 2025 and 2026.
Move to iOS is Apple’s official tool for moving contacts from Android to iPhone. It’s designed to run during your iPhone’s initial setup, and it pulls everything over wirelessly. Contacts, text messages, photos, WhatsApp chats, calendars, and even your Chrome bookmarks. The whole process takes about 10 to 20 minutes depending on how much data you’re moving.
The key thing to understand here is that Google and iCloud don’t sync with each other. They’re completely separate systems. So if you just sign into your Google account on your iPhone and expect your contacts to magically appear in the iPhone’s Contacts app, that’s not going to happen. You need to either use Move to iOS to copy everything over or manually tell your iPhone to pull contacts from your Google account instead of iCloud.
A lot of people still think Android contacts can’t transfer to iPhone at all. That belief comes from the early days of smartphones when there really wasn’t a good way to do it. But Apple built Move to iOS specifically to eliminate that problem, and it works surprisingly well now.
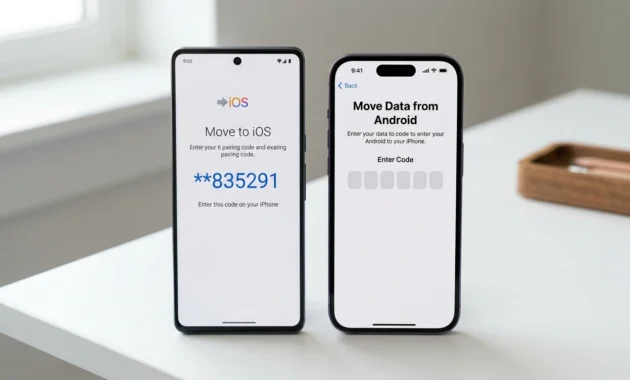
Step-by-Step: Using Move to iOS During iPhone Setup
Here’s how to use Move to iOS if you’re setting up your iPhone for the first time.
First, download the Move to iOS app from the Google Play Store on your Android phone. Apple makes it, so yes, it feels a little weird installing an Apple app on Android. But it’s the official tool, and it’s free.
Make sure both phones are plugged into power and connected to Wi-Fi. The transfer can take a while, and you don’t want either phone dying halfway through.
Now turn on your new iPhone and start the setup process. Follow the on-screen steps until you get to the “Apps & Data” screen. Tap “Move Data from Android.”
Your iPhone will display a code. Open the Move to iOS app on your Android phone and enter that code when prompted. The two phones will connect directly to each other over a temporary Wi-Fi network.
On your Android phone, you’ll see a list of data types you can transfer. Make sure Contacts is checked. You can also select Messages, Photos, Videos, and anything else you want to move. Then tap Continue.
The transfer starts. You’ll see a progress bar on both phones. Don’t touch either phone or let the screen turn off during this process. Just let it run.
When it finishes, your iPhone will continue with the rest of its setup. Sign in with your Apple ID, set up Face ID or Touch ID, and finish the process. When you open the Contacts app on your iPhone, all your Android contacts should be there.
One thing to note. Moving to iOS only works during the initial iPhone setup. If you already set up your iPhone and you’re past that screen, you can’t go back and use Move to iOS without erasing your iPhone and starting over. Which brings me to the alternative method.
Alternative: Add Your Google Account to iPhone
If you already set up your iPhone, or if Move to iOS didn’t work for some reason, there’s a simpler way to get your contacts over. You just add your Google account directly to your iPhone and tell it to sync contacts from Google instead of iCloud.
Open Settings on your iPhone. Scroll down and tap Mail, then tap Accounts. Tap Add Account at the bottom.
Select Google from the list. Sign in with the same Gmail account you use on your Android phone. The one where your contacts are stored.
After you sign in, you’ll see a list of things that can sync from your Google account. Make sure the toggle next to Contacts is turned on. You can turn off Mail, Calendar, and Notes if you don’t want those syncing too. Just leave Contacts on.
Tap Save in the top right corner.
Now open the Contacts app on your iPhone. Your Android contacts should start appearing within a minute or two. If they don’t show up right away, pull down on the screen to refresh the list.
This method works great because your contacts stay in your Google account. So if you add or edit a contact on your iPhone, it updates in Google Contacts automatically. And if you ever switch back to Android, your contacts are already there waiting.
The only downside is that your contacts are stored in Google instead of iCloud. Which means if you use a Mac or iPad, you’ll need to add your Google account to those devices too if you want your contacts to sync everywhere. But for most people, that’s not a problem.
How to Transfer Contacts from Android to Android (Google Sync Method)
If you’re moving from one Android phone to another Android phone, this is the easiest transfer you’ll ever do. Google account sync is built into Android specifically for this purpose, and when it works properly, you don’t have to do anything at all.
The whole process is automatic. You sign into your Google account on your new phone, and your contacts just appear. No app to download, no files to export, no cables to connect. It’s the same way your Gmail and Google Photos sync across devices. Contacts work exactly the same.
But here’s the part that trips people up. You have to be signed into the exact same Google account on both phones. Not just any Google account. The same one.
I’ve seen people set up a new phone with a different Gmail address, like a work email or a secondary account they barely use, and then wonder why their contacts didn’t show up. The contacts are tied to the account, not to you as a person. So if your contacts live at yourname@gmail.com and you sign into your new phone with yourwork@gmail.com, those contacts won’t be there.
And the other thing that catches people is sync lag. Even when everything is set up correctly, it can take a few minutes for contacts to appear on the new phone. Sometimes the sync is instant. Sometimes it takes five or ten minutes. If your contact list is huge, it might take even longer.
So if you sign into your new phone and the Contacts app looks empty, don’t panic immediately. Give it a few minutes. Pull down on the screen to refresh the list. Check your internet connection. Most of the time, the contacts are on their way, and they just haven’t finished downloading yet.
Google Account Sync: The Official Android Method
Assuming you already verified that contact sync is turned on in your old phone back in the preparation section, here’s what happens next.
Turn on your new Android phone and go through the initial setup. When it asks you to sign in with a Google account, use the same Gmail address you use on your old phone. This is critical. Same account, not a different one.
Finish the setup process. Set your lock screen, agree to the terms, and skip all the Samsung or Google One upsells. Just get to the home screen.
Now open the Contacts app. On most Android phones, it’s just called Contacts. On Samsung phones, it might be in a folder with Phone and Messages.
If contact sync is already working, you’ll see your contacts start populating the list within a minute or two. If the list stays empty after a couple of minutes, there are two things to check.
First, make sure you’re looking at the right account. Open the Contacts app, tap the three-line menu icon in the top left, and check which account is selected under the filter or display settings. If it’s set to “Device” or “SIM,” change it to your Google account. That’s usually where the problem is.
Second, force a manual sync. Go to Settings, tap Accounts, tap Google, then tap your Gmail address. You’ll see a list of things that sync with your account. Tap the three-dot menu in the top right and tap “Sync now.” That forces your phone to check for updates immediately instead of waiting for the next automatic sync.
If your contacts still don’t appear after that, go back and verify that sync was actually turned on in your old phone. Because if it was never on, your contacts are still sitting on your old phone, and they never made it to your Google account in the first place.
But if sync was on and working, this method is foolproof. I’ve used it on probably a dozen different Android phones over the years, and it’s worked every single time. Google account sync is the fastest and most reliable way to move contacts from Android to Android.
And if you’re setting up a completely new phone for the first time, make sure you know how to change default apps on Android so your contacts open in your preferred app instead of the stock one.
Samsung Smart Switch: Galaxy-to-Galaxy Transfer (Now with Passkeys and eSIM)
If you’re going from one Samsung Galaxy phone to another Samsung Galaxy phone, you have a second option that’s even more comprehensive. Samsung Smart Switch.
Smart Switch is Samsung’s official transfer tool, and it moves everything. Contacts, photos, videos, apps, app data, text messages, call history, device settings, and even your home screen layout. It’s basically a complete phone clone.
And in 2026, Samsung added two features that make Smart Switch especially useful. It now transfers saved passwords and passkeys, so you don’t have to log back into every app manually. And it can transfer your eSIM information if your carrier supports it, which means you don’t have to call your carrier or visit a store to activate your new phone.
The whole process takes about 10 to 15 minutes for most people. If you have a massive photo library or a lot of apps, it might take longer. But for contacts specifically, that part finishes in the first minute or two.
You can do the transfer wirelessly or with a USB cable. Wireless is more convenient, but cable is faster if you’re transferring a lot of data. For just contacts, wireless is fine.
Smart Switch comes pre-installed on most Samsung phones. If you don’t see it, you can download it from the Galaxy Store. Open Smart Switch on both phones, select whether you’re sending or receiving data, and follow the on-screen instructions. It walks you through the whole process step by step.
One thing to note. Smart Switch transfers everything from your old phone’s storage, including contacts that were saved to the device instead of your Google account. So if you had contacts that weren’t syncing to Google, Smart Switch will still grab them and move them over. That makes it a good backup option if you realize too late that sync wasn’t turned on.
But I still recommend using Google account sync as your primary method. Because once your contacts are in your Google account, they’re backed up forever. If you lose your phone, break it, or upgrade again in two years, your contacts are safe and ready to sync to your next device. Smart Switch is a one-time transfer. Google Sync is permanent protection.
How to Transfer Contacts from iPhone to iPhone (iCloud Sync Method)
iPhone to iPhone transfers are usually the smoothest of all because Apple designed the whole process to be automatic. If you’ve been using an iPhone for a while and you’re upgrading to a newer iPhone, your contacts should move over without you lifting a finger.
The system Apple uses is called iCloud sync. It’s the iPhone equivalent of Google sync on Android. Every contact you save on your iPhone uploads to iCloud automatically, and when you sign into your new iPhone with the same Apple ID, those contacts download right back.
This is one of the few things Apple actually makes simple. You don’t need a computer, you don’t need cables, and you don’t need to download any apps. You just sign in and wait.
But there’s one problem that catches a lot of people. iCloud storage.
Apple gives you 5GB of free iCloud storage when you create an Apple ID. That sounds like a lot until you realize that your iPhone backup, your photos, your messages, and your app data all share that same 5GB. Most people fill it up within the first year without realizing it.
And when your iCloud storage is full, iCloud stops syncing everything. Including contacts. Your phone doesn’t give you a loud warning about it. It just quietly stops backing things up. So you can have the Contacts toggle turned on in your settings, and it looks like everything is working, but nothing is actually uploading because there’s no space left.
I’ll show you how to check that in a minute. But first, let’s cover the normal process when everything is working correctly.
iCloud Automatic Restore During iPhone Setup
If you verified back in the preparation section that your iCloud Contacts toggle is turned on and your storage isn’t full, this part is automatic.
Turn on your new iPhone and start the setup process. Follow the steps until you get to the “Apps & Data” screen. You’ll see a few options here. Tap “Restore from iCloud Backup.”
Sign in with the same Apple ID you use on your old iPhone. Not a different Apple ID. The same one. This is critical because your contacts are tied to that specific account.
After you sign in, your new iPhone will show you a list of available iCloud backups. Pick the most recent one from your old iPhone. It should show the date and time it was created.
Tap that backup and let the restore process run. Your new iPhone will download your apps, settings, photos, and contacts from iCloud. The whole process usually takes 10 to 30 minutes depending on how much data you have and how fast your Wi-Fi is.
Don’t skip the Wi-Fi step. You need to be connected to Wi-Fi for this to work. Cellular data won’t cut it because the restore pulls down too much data.
When the restore finishes, your iPhone will restart and take you to the home screen. Open the Contacts app. All your contacts from your old iPhone should be there.
If they’re not, go to Settings, tap your name at the top, tap iCloud, and make sure the Contacts toggle is turned on. Sometimes the restore process doesn’t enable that toggle automatically. Turn it on, give it a minute or two, and your contacts should start appearing.
And if you already set up your new iPhone without restoring from iCloud, you can still get your contacts. Just go to Settings, tap your name, tap iCloud, and turn on the Contacts toggle. As long as your old iPhone was syncing contacts to iCloud, they’ll download to your new iPhone within a few minutes.
iCloud Storage Full? Here’s How to Fix It
This is the number one reason iPhone contacts don’t transfer. Your iCloud storage is maxed out, and nothing new can sync until you free up space or pay for more.
Here’s how to check. Open Settings on your iPhone. Tap your name at the very top. Tap iCloud. Right under the iCloud heading, you’ll see a bar graph showing how much storage you’re using.
If it says something like 4.8GB of 5GB used, you’re basically full. And if contacts are trying to sync but there’s no room, they just won’t.
Tap “Manage Storage” to see what’s taking up space. Usually it’s old iPhone backups from phones you don’t even use anymore or photos and videos you forgot to delete.
The quickest fix is to delete old backups. Scroll down to the Backups section and look for backups from old iPhones you’ve already replaced. Tap on one, scroll to the bottom, and tap “Delete Backup.” Do that for any phone you’re not using anymore.
That usually frees up a few gigabytes. If you’re still close to the limit, you can either start deleting photos and videos or just pay for more iCloud storage. Apple charges $1 a month for 50GB, which is more than enough for most people.
Once you free up space, go back to the main iCloud screen and make sure the Contacts toggle is turned on. If it was already on, turn it off and back on again to force a fresh sync. Your contacts should start backing up within a few minutes.
And one more thing. If you’re transferring from an older iPhone that’s already backed up to iCloud, you don’t need to do anything special with it. Just set up your new iPhone, restore from your iCloud backup, and your contacts will be part of that restore. The old iPhone can stay in your drawer. You don’t need it powered on or connected to anything.
iCloud keeps your contacts backed up separately from your phone. So even if your old iPhone is dead, lost, or already wiped, your contacts are safe in iCloud as long as they were syncing before.
Alternative Transfer Methods: VCF Export, Quick Share, and More
The cloud sync methods I just covered are the easiest and most reliable ways to transfer contacts. But they’re not the only ways.
Some people don’t want their contacts stored in the cloud for privacy reasons. Some people have unreliable internet and can’t depend on cloud sync. And some people just prefer to have a physical file they can hold onto.
If that’s you, these alternative methods will work. They’re a little more manual, but they give you complete control over the process.
VCF File Export: The Universal Transfer Method
A VCF file is a contact file. It’s a standard format that works on pretty much every phone, whether it’s Android, iPhone, or even an old flip phone from 2010. You export all your contacts into a single VCF file, move that file to your new phone however you want, and import it.
This method works across any combination of phones. Android to Android, iPhone to Android, and Android to iPhone. Doesn’t matter. VCF files are universal.
Here’s how to do it on Android. Open your Contacts app. Tap the three-line menu icon in the top left or the three-dot menu in the top right, depending on your phone. Look for an option that says “Import/Export,” “Manage contacts,” or “Settings.”
Tap “Export” or “Export to file.” Your phone will ask where you want to save the file. Pick “Internal storage” or “Downloads.” Some phones let you save it directly to Google Drive or your SD card if you have one.
The export creates a file called something like “contacts.vcf” or “00001.vcf.” It saves to your phone’s storage, usually in the Downloads folder or a folder specifically for contact backups.
Now you need to get that file to your new phone. You can email it to yourself, upload it to Google Drive or Dropbox, send it via WhatsApp or Telegram, or use Quick Share or Bluetooth if both phones are next to each other. Any method that moves a file from one phone to another works.
On your new phone, find the VCF file you just transferred. If you emailed it, open the email and download the attachment. If you used Google Drive, open Drive and download the file. Once the file is on your new phone, tap it.
Your phone will ask which account you want to import the contacts into. This is important. Choose your Google account or Apple ID, not “Device” or “Phone.” If you import to a device, the contacts are saved only to that phone, and they won’t be backed up. If you import to your account, they sync to the cloud, and you’re protected.
Tap your account, confirm the import, and wait a few seconds. Your contacts will start appearing in your Contacts app. If you have hundreds of contacts, it might take a minute or two to process them all.
VCF export works on iPhone too, but the process is a little different. You can’t export directly from the Contacts app on iPhone. You have to go to icloud.com on a computer, sign in, click Contacts, select all your contacts, click the gear icon at the bottom left, and choose “Export vCard.” That downloads a VCF file to your computer, and then you can email it to yourself or upload it to a cloud service to get it onto your new phone.
Quick Share Tap-to-Transfer: The Fastest Way (2026 Method)
If you’re transferring between two Android phones and they’re both sitting right in front of you, Quick Share is the fastest method by far.
Quick Share is Google’s wireless file transfer system. It’s built into Android, and in August 2026, Google added a feature that lets you transfer contacts just by tapping two phones together.
Here’s how it works. On both phones, swipe down from the top of the screen to open your quick settings. Look for the Quick Share icon. If you don’t see it, swipe left to see more icons, or tap the pencil icon to add it to your quick settings.
Tap Quick Share on both phones. You’ll see a settings screen. Under “Device visibility,” tap “Contacts only” and change it to “Everyone.” This lets the two phones see each other for the next 10 minutes.
Now go back to your old phone and open the Contacts app. Tap and hold on any contact until a checkmark appears. Then tap the “Select all” option at the top or in the three-dot menu. Every contact in your list should now have a checkmark.
Tap the Share button. It usually looks like three dots connected by lines or an arrow pointing out of a box. In the share menu, tap Quick Share.
Your old phone will scan for nearby devices. Your new phone should appear in the list. Tap it.
On your new phone, you’ll get a notification asking if you want to accept the file. Tap Accept.
The transfer happens almost instantly because Quick Share uses Wi-Fi Direct, which is way faster than Bluetooth. In a few seconds, all your contacts bundle into a VCF file and move to your new phone.
When the transfer finishes, your new phone will show a notification that the file was received. Pull down your notification shade, tap the notification, and choose your Google account to import the contacts. Just like with the VCF method, don’t import to Device. Import to your Google account so they’re backed up.
Quick Share is my favorite method when I’m helping someone transfer contacts in person. It’s fast, it’s wireless, and it doesn’t require an internet connection. Just two phones sitting next to each other.
Why Bluetooth Doesn’t Work for All Your Contacts
A lot of guides still recommend Bluetooth for transferring contacts. And technically, it works. But here’s the problem.
Bluetooth transfers one contact at a time.
If you have five or ten contacts, fine. You can send them one by one, and it’s not that bad. But if you have 200 contacts, you’re going to be sitting there tapping Share, selecting Bluetooth, picking the device, accepting on the other phone, and waiting for the transfer 200 separate times.
It’s not practical. I’ve watched people try it, and they give up after about 20 contacts because it’s so tedious.
Bluetooth made sense 15 years ago when phones didn’t have cloud sync and file transfer apps didn’t exist. But today, there’s no good reason to use Bluetooth for bulk contact transfers. Quick Share is faster. VCF export is easier. Cloud sync is automatic.
Save Bluetooth for sending one or two specific contacts to a friend. Don’t use it to move your entire contact list.
SIM Card Transfer: Why It’s Outdated (And What to Use Instead)
Some people still think the easiest way to transfer contacts is to pop the SIM card out of the old phone and put it in the new phone. And yes, SIM cards can store contacts. But they’re terrible at it.
A modern SIM card can hold about 250 to 500 contacts depending on the card. Older SIM cards maxed out at 100 to 250. So if you have more contacts than that, they won’t all fit.
And even if they do fit, SIM cards only store the most basic information. Name and one phone number per contact. That’s it. No email addresses, no profile photos, no notes, and no multiple phone numbers for the same person. Just name and number.
And here’s the part that really gets people. SIM cards have a 15-character limit on contact names. If someone’s name is longer than 15 characters, the SIM card cuts it off. So “Christopher Anderson” becomes “Christopher And,” and you lose the rest.
SIM card storage was designed in the 1990s for flip phones that didn’t have much memory. It made sense back then. But today, with smartphones that have gigabytes of storage and cloud accounts that can hold unlimited contacts, there’s no reason to use a SIM card for this.
Use cloud sync. Or export a VCF file. Or use Quick Share. Any of those methods will preserve all your contact information exactly as it is. SIM cards will mangle it.
How to Transfer Contacts Without Your Old Phone or SIM Card
This is the scenario that makes people panic. Your old phone is dead, lost, stolen, or already wiped and traded in. And now you’re staring at your new phone wondering if all your contacts are gone forever.
I get it. That’s a gut-wrenching feeling. But here’s the good news.
If your old phone was syncing contacts to the cloud before it disappeared, your contacts aren’t gone. They’re sitting in your Google account or iCloud account right now, completely safe, waiting to sync to your new phone.
The whole point of cloud sync is that your contacts don’t live on your phone. They live in your account. Your phone is just a window into that account. So even if the phone is destroyed, your contacts are still there.
And the SIM card question. You don’t need your old SIM card either. Cloud sync never touched your SIM card in the first place. The SIM is only relevant if you were using that old-school method of saving contacts directly to the card, which I already explained is a terrible idea.
So if you had contact sync turned on at any point in the past, your contacts are recoverable. And the process is the exact same as if you still had your old phone sitting right next to you.
If Contacts Were Synced to Google/iCloud Before
Let’s say your old Android phone is broken beyond repair. Or you already traded it in, and it’s been wiped. Doesn’t matter.
Turn on your new phone. Go through the setup. When it asks you to sign in with a Google account, use the same Gmail address you used on your broken phone. The exact same one.
Finish the setup process and get to the home screen. Open the Contacts app.
Your contacts should start appearing within a minute or two. If they don’t appear immediately, wait a few minutes and pull down on the screen to refresh the list. As long as sync was enabled on your old phone before it died, your contacts are in your Google account, and they’re downloading right now.
Same thing on iPhone. If your old iPhone is gone but it was syncing to iCloud, set up your new iPhone and sign in with the same Apple ID. During setup, choose “Restore from iCloud Backup” and pick the most recent backup from your old phone. Your contacts will restore along with everything else.
And if you skipped the restore option during setup, you can still get your contacts. Just go to Settings, tap your name, tap iCloud, and turn on the Contacts toggle. Give it a minute and your contacts will sync down from iCloud.
No old phone needed. No SIM card needed. Just your account credentials.
The only way this doesn’t work is if sync was never turned on in the first place. If your contacts were saved to “Device” or “Phone” instead of your Google or iCloud account, and your old phone is now gone, those contacts are unrecoverable. They were never backed up.
But most people had sync turned on without realizing it because it’s usually enabled by default during phone setup. So chances are your contacts are safe even if your old phone isn’t.
If You’re Not Sure: Check contacts.google.com.
If you’re not certain whether your contacts were syncing, here’s how to find out before you even touch your new phone.
Grab any computer or tablet with a web browser. Go to contacts.google.com.
Sign in with the same Gmail address you used on your old phone.
If your contacts appear on the screen, they’re backed up to your Google account. That means they’ll sync to your new phone automatically when you sign in with the same account.
If the screen is empty or it only shows a couple of contacts, that means most of your contacts were saved to your phone’s internal storage and they never synced to Google. In that case, if your old phone is gone, those contacts are gone too unless you have some other backup.
But if you see your full contact list on contacts.google.com, you’re good. Your contacts are safe in the cloud. Set up your new phone, sign in with that same Google account, and your contacts will appear.
This web interface is also useful if you want to clean up your contacts before syncing them to your new phone. You can delete duplicates, fix typos, and merge contacts right there in the browser. Then when you sign into your new phone, it’ll sync the cleaned-up version.
And if you don’t use Google, you can do the same thing with iCloud. Go to icloud.com on a computer, sign in with your Apple ID, and click Contacts. If your contacts appear there, they’re backed up, and they’ll restore to your new iPhone.
This is one of the best things about cloud sync. Your contacts aren’t trapped on a single device. They’re accessible from anywhere, on any device, as long as you have your account credentials. So losing your phone doesn’t mean losing your contacts.
Contacts Didn’t Transfer? Here’s How to Fix It
So you set up your new phone, signed into your account, and opened the Contacts app, and nothing’s there.
It’s frustrating. I know. You followed all the steps, you did everything right, and your contacts still didn’t show up. But before you assume they’re gone, let’s walk through the most common reasons this happens.
In my experience, contacts fail to transfer for one of three reasons. Either sync was never turned on in the first place, you’re signed into the wrong account, or your cloud storage is full and preventing the sync. There’s a fourth possibility too, which is that your contacts are actually there but hidden by a filter setting.
I’m going to walk you through each one. One of these checks will solve the problem.
Check #1: Was Sync Enabled on Your Old Phone?
This is the number one reason contacts don’t transfer. The sync toggle was off the whole time, so your contacts never uploaded to the cloud in the first place.
If you still have your old phone, grab it right now. Open Settings, navigate to your Google or iCloud settings, and check the Contacts sync toggle.
If it’s off, that’s your problem. Your contacts were saved to your phone’s internal storage, not to your account. They never synced to the cloud, so when you signed into your new phone, there was nothing to download.
The fix is to turn sync on right now. Toggle it on, wait a minute for the upload to complete, and then check your new phone again. Pull down on the Contacts list to refresh it. Your contacts should start appearing within a few minutes.
If you don’t have your old phone anymore, this gets trickier. You can check contacts.google.com or icloud.com to see if your contacts are backed up there. If they’re not, and your old phone is gone, those contacts are unrecoverable unless you exported a VCF file at some point.
This is exactly why I emphasized checking sync status back in the preparation section. If sync is off and you don’t catch it before you lose access to your old phone, your contacts are gone.
Check #2: Are You Signed Into the Same Account?
This one sounds obvious, but it happens more often than you’d think.
You set up your new phone and signed in with a different Gmail address than the one you used on your old phone. Or you used a work email instead of your personal email. Or you have multiple Apple IDs and you picked the wrong one.
Your contacts are tied to a specific account. If your contacts live at yourname@gmail.com and you sign into your new phone with yourwork@gmail.com, those contacts won’t be there. Even if both accounts are yours.
Here’s how to check. On Android, go to Settings, tap Accounts, and look at which Google account is listed. On iPhone, go to Settings, tap your name at the top, and check which Apple ID is signed in.
If it’s the wrong account, sign out and sign back in with the correct one. On Android, you can add multiple Google accounts and switch between them in the Contacts app. On iPhone, you usually need to sign out of the wrong Apple ID and sign into the right one.
Once you’re signed into the correct account, go back to the Contacts app and pull down to refresh. Your contacts should sync within a minute or two.
And if you’re not sure which account your contacts are in, check contacts.google.com or icloud.com with each of your accounts until you find the one that has your contacts. Then sign into that account on your new phone.
Check #3: Is Your iCloud Storage Full?
This one is iPhone-specific, but it’s a huge problem.
If your iCloud storage is full, iCloud stops syncing everything. Photos, backups, contacts, all of it. And your phone doesn’t warn you loudly about it. It just quietly fails in the background.
Go to Settings, tap your name, and tap iCloud. Look at the storage bar at the top. If it says you’re using 4.9 GB out of 5 GB, or anything close to the limit, that’s your problem.
Tap “Manage Storage” and see what’s taking up space. Usually it’s old iPhone backups from phones you replaced years ago. Delete those. Tap the backup, scroll to the bottom, and tap “Delete Backup.”
That should free up a few gigabytes. Once you have some breathing room, go back to the main iCloud screen and make sure the Contacts toggle is turned on. If it was already on, turn it off and back on again to force a fresh sync.
Give it a few minutes, then check your Contacts app. Your contacts should start downloading now that there’s space for them.
And if you’re consistently running out of iCloud storage, just pay the dollar a month for 50GB. It’s the easiest fix, and it solves the problem permanently.
Check #4: Are Contacts Hidden by Filter Settings?
This is the one that catches people off guard. Your contacts actually did sync. They’re on your phone right now. But you can’t see them because the Contacts app is filtering them out.
Here’s what happens. The Contacts app can display contacts from multiple sources. Your Google account, your iCloud account, contacts saved to your phone, and contacts on your SIM card. And there’s usually a filter or display setting that lets you choose which sources to show.
If that filter is set to “Device only” or the wrong account, your synced contacts are hidden even though they’re there.
Open the Contacts app. Tap the three-line menu icon or the three-dot menu, depending on your phone. Look for an option that says “Filter,” “Contacts to display,” or “Accounts.”
Make sure it’s set to “All contacts” or specifically to your Google or iCloud account. Not “Device” or “SIM.”
As soon as you change that setting, your contacts should appear. If they don’t, close the app completely and reopen it. Sometimes it takes a second to refresh.
I’ve seen this fool people so many times. They spend an hour troubleshooting, convinced their contacts are lost, and then they check the filter setting, and everything appears instantly.
And if none of these four checks solved the problem, try this. Restart your new phone. Just power it off and back on. Sometimes a fresh restart is all it takes to kick the sync process into gear.
If your contacts still don’t appear after all of that, there’s a good chance they were never backed up in the first place. Check contacts.google.com or icloud.com one more time to confirm. If your contacts aren’t there, they’re not in the cloud, and they won’t sync to your new phone.
Verify Transfer Success Before Erasing Your Old Phone
This is the step most people skip. And it’s the step that causes the most regret.
You get your new phone, sign in, see a few contacts appear, and assume everything worked. So you factory reset your old phone, trade it in at the store, or toss it in a drawer and forget about it.
Then a week later you realize half your contacts are missing. And by that point, your old phone is wiped or gone, and there’s no way to get those contacts back.
I’ve seen this happen too many times. People get excited about their new phone, and they rush through the setup without actually verifying that everything transferred correctly. And once that old phone is erased, whatever didn’t transfer is gone forever.
So before you do anything permanent with your old phone, take ten minutes to verify the transfer actually worked.
Here’s how. Open the Contacts app on your new phone and scroll through the list. Don’t just glance at it. Actually scroll.
Check the total number of contacts. Most Contacts apps show the count somewhere, usually at the top of the list or in the settings. Compare that number to your old phone. It doesn’t have to be exact because some people have duplicate contacts that get merged during sync. But it should be close.
If your old phone had 300 contacts and your new phone only shows 50, something went wrong.
Next, search for a few specific contacts. Pick people you call regularly or people whose numbers you definitely don’t want to lose. Type their names into the search bar and make sure they appear.
Open a few of those contacts and check the details. Is the phone number there? The email address? The profile photo? Make sure all the information is transferred, not just the name.
And here’s the real test. Make a phone call. Pick one of the transferred contacts and actually call them. Make sure the number works and that your phone can dial it correctly.
If all of that checks out, your contacts transferred successfully. But even then, I recommend keeping your old phone powered on and available for at least two or three days before you erase it or trade it in.
Why? Because sometimes you don’t realize something’s missing until you need it. You’ll go to call someone, realize their number isn’t in your new phone, and wish you still had access to your old phone to grab it.
Three days is usually enough time to catch any problems. If you haven’t noticed anything missing by then, you’re probably good to go.
And if you’re trading in your phone at a store, ask them to hold off on wiping it until you’ve had a chance to double-check everything at home. Most stores will let you take the new phone home, verify everything works, and then come back to complete the trade-in once you’re sure.
It’s a small extra step. But it’s the difference between a smooth transfer and losing contacts you can never get back.
Keep Your Contacts Synced Forever (Set It and Forget It)
Here’s the thing about contact sync that most people don’t realize. It’s not a one-time thing.
A lot of people think contact transfer is something you do when you get a new phone, and then you’re done and you never think about it again. But that’s not how it works.
Contacts change constantly. You meet new people. You get new phone numbers. People change jobs and update their email addresses. Old contacts become irrelevant, and you delete them.
If you only sync your contacts once when you set up a new phone, your contact list on that phone is frozen in time. Any changes you make won’t propagate to your other devices. And if you lose that phone six months later, those changes are gone.
That’s why the smarter approach is to leave contact sync turned on permanently. Not just when you’re switching phones. All the time.
When sync is on, every contact you add, edit, or delete on your phone gets uploaded to your Google account or iCloud immediately. And then it syncs to every other device signed into that same account.
So if you add a contact on your phone, it appears on your tablet a few seconds later. If you update someone’s phone number on your computer, your phone picks up the change automatically. Everything stays in sync across all your devices without you having to do anything.
And the best part is that your contacts are always backed up. If you drop your phone in a lake tomorrow, your contacts are safe in the cloud. Sign into a new phone with the same account, and they’ll be there waiting.
This is the way contact management is supposed to work in 2026. You shouldn’t have to think about transferring contacts ever again after the initial setup. It should just happen automatically in the background.
But that only works if you leave sync turned on.
So here’s what I recommend. Right now, go into your phone’s settings and verify that contact sync is enabled. On Android, go to Settings, tap Google, find Google Contacts sync, and make sure it’s on. On iPhone, go to Settings, tap your name, tap iCloud, and make sure the Contacts toggle is on.
And then leave it on. Don’t turn it off to save battery or free up storage or for any other reason. The battery impact is negligible, and it doesn’t take up any meaningful storage on your phone.
Just let it run. Set it and forget it.
Every few months, you can check contacts.google.com or icloud.com to confirm your contacts are still backing up correctly. But as long as the sync toggle stays on, you shouldn’t have to worry about it.
And when you get your next phone in a year or two or five, you won’t have to transfer anything. You’ll sign into your account during setup, and your contacts will just appear. Exactly as they were on your old phone, with all the updates and changes you’ve made over the years.
That’s how it’s supposed to work. And that’s how it will work as long as you keep sync turned on.
Frequently Asked Questions About Transferring Contacts
How do I add a new contact to my phone manually?
Open your Contacts app and tap the plus icon at the bottom or top right. Enter the person’s name, phone number, and email address. When it asks where to save the contact, choose your Google account or iCloud, not “Device” or “Phone.” That way the contact backs up to the cloud automatically. Tap Save and you’re done.
Do I need my SIM card to transfer contacts?
No. Cloud sync works completely independently from your SIM card. Your contacts upload to your Google account or iCloud over Wi-Fi or cellular data, and the SIM card is never involved in that process. The only time you need a SIM card for contacts is if you’re using the old-school method of saving contacts directly to the card, which I covered earlier and strongly recommend against
Can I transfer contacts if my old phone is completely dead?
Yes, as long as your old phone was syncing contacts to the cloud before it died. Sign into your new phone with the same Google account or Apple ID you used on the dead phone, and your contacts will download automatically. If sync was never turned on and your old phone is now dead, those contacts are unrecoverable unless you have a backup file saved somewhere else.
Will my Google Contacts and iCloud sync together automatically?
No, and this surprises a lot of people. Google Contacts and iCloud are completely separate systems that don’t communicate with each other at all. If you have an Android phone and an iPad, your contacts won’t sync between them unless you manually choose one platform to store everything. I recommend using Google Contacts as your primary storage and adding your Google account to your iPhone or iPad if you need cross-platform access.
How long does contact transfer take?
It depends on the method. Cloud sync usually finishes within a few minutes once you sign into your new phone. Samsung Smart Switch takes about 10 to 15 minutes for a full device transfer. Quick Share happens almost instantly, in just a few seconds. VCF file export and import takes 5 to 10 minutes depending on how many contacts you have and how you’re transferring the file.
4 comments