
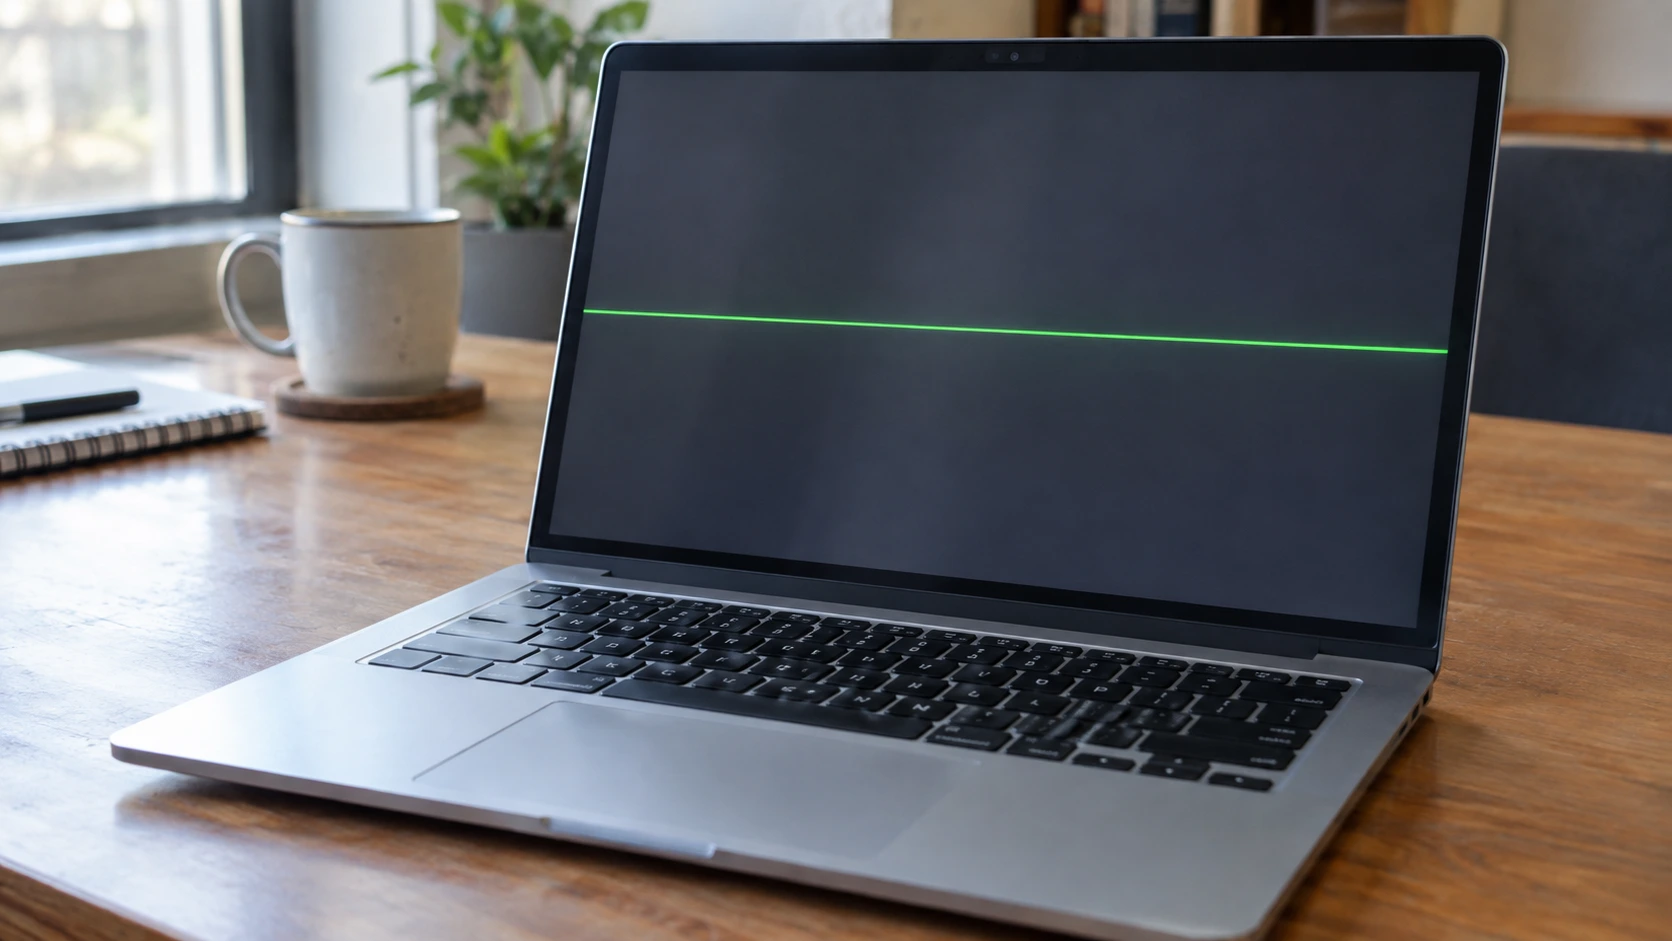
A green horizontal line on laptop screen almost never means your laptop is dying, even though it looks terrifying the first time you see it.
I remember the exact moment one showed up on my own screen. It cut straight across the middle of a video call, right through someone’s face, and my gut reaction was that I had just wrecked an expensive display. I closed the laptop. Opened it again. Still there. My next thought went straight to the worst case, a cracked panel, a dead graphics card, hundreds of dollars down the drain.
That reaction is normal. Almost everyone goes there first.
But it is usually wrong.
Most of these lines come from something small. A driver hiccup. A loose cable. A display setting that got knocked out of place during an update you do not even remember installing. Not a dead panel. Not a fried graphics chip. Just a glitch sitting quietly somewhere between your operating system and your screen, waiting for the right fix to clear it out.
Before you spend a cent on repairs, there is a quick way to tell whether this is software or something physical. It takes about two minutes, maybe less once you know what to look for, and once you know, you will know exactly what to do next. That is really the whole point of this guide. Not just handing you a list of fixes, but showing you how to figure out which fixes actually apply to your situation before you waste time on the wrong ones.
I have walked through this exact troubleshooting path more than once, on more than one laptop, and the pattern repeats itself almost every time. People assume hardware. It is usually software. Let’s get into why.
What’s Actually Causing That Green Horizontal Line?
A green horizontal line on laptop screen usually comes from one of two places. Either something is happening inside Windows, or something is physically wrong with the screen itself.
That is really the whole diagnostic puzzle. Everything else is just details.
On the software side, a graphics driver problem is the most common trigger. Drivers are the small programs that tell your GPU how to talk to the display, translating what Windows wants to show into signals the panel can actually render. When one of these drivers gets corrupted, installs incorrectly, or conflicts with a recent Windows update, it can show up as a colored line instead of a full crash or a black screen. The driver is essentially sending slightly wrong instructions, and that mistake shows up as a visible artifact rather than a total failure.
I have also seen cases where third party software causes the exact same thing. Overlay tools are a big one here. Programs that sit on top of your display to show frame rates, battery stats, or recording controls can sometimes interfere with how the screen renders, especially if they were not built with your specific graphics hardware in mind. I once had a recording tool do something similar on a completely different laptop, and uninstalling it was the entire fix. No driver work needed at all.
On the hardware side, you are usually looking at a loose or damaged ribbon cable connecting the motherboard to the screen, or a failing section of the LCD panel itself. Laptop screens take a lot of quiet abuse over their lifespan. Closing the lid too fast. Tossing the laptop into a bag without much padding. Even normal flexing every single time you open and close the lid, thousands of times over a few years. Eventually something inside gives out, usually right where the cable bends through the hinge.
Here is a rough way to think about it. A line that sits perfectly still and never changes, no matter what you do, is usually a hardware story. A line that flickers, shifts position, or comes and goes depending on what you are doing on screen is more often a software story.
It is not a perfect rule. There are exceptions on both sides. But it is close enough to work as a starting assumption, and it is a far better one than jumping straight to panic.
I have also seen plenty of people jump straight to blaming the graphics card for this, assuming any colored line automatically means a dying GPU. That assumption is not accurate most of the time, and I will walk through exactly why a little further down, because it matters for which fix you try first.
One more thing worth mentioning here. Motherboard level failures causing this specific symptom are rare. Far more often, when people assume motherboard damage, the real cause turns out to be the driver or the cable. The motherboard gets blamed because it sounds like the most serious possible answer, not because the symptoms actually point there.
The 30 Second Screenshot Test (Do This Before Anything Else)
The fastest way to know if a green horizontal line on your laptop screen is software or hardware takes about thirty seconds, and it does not need an external monitor, a technician, or any tool you do not already have sitting on your laptop right now.
Here is what to do. Pull up any screen with a plain background, even your desktop wallpaper works fine, then press the Print Screen key, or open the Snipping Tool if your laptop does not have a dedicated key for it. Take the screenshot, then open the resulting image and look closely at the exact spot where the line usually shows up.
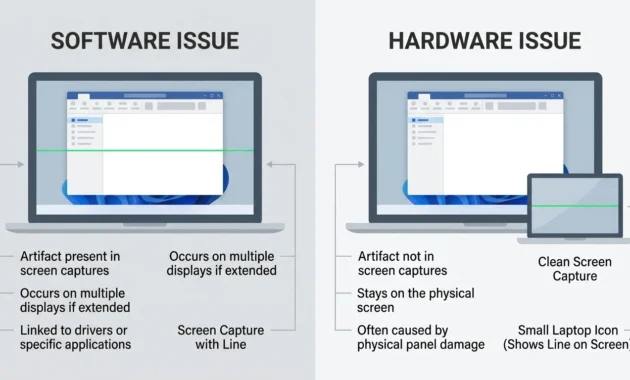
If the line appears in the screenshot, you are dealing with software.
If the line is nowhere to be found in that image, even though you can clearly see it with your own eyes on the actual screen, you are looking at a hardware failure.
This works because of how your screen actually displays an image. A screenshot captures what Windows is sending to the display, essentially a snapshot of the data before that signal ever reaches the physical panel. So if a driver glitch or a software conflict is creating the line, the screenshot captures it too, because the fault already exists in the data itself. But if the fault happens after that point, somewhere inside the cable or inside the panel, the screenshot stays perfectly clean. The image data was correct the whole time. Something physical just failed to display it properly.
I picked this test up from people troubleshooting the exact same issue in a help forum, regular users comparing notes on what worked for them, and honestly, it should be step one in every guide on this topic. Most articles send you straight to driver updates or an external monitor first. Those steps work too, and I cover them next. But this one is faster, it costs nothing, and it rules out an entire category of causes before you touch a single setting or plug in a single cable.
Most people have never heard of this test, even though it takes less time than finding an HDMI cable in a drawer somewhere.
A quick note on doing this properly. Make sure you are looking at a static image when you take the screenshot, not a video or a game running in the background, since motion can sometimes make it harder to spot the line clearly in the captured image. A plain desktop, a blank document, or a solid colored background all work well for this.
If your screenshot test comes back clean and the line really does look like hardware, do not worry. There is still more you can check before assuming the worst, and there are still a few affordable paths forward even if it turns out to be physical.
Still Not Sure? The External Monitor and BIOS Tests
If the screenshot test did not give you a clear answer, or if you just want more confirmation before deciding anything, there are two more checks worth running. Both are free. Neither takes more than five minutes, and together they cover almost every edge case the screenshot test might miss.
The first one is the external monitor test. Grab an HDMI cable, plug your laptop into a TV or a separate monitor, and watch what happens on that second screen.
If the green line shows up on the external screen too, the problem is coming from your graphics card or your driver, not the laptop’s physical display panel. The same faulty signal is being sent to both screens, which means the issue lives upstream, somewhere before the image even leaves your laptop.
If the line disappears the moment you switch to the external screen, that tells you the fault is sitting inside your laptop itself, most likely the panel or the internal cable feeding it. The signal going out to the external monitor is clean. Only your laptop’s own screen is failing to show it correctly.
I like this test because it isolates the GPU completely. Whatever your laptop’s own screen happens to be doing stops mattering the moment you are looking at a different display being fed by the exact same graphics hardware. If the external display is perfectly clean, your GPU is doing its job correctly. The problem has to be somewhere between the GPU and your laptop’s own screen.
That said, this test is not always perfectly conclusive on its own. Sometimes the external display behaves a little differently due to its own settings, or you simply do not have a spare monitor or TV lying around to test with. That is exactly where the second test comes in, and honestly, I think it deserves more attention than most guides give it.
Checking the BIOS Screen
This one settles the argument for good, because BIOS loads before Windows, before any driver, before any piece of software has a chance to touch your display in any way.
Restart your laptop and tap F2 or Delete repeatedly the moment it powers back on. Your exact key depends on the manufacturer. Some Dell models use F2, some HP models use Esc followed by F10, and Lenovo often uses F1 or F2 as well. If one key does not get you into BIOS, the other almost always will.
Once you are looking at the BIOS screen, that blue or gray menu with system information before Windows even starts loading, check the exact spot where the line normally appears.
If the line is there, sitting in a screen that loaded before Windows even started and before any driver had a chance to run, that is about as close to proof as you can get that this is a hardware failure. Nothing software related has executed yet at that point in the boot process. The display is showing raw firmware output with no operating system involved at all.
If the BIOS screen is completely clean, the problem lives somewhere inside your operating system or your graphics driver, and the good news is those are usually fixable without opening the laptop or spending anything at all. This single test alone, combined with the screenshot test from earlier, gives you about as much diagnostic confidence as a repair shop would without actually taking the laptop apart.
I would run these three tests in this exact order. Screenshot first, because it is instant. External monitor second, if the screenshot test was inconclusive or you want a second confirmation. BIOS third, as the tiebreaker if you still are not sure. By the time you finish all three, you will know almost certainly which half of this guide actually applies to you.
How to Fix a Green Horizontal Line on Your Laptop Screen (Free Steps First)
Most green horizontal line fixes do not cost anything at all. Before you consider a repair shop or a screen replacement, there are five things worth trying, in the order I would try them myself.
I am listing these from easiest and most reversible to more involved, because there is no reason to jump straight to the complicated stuff when a thirty second fix might solve it entirely. Work through them in order. Do not skip ahead just because one sounds more technical or more promising. The order matters more than people think.
Roll Back the Driver (Especially If This Started After an Update)
If the line showed up right after your laptop installed an update, whether that was a full Windows update or just a driver update pushed automatically in the background, roll back the driver before you do anything else.
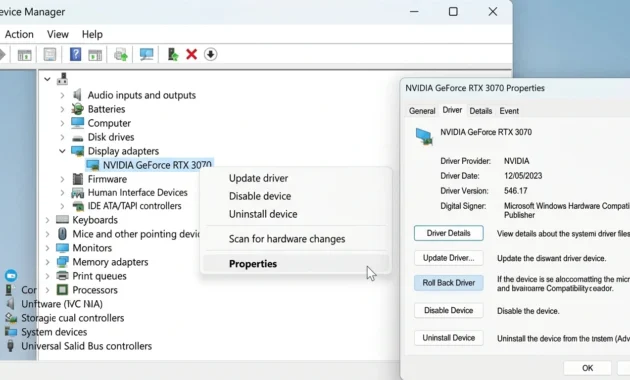
Here is how. Right click the Start button and open Device Manager. Expand the Display adapters section, right click your graphics card, which will show up as something like Intel UHD Graphics, NVIDIA GeForce, or AMD Radeon depending on your laptop, and choose Properties. Click the Driver tab, then look for a button labeled Roll Back Driver.
If that option is available, Windows is telling you it kept a copy of your previous driver version in reserve. Click it, confirm the prompt that follows, and restart your laptop once the rollback finishes.
This works because sometimes the newest driver is not actually the safest one. It sounds backward, and I get why people are skeptical the first time they hear it. But a fresh driver, especially one pushed automatically through Windows Update rather than downloaded directly from the manufacturer, can occasionally conflict with your specific hardware configuration in ways the older, already tested version never did. The new driver was built to work broadly across many devices. Your exact laptop model might just happen to sit in a gap that version does not handle well.
If the Roll Back Driver button is grayed out or missing entirely, that usually means Windows did not keep a previous version to restore, which happens on laptops where the driver has not changed in a while. In that case, move on to the next step instead.
Update the Graphics Driver
If rollback is not available, or if your driver has not been touched in a long time and the line just appeared out of nowhere with no update in sight, go the other direction and update it instead.
Same starting point as before. Device Manager, Display adapters, right click your graphics card. This time choose Update driver, then select Search automatically for drivers.
Let Windows search and install whatever it finds, then restart once it finishes. This fixes a surprising number of display glitches on its own, simply because an outdated driver was never built to handle whatever Windows update or app change happened since the last time you installed it. Software moves forward constantly. A driver sitting untouched for a year or more can easily fall behind what your system now expects from it.
If Windows reports that your driver is already up to date but the line persists, you can also visit the graphics manufacturer’s own website directly, Intel, NVIDIA, or AMD, and download the latest driver manually. Sometimes the manufacturer’s own installer includes a version that has not yet made its way through Windows Update, and manual installation can occasionally resolve what the automatic search missed.
If Windows reports that your driver is already up to date but the line persists, you can also visit the graphics manufacturer’s own website directly, Intel, NVIDIA, or AMD, and download the latest driver manually. For Intel integrated graphics specifically, you can check Intel’s official driver support page to confirm you have the correct version for your exact chip. Sometimes the manufacturer’s own installer includes a version that has not yet made its way through Windows Update, and manual installation can occasionally resolve what the automatic search missed.
Disable and Re-Enable the Display Adapter
This one barely takes ten seconds and almost nobody mentions it, which is honestly surprising given how often it works.
In Device Manager, right click your display adapter under Display adapters and select Disable device. Your screen might flicker, dim, or go briefly black for a moment. That is completely normal and expected.
Then right click the same device again, which should still be visible in the list even while disabled, and choose Enable device.
What you just did is force a soft reset of the entire display session without restarting your whole computer. Think of it as closing and reopening a program that got stuck, except the program in this case is the connection between your operating system and your graphics hardware. Sometimes that alone clears whatever temporary glitch was causing the line in the first place, without needing a full driver reinstall or a complete restart.
I have seen this fix cases where neither rollback nor update made any difference, which tells me the issue was not actually about the driver version itself, just a stuck session that needed a nudge to reset properly.
Reset Your Resolution and Refresh Rate
Go to Settings, then System, then Display, then scroll down to Advanced display settings.
Check that your resolution matches your screen’s native resolution exactly. Laptop screens are built for one specific resolution, and running at anything else forces Windows to scale the image, which can occasionally create rendering artifacts that look suspiciously like hardware damage but are not actually related to any physical fault at all.
While you are in that same menu, try switching your refresh rate to a different supported option, say from 60Hz down to 48Hz, and then back up again. I have seen this clear up line artifacts that nothing else touched, likely because changing the refresh rate forces the display connection to fully reinitialize its signal from scratch, rather than continuing to run whatever glitched state it was stuck in.
This step feels like it should not work. It often does anyway. Display signals are more finicky than people expect, and forcing a reset at this level catches problems that driver level fixes sometimes miss entirely.
Rule Out Malware or Sketchy Display Software
This step gets skipped constantly, and it really should not be, because it is the one cause almost nobody thinks to check.
Think back to anything you installed recently. A new app, a display calibration tool, a free program you downloaded without thinking twice about it, or even a game that came bundled with its own overlay software. Third party software, especially anything that overlays on top of your screen, controls RGB lighting, or messes with display settings in the background, can cause exactly this kind of visual artifact.
Open your list of installed programs through Settings, then Apps, and look for anything unfamiliar near the top of the list, sorted by install date if possible. If something looks out of place, or you genuinely do not remember installing it, uninstall it and restart your laptop to see if the line disappears.
It is not the most common cause compared to a straightforward driver issue. But when none of the driver fixes above made any difference at all, this is usually where the real answer turns out to be hiding.
Did This Start Right After a Windows Update?
Yes, this matters, and it genuinely changes which fix you should try first out of everything covered above.
Windows Update does not just patch your operating system in the background. It can also quietly swap out your graphics driver for a newer version as part of that same update package, and that new version does not always play nicely with your specific laptop’s exact hardware configuration. Microsoft tests these updates broadly across thousands of hardware combinations, but your particular laptop model, especially if it is a few years old or uses a less common chip configuration, can occasionally fall into a gap that testing did not fully catch.
If you noticed the green line appear within a day or two of an update installing, roll back the driver before you try anything else from this guide. Do not update again right afterward, since updating further usually just reinstalls the exact same driver version that caused the problem in the first place. You would essentially be undoing your own fix without realizing it.
If it has been weeks or months since your last update, and the line just appeared out of nowhere with no obvious trigger, go the other direction entirely and update your driver instead, following the steps covered earlier in the fix section.
This is really a timing question more than anything deeply technical. Just updated, roll back. Nothing updated in a while, update forward. That single question, asked before you touch Device Manager at all, saves a lot of wasted effort.
I bring this up as its own separate point because I have genuinely seen people stuck in a frustrating loop, updating their driver over and over expecting a different result each time, not realizing the newest version is the actual source of the problem they are trying to fix. That loop wastes real time for absolutely nothing, and it is one of the more common mistakes I come across when people describe what they already tried before reaching out for help.
This kind of driver regression following a Windows update is not rare, and it is not new either. It shows up often enough across different laptop brands and different driver manufacturers that checking your update history should genuinely be one of the first things you do, right alongside the screenshot test from earlier in this guide.
Don’t Do This: The Mistake That Can Crack Your Screen
Do not press, tap, or flex your laptop screen in an attempt to fix a green line. I know the instinct behind it. It feels similar to jiggling a loose wire back into place, the way you might with a cable that is almost connected but not quite. But a laptop display is not a loose wire, and applying pressure in the wrong spot can do real, permanent damage that no software fix will ever undo.
LCD panels are thin and genuinely fragile by design, built to be as light as possible while fitting inside a laptop lid that is itself only a few millimeters thick. Applying pressure directly over the line will not reseat anything internally the way pushing a cable connector firmly into place sometimes does. What it can actually do is crack the glass layer, damage the delicate circuitry running underneath it, or spread existing damage into something dramatically worse than what you started with.
I have seen this play out before, more than once. A single, perfectly manageable line turns into a dead section of the screen, or in worse cases, a fully broken display that no longer shows anything at all, all because someone pressed directly where it hurt most, hoping it would somehow pop back into place.
If you want to test whether movement affects the line, that is completely fine and actually useful as a diagnostic step. Gently opening and closing the lid at different angles to watch whether the line shifts, flickers, or disappears is a reasonable way to check for a loose internal cable. Pressing directly on the screen’s surface, however, is not the same thing at all, and it carries a risk that is simply not worth taking.
Stick to the screenshot test, the external monitor test, and the BIOS check covered earlier in this guide. Those three tell you exactly what is wrong without putting your display at any additional risk in the process.
When It’s Actually a Hardware Problem
If your tests point clearly toward hardware, you are usually looking at one of two things. A loose or damaged display cable, or a failing LCD panel. Knowing which one you are dealing with matters quite a bit, since the cost and the fix are very different between the two.
These are not the same problem, and they do not call for the same solution, even though both can produce a line that looks nearly identical at first glance.
Loose or Pinched Display Cable
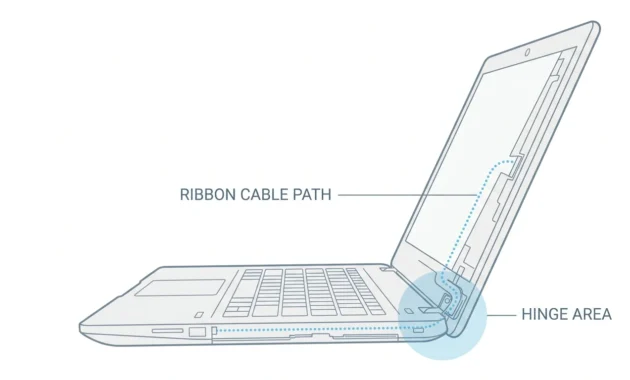
A thin ribbon cable runs from your motherboard, through the laptop’s hinge, and up into the back of the screen itself. That hinge area takes a real beating every single time you open and close the lid, day after day, for years. Over time, the cable running through it can loosen at its connector, fray along its length, or get pinched tightly enough to interfere with the signal passing through it.
Here is the tell that points toward a cable issue specifically. If the line shifts position, flickers, or disappears entirely when you gently open and close the screen or adjust the hinge angle, the cable is the likely culprit rather than the panel itself. A panel level fault stays exactly the same no matter how you move the screen, because the damage is fixed in place. A cable issue often changes with movement, because you are physically affecting the connection as you move the hinge.
A loose cable is often the more affordable fix of the two by a wide margin, since reseating or replacing a cable costs noticeably less than replacing an entire screen assembly. That said, fixing this involves opening the laptop case and working around the hinge mechanism, which is not something every laptop makes easy. If you are not comfortable doing that yourself, a repair technician can usually handle it quickly, often in under an hour depending on the laptop model and how accessible the internal cable routing is.
A Failing LCD Panel
If the line stays exactly the same no matter how you move the screen, tilt the hinge, or apply gentle pressure near the edges, and it shows up identically during the BIOS test from earlier, you are likely dealing with the panel itself rather than anything connecting to it.
This usually happens from age, from a drop or impact at some point in the laptop’s life, or occasionally from a manufacturing defect that slowly worsens over months or years of normal use. There is no software fix for a physically damaged panel, since the fault exists inside the display hardware itself, and reseating a cable will not help if the panel is the actual source of the problem rather than the connection feeding it.
Dell, HP, Lenovo, and Asus laptops all handle screen replacements a little differently in terms of part availability, how easily the panel can be sourced, and how the repair process itself works depending on the specific model line. Checking your exact model number before ordering a replacement panel saves you from buying a part that looks right but does not actually fit your laptop’s connector or mounting setup.
What It Actually Costs to Fix
Here is the part most guides skip entirely, and it is usually the part people actually want to know the moment they suspect this might be a hardware problem rather than something free to fix.
The honest answer is that cost depends entirely on which cause you are actually dealing with, and the range across different outcomes is wide. A software fix costs nothing at all. A cable problem costs some, but noticeably less than a full panel. A full panel replacement costs the most out of everything covered in this guide.
That is the ladder, essentially, running from free at the bottom to expensive at the top. The mistake I see constantly, both in forums and in my own troubleshooting experience, is people skipping straight to the top rung without trying anything below it first, often out of panic rather than any real evidence pointing toward the most expensive outcome.
If a driver rollback or update fixes your line, and for a genuinely large share of cases it does, you just spent zero dollars solving a problem that could have cost you real money if you had assumed the worst and gone straight to a repair shop without testing anything first.
If it turns out to be a loose or damaged cable, that repair sits well below the cost of a full screen, since you are replacing a small, relatively inexpensive internal part rather than the entire display assembly that houses it.
A full LCD panel replacement is the most expensive outcome covered here, and the exact price depends heavily on your laptop’s brand, its screen size, whether it uses a touchscreen panel, and whether you go through an official manufacturer repair center or an independent local shop instead. Official repair centers tend to cost more but use guaranteed compatible parts. Independent shops can often beat that price but vary more in quality depending on where you go.
My advice is simple, and it is the same advice I would give a friend in this exact situation. Try every free fix first, in the order covered earlier in this guide. Only move toward paid repair once you have actually confirmed, through the screenshot, external monitor, and BIOS tests, that the issue is genuinely physical rather than something sitting in software that costs nothing to correct.
The Extreme Fix Almost Nobody Talks About
This one sounds made up the first time you hear it, but it is a real technique some experienced users have tried for a very specific kind of GPU failure that falls outside everything else covered in this guide.
It is called baking the GPU, and it involves carefully heating the graphics chip to reflow the tiny solder connections underneath it that physically attach the chip to the circuit board. When those connections weaken over time, usually from repeated heat cycles built up over years of normal use, tiny cracks can form in the solder itself. That kind of failure can cause exactly the sort of line artifacts covered throughout this guide, even though the cause has nothing to do with the cable or the panel at all.
I want to be clear about something here, because this is not a step I take lightly in recommending. This is not a mainstream repair, and no laptop manufacturer recommends it or supports it in any official capacity. It carries real risk, including the possibility of permanently damaging your laptop beyond what it already was if the process goes wrong at any point.
This fix belongs at the very bottom of the list, reserved specifically for people who are technically confident, who understand the risk involved going in, and who have already ruled out every safer option covered earlier in this guide through actual testing rather than guesswork.
I am including it here anyway because it explains something genuinely interesting about how these display artifacts work. Not every green line traces back to a cable or a panel, even after you have ruled out the obvious software causes. Some trace back to a tiny solder joint failing quietly underneath the graphics chip itself, which is honestly a detail most people never think to consider, and it is part of why “just update your driver” advice does not always work for everyone who tries it.
Pink Lines, Vertical Lines, or a Green Tint, Does It Change Anything?
Not really, and that is good news if your line does not match the exact description in the title of this guide.
A vertical green line on laptop screen points to the same handful of causes as a horizontal one. Driver issues, a loose cable, or a failing panel. The orientation of the line, whether it runs horizontally or vertically across the display, tells you which row or column of the panel is affected on a technical level, but it does not point to a fundamentally different underlying problem than what has been covered throughout this guide.
The same goes for color. If you are seeing a green tint spreading across part of the screen rather than a single clean line, or a mix of pink and green lines appearing together, you are usually still looking at either a signal level issue or a hardware fault located in that same general section of the panel. The color itself depends on which specific part of the display’s internal circuitry is affected, not on a completely separate category of cause you need to research from scratch.
Run the same three tests either way, regardless of what color or orientation your particular line happens to be. Screenshot first, external monitor second, BIOS check third. The diagnostic approach does not change just because the line looks a little different on your screen than the exact scenario described at the top of this article.
Is It Safe to Keep Using a Laptop With a Green Line?
Short term, yes. Long term, it genuinely depends on what is actually causing it underneath the surface.
The line itself will not hurt you, and it will not damage anything else connected to your laptop simply by continuing to appear on screen. It is a visual symptom sitting on top of whatever the real underlying cause happens to be, not an active, spreading danger on its own.
What matters more is what the line is actually telling you about your laptop’s current state. If it is a software glitch, it is genuinely harmless in the meantime and will likely go away entirely once you apply the right fix from earlier in this guide. If it is a hardware fault instead, the real risk is not the line itself, but the possibility that whatever is failing underneath it, whether that is the cable or the panel, could continue getting worse over time rather than staying exactly the same indefinitely.
My honest advice here is straightforward. Keep using your laptop if you need to for work or daily tasks, but back up your important files sooner rather than later regardless of what you suspect the cause to be. That way, even if a hardware issue does progress further down the line, you are not caught off guard trying to recover files from a screen that has stopped working entirely.
A green horizontal line on laptop screen rarely means your laptop is finished for good. More often, it is a fixable annoyance with a clear, testable path toward a solution, and now you genuinely know exactly how to find that path for yourself without guessing or spending money before you need to.
Run the screenshot test first, since it takes the least effort and rules out the most. Check the external monitor and BIOS screen next if you need more confirmation either way. Try the free driver fixes before anything else, working through them in the order covered earlier. And if it really does come down to a cable or a panel after all that testing, you now know what to expect going forward and roughly where the eventual cost lands depending on which one it turns out to be.
If the underlying hardware issue does get worse over time rather than staying the same, it’s worth knowing what the next warning signs usually look like. I’ve covered what to check if your laptop won’t turn on in a separate guide, which walks through the difference between a dead battery, a power issue, and something more serious.
Frequently Asked Questions
Can I fix a green line on my laptop screen myself?
Yes, if the screenshot test, external monitor test, or BIOS check points to software rather than hardware. Most software causes clear up with a driver rollback, a driver update, or a simple disable and re-enable reset, none of which cost anything or require opening your laptop at all.
Is it safe to use a laptop with a green line on the screen?
Generally yes in the short term. The line itself will not cause additional damage on its own, but if it traces back to a hardware issue underneath it, backing up your data is a smart precaution in case the underlying problem gets worse over time rather than staying the same.
Why does my laptop have a green line after a Windows update?
Windows Update sometimes installs a new graphics driver version that does not fully agree with your laptop’s specific hardware configuration. Rolling back to the previous driver version, rather than updating again right afterward, usually clears this up without needing anything further.
Is a green line the same thing as a dead pixel?
No. A dead pixel is a single tiny point on the screen, often barely noticeable unless you know exactly where to look. A line means an entire row or column of the display has failed together, which usually points to a connection issue inside the panel rather than one isolated pixel defect sitting on its own.
Does a green line always mean my graphics card is dying?
No, and this is one of the most common assumptions people make the moment they see one. A single line that never moves is far more often a cable or panel issue rather than anything related to the graphics card itself. Graphics card problems tend to show up as flickering, shifting, or more chaotic visual artifacts instead, often visible even in the BIOS screen before Windows has loaded at all.
Will pressing on the screen fix a green line?
No. Never apply direct pressure to your laptop screen in an attempt to fix a line. Doing so risks cracking the panel or spreading existing damage further, turning a manageable, fixable issue into a much bigger and more expensive one.