

What That Black Spot on Your Laptop Screen Actually Is
You noticed something on your screen, and your first instinct was probably panic. I get it. But here is the thing most guides will not tell you upfront: a black spot on a laptop screen is not one problem. It is one of four completely different problems, and each one has a different cause, a different appearance, and a different fix pathway. Treating them all the same way is exactly why most DIY attempts either fail or make things worse.
The four types are dead pixels, stuck pixels, pressure damage, and trapped dust or debris. Backlight failure is a fifth possibility, but that one tends to show up as a shadow creeping in from the screen edge rather than a spot in the middle.
Here is what most articles get wrong from the start: they use the term “dead pixel” to describe every black spot on laptop screen. That is not accurate. A dead pixel is one specific type of failure with one specific cause. Calling everything a dead pixel leads readers to the wrong fix every time.
The shape, size, and edge quality of your spot are your first diagnostic clues. A tiny clean square dot points to one type. A color-tinted dot points to another. A soft-edged blotch that looks like a bruise points to something else entirely. And a shadow starting at the edge of the screen is a backlight issue, not a pixel issue at all.
Research suggests the majority of black spots indicate permanent physical damage to the display matrix. But here is the counterintuitive part: a small number of spots can be resolved at home, for free, in minutes. The diagnostic section below is what tells you which category you are in.
Modern laptops are built with thinner and lighter panels than ever before. That makes them more susceptible to damage from surprisingly small amounts of force. So these spots are more common now than most people expect, and they are not always caused by something obvious.
Read the diagnostic section before you try anything. That is the difference between fixing it and making it permanent.
Why Black Spots Appear on Your Laptop Screen
Most people want to know why the spot appeared before they try to fix it. That makes sense. And the honest answer is that the cause tells you almost everything about whether a fix is even possible.
Dead Pixels — When the Transistor Burns Out
A dead pixel happens when the transistor controlling that pixel completely fails. Think of it like a burned-out light bulb. When the bulb burns out, no amount of flipping the switch will bring it back. The circuit is gone. The same thing happens in an LCD panel—when the transistor driving a cluster of pixels fails, that area turns completely black and stays that way.
Dead pixels always look pure black. The edges are clean and square. The spot does not shift, change color, or respond to anything. It is the same on a white background as it is on a dark one.
Software cannot fix a dead pixel. Pressure cannot fix it. The transistor is gone. Panel replacement is the only real solution.
Stuck Pixels — Frozen But Not Dead
A stuck pixel still receives power. The problem is that the pixel is frozen on a single color and cannot update. That color is usually red, green, blue, or white depending on which sub-pixel is stuck.
This is the one type where a free fix has a realistic chance of working. Stuck pixels respond to rapid color cycling because the electrical stimulation can sometimes shake the pixel loose from its frozen state. A dead pixel cannot respond to that same treatment at all because there is no active circuit to stimulate.
The visual difference matters here. A stuck pixel often appears as a bright-colored dot, not a black one. If your spot has any color to it at all, a stuck pixel is worth investigating before anything else.
Pressure Damage — What Happens Inside the LCD Layer
Pressure damage is the most common cause of the soft-edged, irregular dark blotches that people find on their screens. When physical force is applied to an LCD panel, the liquid crystal layer gets crushed. The liquid crystals in that area can no longer orient themselves properly to control light, which creates a dark patch that cannot be reversed at the spot level.
HP’s official guidance is explicit that physical pressure on the screen can create permanent dark spots in the LCD layer. HP’s pixel policy for warranty claims is based on defective dot thresholds consistent with industry standards, which means a single dead pixel typically does not qualify for a free replacement. If your HP screen is showing no display at all rather than a visible spot, that is a different problem entirely and worth reading about separately. I have covered the full diagnostic and fix process for that in my guide on how to fix an HP laptop black screen.
The most common cause is closing the laptop lid over a pen, pair of earbuds, or any small object left on the keyboard. One small object. One firm lid closed. That is enough.
On modern ultra-thin laptops, even lighter force than you might expect can cause this. Some MacBook users have reported black spots forming from keyboard pressure alone when the laptop was packed tightly in a bag. That is how little force some of these panels can take.
Pressure damage produces blotches, not clean squares. The edges are irregular and bruise-like. And unlike stuck pixels, pressure damage does not respond to software or gentle stimulation. It spreads if you apply more pressure.
Trapped Dust or Debris — The One You Might Fix for Free
Dust or debris trapped between the panel and the outer glass layer can look remarkably similar to a dead pixel, especially in photos. But there is a key visual tell: the spot appears to sit slightly above the pixel layer, and when you tilt the screen at different angles, the spot’s position shifts ever so slightly.
A genuine pixel defect is locked to one exact location on the screen. It does not move with the viewing angle. Dust does.
This is the type most likely to yield to cleaning, and it is also the one most commonly misidentified as something more serious.
Diagnose Your Spot Before You Try Anything—Here’s How
The most important section of this article is this one. Every competitor I have looked at jumps straight to fixes without telling you what type of spot you have. That is how people end up wasting an hour running pixel-fixing software on a dead pixel or pressing on pressure damage and turning a small spot into a large blotch.
Run these four tests in order. By the end, you will know exactly what you are dealing with.
Test 1 — The Tilt Test (Rules Out Dust in 10 Seconds)
Turn the laptop off and hold the screen up to a bright light source. Slowly tilt the screen at different angles while watching the spot.
If the spot’s position shifts slightly as you change the viewing angle, you have debris between the panel layers, not a pixel defect. If the spot stays locked to the exact same location regardless of angle, the problem is in the panel itself.
This test takes ten seconds and costs nothing. It also determines whether cleaning is a viable first step. If the spot moves, go to Fix 1. If the spot is fixed in place, continue to the next test.
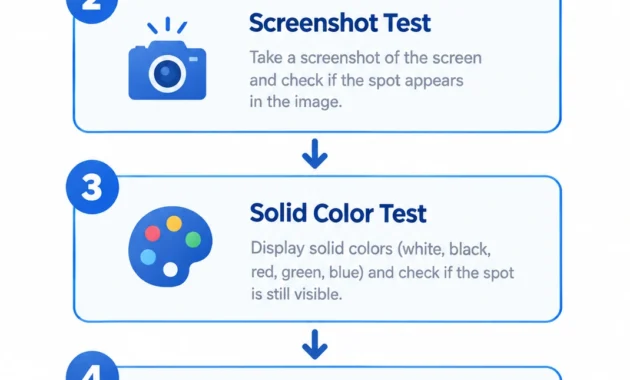
Test 2 — The Screenshot Test (Rules Out Software)
Take a screenshot of your screen. Any method works: the print screen key on Windows or Command + Shift + 3 on Mac. Open the image file and look at the spot location.
If the black spot appears in the screenshot file, the problem is in your software or graphics driver, not the physical screen. Update or roll back your graphics driver before doing anything else.
If the spot does not appear in the screenshot file, the problem is confirmed hardware. Software fixes will not help, and you can skip straight to the physical tests.
This test catches a surprising number of cases that are actually driver-related display issues rather than panel damage. It is worth doing before anything else on the hardware side.
Test 3—The Solid Color Background Test (Dead vs. Stuck)
Open a browser window and display a full-screen solid-color image. White first, then black, then red, then green, then blue. Watch the spot through each color.
If the spot stays pure black on every single color, you have a dead pixel. The transistor is gone, and no fix will change it.
If the spot shows a consistent color on some backgrounds or appears to change slightly, you have a stuck pixel. This is the type worth treating with software tools.
If the spot is a soft-edged, irregular blob that looks the same regardless of background color, pressure damage is the most likely cause.
This test sequence comes directly from repair technicians, and it is the most reliable way to separate dead pixels from stuck pixels without any equipment.
Test 4 — The External Monitor Test (Screen vs. GPU)
Connect the laptop to an external monitor or TV using an HDMI cable. Mirror the display and look for the spot on the external screen.
If the spot is absent on the external monitor, the laptop’s internal display panel is confirmed faulty. The GPU and motherboard are fine. A screen replacement will fix it.
If the same spot appears on the external monitor too, the problem is coming from the GPU or graphics circuit, not the panel itself. Replacing the screen in that case will not fix anything. The repair pathway is completely different.
This test is the one that prevents people from paying for the wrong repair.
The 10-Second Dell Self-Test (Dell Owners Only)
If you have a Dell laptop, hold the D key while pressing the power button. The screen will cycle through a series of solid colors as part of Dell’s built-in LCD self-test.
If the black spot appears during this built-in test sequence, the panel is definitively faulty. No driver update or software fix will resolve it. Dell’s own hardware has confirmed the panel problem. Take that result to your repair shop or warranty claim with confidence.
How to Fix a Black Spot on Your Laptop Screen: 5 Safe Methods
Now that you know what type of spot you have, you can go directly to the fix that actually applies to your situation. Every method below is labelled so you know before reading whether it is relevant to your case.
The goal of fixing a black spot on a laptop screen depends entirely on identifying the right method for the right problem type. Running the wrong fix on the wrong spot type wastes time at best and causes permanent damage at worst.
Fix 1 — Clean the Screen Properly (Works On: Dust and Surface Dirt)
If your tilt test suggested dust or debris, start here. This is the safest possible first step.
Turn the laptop completely off. Let the screen go dark. Grab a clean, dry microfiber cloth and wipe the screen in gentle circular motions around the affected area. Use light pressure. Do not press into the spot.
If that does not shift anything, dampen the corner of the microfiber cloth with a small amount of distilled water. The cloth should be barely damp, not wet. Wipe again with the same gentle circular motion.
Never spray any liquid directly onto the screen. Liquid can seep into the panel edges and cause far worse damage than the original spot. And never use household glass cleaners. These products strip the anti-glare coating on most modern laptop screens, and the damage from that is permanent and cosmetic.
After cleaning, turn the screen back on and check whether the spot has moved or disappeared. If it has shifted even slightly, you are dealing with debris and additional gentle cleaning sessions may clear it completely.
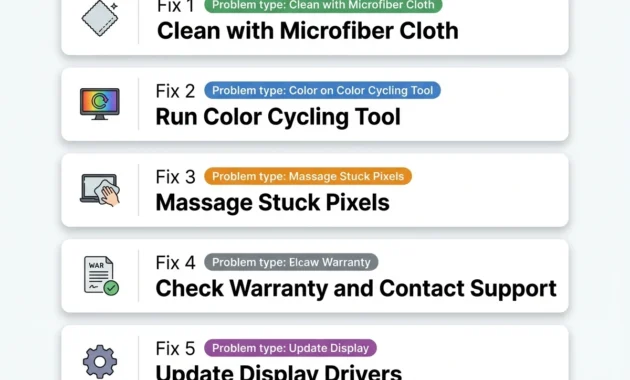
Fix 2 — Run a Pixel Fixer Tool (Works On: Stuck Pixels Only)
Before I explain how to do this, one important clarification: pixel fixer tools have zero effect on dead pixels. A dead pixel has no active circuit. Rapid colour stimulation cannot wake up a transistor that has permanently failed. If your solid colour test confirmed a dead pixel, you can skip this fix entirely.
But for stuck pixels, this method is genuinely worth trying and costs nothing.
Open a browser and go to jscreenfix.com. The tool runs entirely in the browser with no installation needed. A window of rapidly cycling colours will appear on screen. Drag that window directly over the area where the stuck pixel is located. Leave it running for 20 to 30 minutes without disturbing the laptop.
JScreenFix claims a success rate of around 60 percent for stuck pixels based on vendor data. That is not a guarantee, but it is a meaningful chance for something that takes no effort and costs nothing. Stubborn pixels sometimes need two or three sessions over consecutive days.
An alternative tool is available at flexcode.org/lcd2.html if you prefer a second option.
If the pixel has not responded after three sessions, it is unlikely to respond at all. At that point the stuck pixel is effectively permanent and panel replacement becomes the relevant option.
Fix 3 — The Gentle Physical Method (Works On: Stuck Pixels — With Serious Caveats)
Read the next section of this article before attempting this fix. Then come back.
Still here? Then you understand the risk. This method carries real potential for making the problem worse on modern thin panels, so try Fix 2 first and only come to this if software stimulation has not worked after multiple sessions.
Turn off the display completely. Keep the screen in an upright, vertical position throughout this process. Do not lay the laptop flat with the screen facing up. The pressure dynamics change completely when the screen is horizontal, and the risk of spreading damage increases.
Wrap a pencil eraser in a clean microfiber cloth. Use the cloth as a buffer between the eraser and the screen so you never touch the screen with bare rubber.
Apply the absolute minimum pressure needed to make contact with the screen surface. Then push the stuck pixel toward the nearest screen edge using small, slow circular motions. The goal is not to press hard. The goal is to encourage the frozen liquid crystal to release and move toward the bezel where it does not affect the display.
Work for five to ten minutes per session. Stop completely if you see the spot growing in any direction. That is a sign that the underlying issue is not a stuck pixel but pressure damage, and continuing will make it significantly worse.
Small stray lines or sub-pixel bleeds sometimes appear near the spot during this process. These are a normal side effect. Push those toward the nearest screen edge as well using the same gentle technique.
Fix 4 — Check Your Warranty and Purchase Protection
Before paying a single dollar for a repair, check whether the laptop is still under manufacturer warranty. This takes about two minutes and can save several hundred dollars.
HP warranty status: hp.com/go/productwarranty
Dell warranty status: dell.com/support using the Service Tag on the bottom of the laptop
Lenovo warranty status: pcsupport.lenovo.com/us/en/warrantylookup
One thing most people do not know: many premium credit cards include purchase protection or extended warranty coverage for electronics bought within the last one to two years. Check the benefits guide for the card you used to buy the laptop. This coverage is separate from the manufacturer warranty and many people have it without realising.
One honest note: pressure damage from a physical cause is almost always classified as user damage by manufacturers. Standard warranty coverage typically does not apply. But manufacturing defects may qualify depending on the pixel count and your model’s specific policy. It is always worth checking before assuming the cost is yours to bear.
Fix 5 — Update or Reinstall Your Graphics Driver (Works On: Software-Caused Display Issues)
If your screenshot test suggested a software cause, or if the spot appeared after a Windows update rather than after any physical event, a graphics driver issue may be the culprit.
On Windows, go to Device Manager by right-clicking the Start button. Find Display Adapters and expand the list. Right-click your display adapter and choose either Update Driver or Roll Back Driver if the spot appeared immediately after an update.
If the spot disappears after a driver change, the cause was software all along. The physical screen is fine.
If the spot still appears when the laptop is in BIOS before Windows even loads, it is confirmed hardware. No driver update will touch it and you can skip this step entirely. Microsoft recommends this driver troubleshooting step specifically for display issues that appeared after a system update rather than after physical damage.
Stop — Read This Before You Try the Pressure Method
Repair shops see this regularly: a laptop comes in with a small black spot, maybe the size of a grain of rice. Around it is a blotch the size of a hand. The customer tried pressing on it. They thought they were being gentle.
The damage from that well-intentioned pressing is almost always permanent and significantly larger than the original problem.
Modern laptop panels are thinner than any previous generation of screens. That thin design is what makes today’s laptops light and portable, but it also means the liquid crystal layer requires far less force to crush than older, thicker panels did. Advice about pressing on black spots originated years ago when displays were built with more tolerance for physical contact. That same advice applied to today’s panels can turn a small spot into something that covers a visible area of the screen.
Dell states in its official documentation that pressing on the screen can damage the display and may void the warranty. Dave’s Computers, a repair shop with documented experience in panel repairs, notes that pressure applied by customers attempting home fixes regularly results in panels arriving with damage that is significantly larger than what the customer started with.
Even when a physical technique produces a temporary improvement, the result often reverts within hours or days. The liquid crystal may shift briefly but without the underlying cause being addressed, the spot returns.
The balanced view: Lenovo does acknowledge a gentle pressure technique for single stuck pixels as a last resort after software methods have failed. But that guidance applies narrowly to stuck pixels confirmed through proper diagnosis, not to dead pixels or pressure damage where any additional pressure accelerates harm.
Try Fix 2 before Fix 3. Every time. If software stimulation does not work after three sessions, then consider the physical approach with full awareness of the risk it carries on modern thin panel designs.
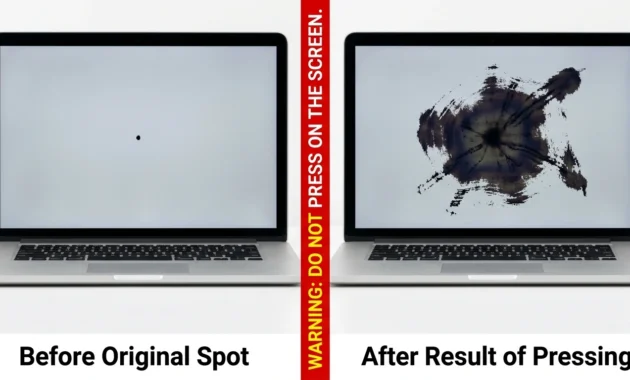
Is Your Black Spot Spreading? This Is What It Means
A spreading black spot is a different situation entirely from a spot that has been fixed in one location since you first noticed it.
If your spot has an ink-blot appearance with irregular edges, and if the spot has grown since you first saw it, what you are looking at is almost certainly a cracked internal LCD layer with leaking liquid crystal. The liquid crystal that was contained between the layers of the panel is now spreading through the crack. Light hits the leaked crystal differently than contained crystal, which produces both the dark appearance and sometimes rainbow-coloured halos around the edges of the blotch.
HP’s official guidance specifically notes that damaged displays can show black spots that may increase in size over time. This is the scenario HP is describing.
DIY methods cannot stop this. There is no technique that reverses liquid crystal leakage or repairs a cracked internal layer. Every intervention, whether pressing, rubbing, or applying heat, risks accelerating the spread. The panel needs replacement.
One thing to watch for: when a stuck pixel is being treated with the gentle physical method in Fix 3, small stray lines or sub-pixel bleeds can appear near the treated spot. These look alarming but they are a normal side effect of the technique, not spreading damage. The way to tell the difference is direction and speed. Treatment side effects appear quickly during the session and respond to being pushed toward the screen edge. Genuine spreading damage grows on its own over days, has no clear boundaries, and does not respond to directional pressure.
If your spot is growing on its own without any treatment being applied, stop attempting fixes and get a professional repair assessment. The longer a cracked LCD panel goes without replacement, the larger the damaged area becomes.
Does Your Warranty Cover a Black Spot? The Answer Might Surprise You
Most people assume that any defect on a screen qualifies for a free warranty replacement. The reality is more complicated and most manufacturers are quite specific about what does and does not qualify.
Most people contact manufacturer support expecting a free replacement and walk away confused and frustrated when the claim is denied. The reason it gets denied almost every time comes down to one international standard that most laptop owners have never heard of and manufacturers never volunteer to explain upfront.
The standard governing display quality for LCD screens is ISO 13406-2. Under the Class II category of this standard, manufacturers are permitted to ship displays with up to 17 faulty dots before a screen is considered defective for warranty replacement purposes. Fujitsu’s official documentation on the standard states it plainly: production techniques today cannot guarantee an absolutely fault-free display. That sentence is not a disclaimer buried in fine print. It is the foundation of why one dead pixel almost never qualifies for a free screen replacement. If you want to read the full standard details for yourself, the ISO organisation publishes information on display quality classifications and your laptop manufacturer’s support page will list the specific pixel policy for your model. HP for example publishes its pixel defect policy directly on its support site and the threshold numbers are worth checking before you call support expecting a replacement.
What this means in practical terms is that a single black spot on your screen sits well below the threshold that triggers a warranty obligation for most manufacturers. The defect count would need to reach a specific number across different pixel fault categories before a replacement is owed. For most people reading this article with one or two spots, the support call will end with a no. Knowing that before you call saves time and sets realistic expectations for what comes next.
Most major laptop manufacturers including HP, Dell, and Lenovo base their pixel defect policies on variations of this standard. Specific thresholds vary by model and product tier, and manufacturers occasionally update their policies, so checking the current policy for your specific model on the manufacturer’s support page is the most reliable approach.
Pressure damage is in a different category entirely. Standard manufacturer warranties almost universally classify physical pressure marks, whether from keyboard contact, backpack compression, or objects placed on a closed lid, as user damage. User damage voids standard warranty coverage and shifts the full repair cost to the consumer. This includes spots caused by closing the lid over a pen or earbuds. The warranty tightening around pressure damage has become more consistent across brands over the past few years.
There is one practical step worth taking before calling support: check the card you used to purchase the laptop for purchase protection benefits. Many premium credit cards extend coverage for hardware damage in the first one to two years after purchase. This is separate from the manufacturer warranty and it applies even when the manufacturer declines a claim.
Black Spots on HP, Dell, Lenovo, and MacBook: Brand-Specific Help
The core cause of a black spot is the same regardless of brand. But each manufacturer has a different diagnostic tool, a different warranty policy, and sometimes a different repair pathway worth knowing about.
Black Spots on HP Laptop Screens
HP’s official guidance is explicit that physical pressure on the screen can create permanent dark spots in the LCD layer. HP’s pixel policy for warranty claims is based on defective dot thresholds consistent with industry standards, which means a single dead pixel typically does not qualify for a free replacement.
Check your HP warranty status at hp.com/go/productwarranty using the serial number on the bottom of the laptop. For recently purchased HP machines, HP Support Assistant in Windows can pull warranty information automatically.
If your HP laptop developed a spot from keyboard pressure or a bag collision, be prepared for the warranty claim to be declined as user damage. That does not mean repair is not available, just that it will likely come at your cost.
Black Spots on Dell Laptop Screens
Dell owners have access to a built-in hardware test that takes ten seconds and gives a definitive answer. Hold the D key while pressing the power button. The screen cycles through solid colours. If the black spot appears during this test, the panel is confirmed faulty at the hardware level. No driver update, no software fix. The panel needs replacement.
Dell’s official guidance also states that pressing on the screen can damage the display and may void the warranty. Run the D-key test first. Then check warranty status at dell.com/support using the Service Tag printed on the bottom of the laptop.
Black Spots on Lenovo Laptop Screens
Lenovo’s recommended sequence is to power cycle first, then check for software or driver issues, and then contact support for a warranty assessment. For Lenovo laptops showing a black spot that appeared without any physical impact, this sequence is worth following before assuming hardware replacement is necessary.
Lenovo’s defective pixel policy varies by product line. ThinkPad models have historically had different pixel tolerance policies than consumer IdeaPad lines. Check the current policy for your specific Lenovo model at pcsupport.lenovo.com.
Black Spots on MacBook Screens
MacBook screens behave the same as other LCD panels when it comes to dead pixels and pressure damage. But the repair cost situation is different from Windows laptops in a significant way.
Screen repairs through Apple’s service centre can range from several hundred dollars to over a thousand dollars depending on the model and whether you have AppleCare+. Third-party repair shops with genuine Apple panels typically come in lower, but the cost is still notably higher than a comparable Windows laptop repair. It is worth getting a third-party quote before committing to an Apple service centre repair.
Apple’s newer MacBook models are beginning to transition toward OLED displays. Black spot behaviour on OLED panels can differ from LCD in appearance and origin, so note what display type your MacBook uses before applying LCD-specific diagnostics.
Run Apple Diagnostics by restarting the MacBook while holding the D key. This built-in hardware test can confirm whether the spot is a display hardware issue rather than a software rendering problem.
Black Spots on Windows 10 — Display Driver Troubleshooting
If a black spot appeared on a Windows 10 laptop shortly after a system update and the spot does not appear in BIOS before Windows loads, a driver issue is worth investigating before assuming hardware failure.
Open Device Manager by right-clicking the Start button. Expand Display Adapters. Right-click the display adapter and choose Roll Back Driver if the option is available, or Update Driver to pull the latest version. Restart the laptop after the change and check whether the spot is still present.
If the spot disappears after the driver change, the cause was software and the physical screen is undamaged. If the spot remains even in BIOS, the screen itself is the problem and driver changes will not help.
Repair or Replace? How to Make the Right Call
Once you have confirmed that professional repair is the path forward, the next question is whether to repair the current laptop or replace it entirely. This is a financial decision and the numbers matter.
Screen replacement on most Windows laptops runs between approximately $135 and $250 for parts and labour at a reputable repair shop. MacBook screen repairs through third-party shops typically run from around $220 to $730 depending on the model, while Apple’s own service centre often comes in higher. Those numbers vary by region and by the specific panel required for your model.
For comparison, screen repair typically costs significantly less than buying a new laptop with comparable specs. When a functional laptop needs only a screen replacement, repair almost always makes more financial sense than replacement.
The decision framework I use is straightforward: if the laptop is under four or five years old, functions well in every other way, and the repair cost is below roughly 50 percent of the laptop’s current market value, repair is the right call. If the laptop is old, slow, has other failing components, or the repair cost approaches half of what a replacement would cost, replacement becomes worth considering.
One important detail when getting a repair quote: ask specifically for a model-matched panel. Generic replacement panels can cause issues with fitting, connector compatibility, or colour accuracy. Panel matching to your exact model is the professional standard for quality repairs in 2024 and beyond. A good repair shop will confirm the panel match before ordering parts and should offer at least a 90-day warranty on the repair.
How to Replace the Screen Yourself (If You’re Confident)
For out-of-warranty laptops where a professional repair quote is higher than you want to spend, DIY panel replacement is a real option for technically confident people.
Start with the external monitor test to confirm the panel is the problem and the GPU is fine. Then find the exact replacement panel by looking at the sticker on the back of the current screen after removing the bezel. That sticker contains the panel model number you need to order the correct replacement.
The bezel on most laptops pops off from the inside edge, not the outside. Starting pry attempts from the outside edge risks cracking the bezel frame. Starting from the inside edge is safer. Work slowly around the perimeter.
Once the new panel is installed but before you close the bezel back down, connect the laptop to power and boot from a Ubuntu live USB drive to test the new display. This lets you confirm the panel works correctly before the case is fully reassembled. Finding a problem at that stage saves you from opening it back up again.
This approach is most appropriate for laptops that are already out of warranty and where a professional repair quote exceeds the combined cost of the panel and your time.
How to Prevent Black Spots Before They Happen
The single most important prevention habit costs nothing and takes ten seconds: check the keyboard before closing the lid. Every time. A pen, a pair of earbuds, a USB drive, a charging cable. Anything left on the keyboard that gets caught between the keyboard and screen when the lid closes applies direct pressure to the panel. That one habit is behind more permanent black spots than any other single cause.
When the laptop goes into a bag, use a padded laptop sleeve. The sleeve is not just about the screen. A book corner or a charger brick pressing against the outside of the lid during transport applies the same type of pressure that objects on the keyboard create. Repair shops consistently see pressure damage that originated in transit.
Never stack objects on top of a closed laptop. The lid is not designed to bear weight. Even a textbook set on top for a few hours can be enough to damage thin panels on modern laptops.
For cleaning, always use a dry microfiber cloth as the first step and distilled water as the only liquid if needed. Household glass cleaners destroy the anti-glare coating on most modern laptop screens and can allow liquid to seep into the panel edges. The coating damage is cosmetic and permanent. The liquid damage can be far worse.
Temperature extremes are worth mentioning too. Leaving a laptop in a cold car and then opening it in a warm room causes condensation. That moisture finding its way into the panel edges is a slow cause of spot formation that most people never connect back to the temperature event.
The financial argument for these habits is direct. When pressure damage voids warranty coverage, the out-of-pocket repair cost starts at around $135 and can run significantly higher depending on the model. Every one of these prevention habits costs nothing. The alternative can cost several hundred dollars and weeks without a laptop.
Frequently Asked Questions
Can a black spot on a laptop screen be fixed without replacing the screen?
It depends entirely on the type of spot. Dust can sometimes be removed with careful cleaning. Stuck pixels can sometimes be resolved using a free browser tool like JScreenFix with no screen replacement needed. Dead pixels and pressure damage are physically permanent at the panel level and require screen replacement to resolve. Running the diagnostic tests in this article before attempting any fix is the step that determines which path applies to your situation.
How do I know if my black spot is permanent?
Run the solid colour background test by displaying full-screen white, red, green, blue, and black backgrounds one at a time. If the spot stays pure black on every single colour, it is a dead pixel and permanent. If the spot shows any colour variation or shifts slightly with the viewing angle, a stuck pixel or debris is possible and worth treating first. A soft-edged blotch that appeared after physical contact is pressure damage and also permanent.
How do I remove black spots from my laptop screen permanently?
Permanent removal at home is only possible for stuck pixels, where software tools like JScreenFix report around a 60 percent success rate based on vendor data, and for trapped dust, where careful cleaning sometimes resolves the spot completely. Dead pixels and pressure damage are physically permanent conditions. The only true permanent resolution for those types is replacing the display panel, which removes the faulty hardware entirely.
Why did a black spot appear on my laptop screen after I dropped it?
A drop or physical impact can crack the internal LCD layer or crush the liquid crystal matrix in the affected area. This type of damage is permanent and will not improve on its own. Applying pressure to the spot after a drop will spread the damage further. Run the external monitor test to confirm the problem is in the panel rather than the GPU, and then get a professional repair quote. Continuing to use the laptop with a cracked LCD layer typically results in the damaged area growing over time.
Does my laptop warranty cover a black spot on the screen?
It depends on the cause. Manufacturing defects involving dead pixels may be covered, but most manufacturers follow standards similar to ISO 13406-2 which allow multiple defective pixels before a warranty replacement is required. A single dead pixel almost never qualifies for a free replacement on its own. Pressure damage is almost universally classified as user damage under standard manufacturer warranties, which means the repair cost typically falls to the consumer. Check your model’s specific warranty policy on the manufacturer’s support page and also check the purchase protection benefits on the credit card used to buy the laptop before assuming the cost is entirely yours.