
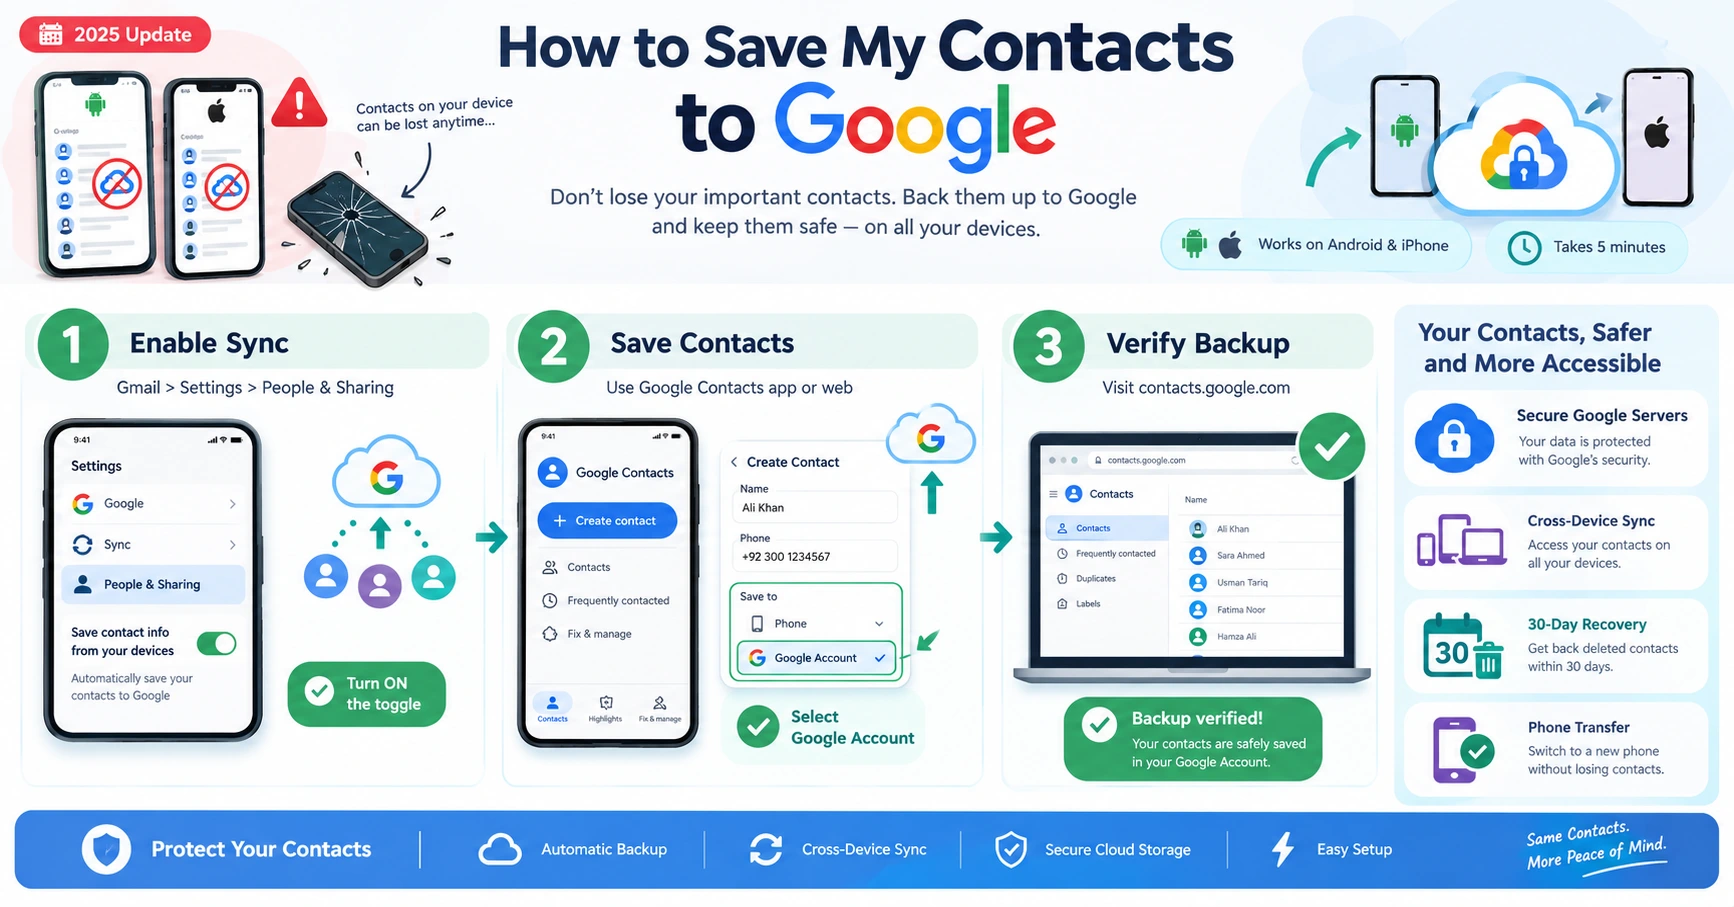
Your phone stores contacts in multiple places, and most people don’t realize this creates a serious problem. One storage location backs up automatically to the cloud. The other one doesn’t. If your contacts end up in the wrong place, switching phones or experiencing device damage means losing them forever with zero recovery options.
I learned this the hard way years ago. I switched to a new phone and assumed my hundreds of contacts would transfer automatically. They didn’t. I’d been saving everything to “Phone” storage without understanding the distinction, and none of it synced to Google. No backup. No cloud storage. Just gone. Completely unrecoverable.
That’s the situation that brings people searching for solutions. Your contacts feel safe sitting in your Contacts app. They’re right there on your screen. But they’re not actually protected. They live only on that one physical device. If your phone gets lost, stolen, water damaged, or you accidentally factory reset it, those contacts vanish completely with no way to bring them back.
Understanding Where Your Contacts Actually Live
When you save a contact to your phone’s storage, it stays on that physical device only. It doesn’t sync anywhere. It doesn’t back up to the cloud. It doesn’t transfer to a new phone automatically. The contact exists in one place and one place only: that specific phone sitting in your hand. This is fundamentally different from a contact saved to your Google Account or Apple ID.
Those cloud-based contacts live on secure servers managed by Google or Apple. They sync across every device you own. They’re protected by automatic backup systems. They transfer seamlessly when you sign into a new phone. But here’s what most people don’t understand: your phone doesn’t automatically save contacts to the cloud by default. You have to actively choose the cloud storage location when creating each contact, or enable a backup feature. Most users don’t know this happens. They assume all contacts work the same way. They don’t.
The moment you get a new phone and sign in with your account, here’s what actually happens: contacts saved to your cloud account appear automatically. Contacts saved to “Phone” storage? They stay on the old phone. They don’t transfer. They don’t sync. They’re stuck on the device you’re no longer using. I see this happen constantly. Someone gets a new device, signs in, and realizes half their contacts are missing. They panic. They search desperately for recovery options. And usually by then, it’s too late. The old phone is gone or has been reset.
This is completely preventable. But it requires understanding exactly where your contacts live right now and taking the right actions to protect them.
The Real Risk of Losing Your Contacts
Contacts stored only on your device face three specific risks that most people never consider. First, they disappear completely if you lose or damage the phone. There’s no recovery possible. No cloud backup to restore from. No way to get them back. Second, they don’t transfer when you upgrade to a new device. You have to manually move them or lose them entirely. Third, they’re vulnerable to software issues like accidental factory resets that wipe everything on the phone. One wrong tap during troubleshooting and years of contact information is gone.
This is exactly why technology experts recommend moving to cloud backup immediately. It solves all three of these problems at once. Your contacts live on secure servers managed by Google or Apple. They sync automatically across your devices. They’re protected by backup and recovery systems. And you don’t have to do anything after the initial setup.
The process takes minutes. And I’ll walk you through every single step for both Android and iPhone users.
Method 1: Turn On Automatic Contact Sync on Android
This is the single easiest way to protect your Android contacts. You enable one toggle in your settings. After that, your phone backs up every contact automatically. No maintenance. No remembering to export files. Set it once and your contacts are protected forever.
I recommend this method to everyone because it takes three minutes and prevents ninety-five percent of contact loss problems completely. Here’s exactly how to do it.
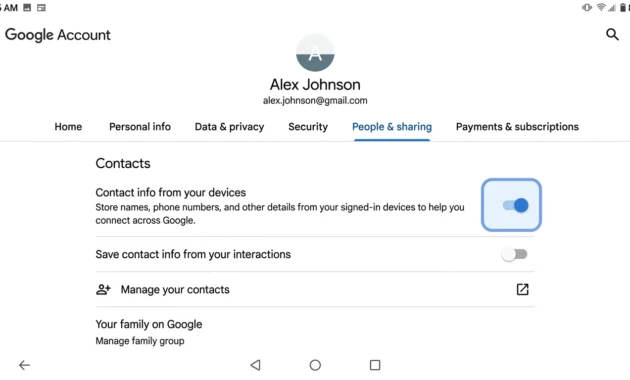
Start by opening the Gmail app on your phone. I want to emphasize that this is the Gmail app specifically, not just your email settings. Tap your profile picture in the top right corner. It’s a small circle with your photo or initial in it. You’ll see a dropdown menu appear. Tap “Manage your Google Account.” You’re now in your Google Account settings. At the top of the screen, you’ll see several tabs. Scroll right until you see “People & sharing.” Tap that tab. This is where Google keeps all the contact-related settings. It’s also where you can verify your contacts are actually syncing later.
Scroll down in this section until you find “Contact info from your devices.” Under that heading, you’ll see a toggle switch. It might say “Save contact info from your devices automatically” or something similar depending on your Android version. This is the crucial step. Tap that toggle to turn it ON.
When this toggle is ON, your phone does two things automatically in the background. First, it backs up every device contact to Google Contacts. Second, it backs up every SIM card contact to Google Contacts. No action needed from you. It just happens automatically without any intervention.
After you enable that toggle, your phone starts syncing immediately. This usually takes a few seconds for small contact lists, up to a few minutes if you have hundreds of contacts. To confirm it worked, go to contacts.google.com on your computer and sign in with the same Google account you just enabled sync for. You should see all your contacts listed there on Google’s servers.
Alternatively, open your Google Contacts app on your phone right now. Look for the sync status card at the top. It shows your total contact count and the last time sync happened. If it says a recent time like within the last few minutes, you’re good. Your contacts are now being backed up automatically.
Method 2: Save New Contacts Directly to Google Account on Android
This is your second line of defense once automatic sync is enabled. When you create new contacts going forward, they should save to Google automatically. But I want to show you how to guarantee this happens by selecting the right storage location. Because here’s what I discovered: the default storage location isn’t always Google. Sometimes it defaults to your phone storage. And if you don’t know to change it, new contacts don’t get backed up at all.
Open the Google Contacts app on your Android phone. If you don’t have it installed, download it from the Google Play Store. If the Play Store itself is missing or not working, here’s how to reinstall Google Play Store.. The app icon usually shows a person silhouette. Once it opens, you’ll see your contact list displayed. At the bottom right of your screen, you’ll see a blue circle with a plus sign in it. Tap that button to create a new contact. The Create Contact screen will open.
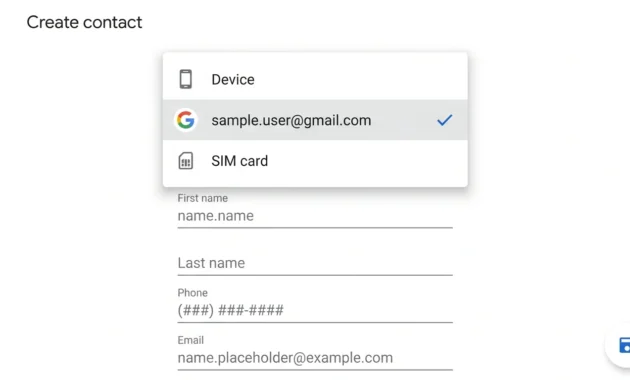
Here’s where most people make the mistake that prevents backup. Before you enter any contact information, look at the very top or bottom of the Create Contact screen. You’ll see a dropdown showing where this contact will be saved. Tap that dropdown. You’ll see options like “Phone,” “Your Gmail Email Address,” or possibly “SIM Card.”
Select your Gmail address or Google Account email. This is the crucial step and I cannot stress this enough: choose your Google Account BEFORE entering any information. Not after. Before. If you skip this and just start typing contact details, the contact defaults to “Phone” storage and doesn’t back up to the cloud.
Now that you’ve selected Google Account as the destination, type in the contact’s information. Name, phone number, email, address, whatever you need to save. This part is straightforward. When you’re done entering information, tap the Save button in the top right corner. That contact is now saved to your Google Account. It syncs to contacts.google.com immediately. It appears on any other device where you’re signed into that Google account. It’s protected by Google’s backup system.
The reason I emphasize this method is because it creates a habit. After you do this a few times, selecting Google Account becomes automatic. You never accidentally save to “Phone” storage again. Every new contact you add is automatically backed up to the cloud. Combined with the automatic sync from Method 1, you end up with complete protection. Old contacts sync to Google. New contacts save to Google. Everything is backed up.
Method 3: Move Existing Contacts to Google Account on Android
If you have contacts already on your phone or SIM card from before you enabled automatic sync, you need to move them to Google. Otherwise, they’re still unprotected and vulnerable to loss. I have three ways to do this, from easiest to most controlled. Pick the one that fits your situation best.
The fastest way to move all your existing contacts at once is through your default Contacts app. Open your Contacts app which is the default phone contacts application, not Google Contacts. Tap the menu which might appear as three horizontal lines or three dots, depending on your phone. Look for “Fix & Manage” or “Settings.” Tap that option. You’ll see an option for “Import” or “Import/Export.” Tap it to proceed.
The app will ask where you want to import from. Select “Phone” or “Device Storage.” Then select which Google account to import into, which is usually your Gmail address. Tap “Import” or “Confirm.” The app processes all your phone contacts and copies them to your Google Account. This usually takes a minute or two depending on how many contacts you have. When it finishes, all those contacts are now backed up to Google. They’re protected by Google’s servers. They’ll transfer to your new phone automatically.
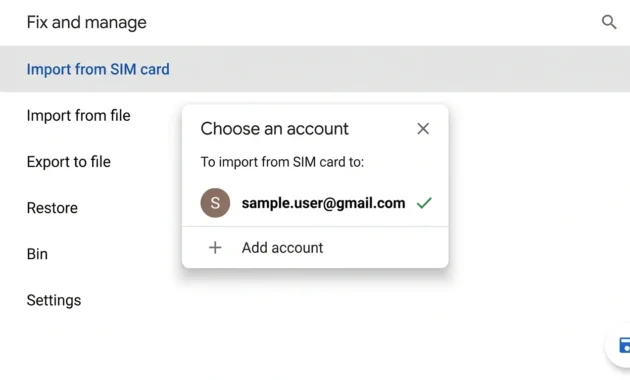
If you have contacts stored on your SIM card from older devices or older practices, the process is almost identical. Open Contacts app. Menu. Fix & Manage. Look for “Import from SIM” specifically. Select your Google Account as the destination. Let it import. Your SIM contacts now live in your Google Account instead of just on the physical SIM card. This is especially important if you’re planning to switch phones soon. SIM contacts don’t transfer between devices automatically like Google Contacts do.
For people who want more control over the backup process or who are migrating from another service entirely, there’s a manual method. Open Contacts app. Menu. Settings. Look for “Export” or “Export to File.” The app creates a .vcf file containing all your contacts. This vCard file is now on your phone or can be saved to Google Drive for extra protection and redundancy.
Later, if you need to restore these contacts or import them to Google Contacts, open Contacts. Fix & Manage. Import from File. Select the .vcf file. Choose your Google Account as the destination. The contacts import into Google. They’re now part of your Google Account and backed up permanently to Google’s servers.
I use this method as a secondary backup even though I have automatic sync enabled. It’s insurance. If sync ever fails for some reason, I have a snapshot backup saved to Google Drive. When you import contacts, you’re usually copying them, not moving them. The original contact stays where it was. The copy goes to Google Contacts. Some phones have a “Move” option that removes the original after copying. Others just copy and leave the original in place. Either way is fine. You now have the contact backed up to Google. That’s what actually matters.
How to Verify Your Contacts Are Actually Backed Up
This is the part most guides skip completely. And it’s exactly why people end up panicking later. You go through all the steps to back up your contacts. You enable sync. You import contacts. Then what? How do you actually know it worked? How do you know your contacts are actually safe? I don’t assume anything ever works. I verify. And I’m going to show you exactly how to do it in about thirty seconds.
Open a web browser on your computer. Go to contacts.google.com. Sign in with your Google account, the same account you backed up to. You’re now looking at your backed-up contacts in the cloud. They’re listed right there. This is where all your Google Contacts live on Google’s servers. Scroll through the list. Make sure you see the contacts you backed up. See that contact you just created? See that phone number you imported from your phone? If they’re here, they’re backed up. They’re safe. They exist on Google’s servers now, not just on your phone.
Alternatively, open the Google Contacts app on your phone. Look at the top of the screen. You should see a card that shows your sync status. It displays your total contact count and the last time sync occurred. If the sync time is recent, within the last few minutes, your contacts just synced. The contact count should match the number of contacts you expect to see. This card is new in 2025 and makes verification much easier than it used to be. Google literally tells you the exact moment your contacts last synced and exactly how many are backed up.
For the simplest verification method, open your phone’s Contacts app and look at how many total contacts you have. Note that number. Now go to contacts.google.com on your computer. Count how many appear there. The numbers should match, or be very close. If your phone has 287 contacts and contacts.google.com shows 287, they’re all backed up to the cloud. If the numbers don’t match, you have unsynced contacts still on your phone. This usually means some contacts are saved to “Phone” storage instead of Google Account. But at least now you know what the problem is.
How to Transfer Contacts When Getting a New Android Phone
This is why you backed everything up in the first place. You’re getting a new Android phone. You want your contacts to transfer over automatically instead of disappearing. If you did the backup steps above, this part is almost magical. Everything just appears on the new phone. No manual transfer needed. No complicated processes.
Before you hand over your old phone or put it away, do a final check on your old device. Go to contacts.google.com on your computer. Sign in. Verify your contacts are there. Or open Google Contacts app on your old phone and check the sync status card at the top. Make absolutely sure your contacts are backed up to Google before you move to the new device. This takes thirty seconds and prevents panic later.
When you set up your new phone for the first time, Android usually prompts you to sign in to a Google account. Use the same email address you backed up to every time. If the phone doesn’t prompt you, go to Settings. Accounts. Add Account. Select Google. Sign in with your backup email address.
After you sign in, your new phone automatically downloads your backed-up contacts from Google’s servers. This usually takes seconds for a small list, up to a few minutes if you have hundreds of contacts, depending on how fast your internet connection is. You don’t do anything. The phone handles it in the background. Open your Contacts app and watch. Gradually, your contacts appear. First a few dozen. Then more. Then all of them.
When sync finishes, open your Contacts app and scroll through. Verify that all your important contacts are there. Open Google Contacts app on the new phone. Check the sync status card at the top. It should show the same contact count as your old phone. If everything matches, you’re done. All your contacts transferred successfully. The entire process is automated once you sign in. That’s the point of backing up to Google. You don’t lose anything when you switch phones. If you’re moving between different brands or don’t use Google sync, our guide on how to transfer contacts to a new phone covers the other methods.
Method 1: Automatic Contact Sync on iPhone
iPhone users need to take a slightly different approach because Apple’s ecosystem defaults to iCloud instead of Google. But saving your iPhone contacts to Google is absolutely possible and equally straightforward. Open your iPhone Settings app. Scroll down until you find “Contacts.” Tap it. You’ll see several options related to your contacts. Look for an option that says “Accounts” or “Default Account.” Tap it.
You’ll see a list of accounts set up on your iPhone. If you already have a Google account set up, you’ll see it listed. If not, tap “Add Account” and select Google. Sign in with your Google account email and password. After signing in, iPhone will ask which services you want to sync with this account. Make sure “Contacts” is turned ON. Once you’ve enabled this, your iPhone contacts start syncing to your Google Account.
But there’s one more important step that many iPhone users miss. Go back to Settings. Scroll to Contacts again. Look for “Default Account.” Tap it. Change the default from “iCloud” to your Google account email. This ensures that any new contacts you create on your iPhone save to Google Account instead of iCloud. This is the crucial step. Tap that toggle to turn it ON. Menu names vary slightly between phone brands and Android versions, so if your screen looks different, follow Google’s own guide to back up and sync device and SIM contacts.
After you make this change, wait a few minutes for your iPhone to sync. Open your iPhone Contacts app and look at the contacts you have. Now open contacts.google.com on your computer and sign in with your Google account. You should see those iPhone contacts appearing in Google Contacts. They’re now backed up to Google’s cloud servers.
Method 2: Save New iPhone Contacts Directly to Google
Once you’ve set up your Google account on your iPhone, new contacts should save to Google by default if you changed the default account setting. But let me show you how to guarantee this. Open your iPhone Contacts app. Tap the plus sign to create a new contact. Start entering the contact information. When you finish entering all the details, look at the top of the screen where it says “iPhone” or shows your account name. This indicates where the contact will be saved.
If it shows “iCloud” instead of your Google account email, tap that field to change it before you save. Select your Google account email. Then tap “Done.” The contact now saves to your Google account instead of iCloud. This one simple step ensures the contact is backed up to Google’s servers instead of being trapped in Apple’s iCloud.
The reason I emphasize this is the same reason I emphasized it for Android users. After you do this a few times, selecting Google Account becomes automatic. You never accidentally save to iCloud again. Every new contact you add is automatically backed up to Google. Combined with the account sync you set up in Method 1, you end up with complete protection.
Method 3: Move Existing iPhone Contacts to Google
If you have contacts already on your iPhone from before you set up Google sync, you need to transfer them to Google. Otherwise, they’re still stuck in iCloud and won’t easily transfer to Android if you ever switch phones. There are three methods for iPhone users.
The easiest way is to use iCloud’s built-in export feature. Open iCloud.com in your web browser on your computer. Sign in with your Apple ID. Click “Contacts.” You’ll see all your iPhone contacts listed there. Select all contacts by clicking on a contact, then pressing Ctrl+A on Windows or Cmd+A on Mac. Now look for an export or download option. Click the settings gear icon. Look for “Export vCard” or “Download.” This creates a .vcf file containing all your contacts.
Open contacts.google.com on the same computer. Sign in with your Google account. Look for an import option, usually a menu icon at the top. Click “Import.” Select the .vcf file you just downloaded from iCloud. Google imports all those contacts into your Google Account. They’re now backed up to Google’s servers.
The second method uses the Settings app. Go to Settings on your iPhone. Mail. Accounts. Select your iCloud account. Make sure “Contacts” is turned ON. This syncs your iCloud contacts to your iPhone. Then set up your Google account as I described above. Your iPhone now has both iCloud and Google accounts with contacts. The contacts from iCloud appear in your Google account automatically through the sync process.
The third method is for users with just a few important contacts. You can manually re-create them in Google Contacts or add them through your iPhone if you’ve changed the default account. Open your iPhone Contacts. Find an important contact. Tap it to open it. Tap “Edit.” Tap the account field at the bottom where it shows “iCloud.” Change it to your Google account. Tap “Done.” That contact is now saved to Google instead of iCloud. Repeat for your important contacts.
Understanding: Move vs. Copy When Importing
Something to clarify here that confuses many people. When you import contacts from iCloud to Google, you’re usually copying them, not moving them. The original contact stays in iCloud. The copy goes to Google Contacts. This is actually fine because you want a backup anyway.
Some services have a “Move” option that removes the original after copying. Others just copy and leave the original in place. On iCloud, when you use the export method, you’re copying. Your original contacts stay in iCloud. Your copy is now in Google. This means you have redundant backups, which is actually better for safety.
If you later want to remove the duplicate from iCloud, you can delete them manually from iCloud.com. But keep them in Google because that’s your actual backup location now.
How to Verify Your iPhone Contacts Backed Up to Google
This verification process is exactly the same for iPhone as Android because you’re checking Google’s servers, not Apple’s iCloud. Open a web browser on your computer. Go to contacts.google.com. Sign in with your Google account. You’re now looking at your backed-up contacts in the cloud.
Scroll through the list. Make sure you see the iPhone contacts you backed up. Did your important contacts transfer? Are your phone numbers there? If they’re listed on contacts.google.com, they’re backed up to Google’s servers. They’re safe.
Alternatively, on your iPhone, open the Contacts app. Scroll through your contacts. They should show the Google account next to them. Look for a contact and notice the account indicator. If it says your Google account email, that contact is backed up to Google. If it says “iCloud,” it’s not backed up to Google. You may want to move those remaining iCloud contacts over to Google for consistency.
How to Transfer iPhone Contacts When Getting a New iPhone or Switching to Android
This is where all your work pays off. You’re getting a new iPhone or you’re switching to Android. You want your contacts to transfer over automatically. If you did the backup steps above, this part is seamless.
Before you get your new phone, make sure all your contacts are backed up to Google. Go to contacts.google.com on your computer. Sign in. Verify your contacts are there. This takes thirty seconds and prevents panic later.
On your new iPhone, go through the initial setup. When prompted to set up accounts, add your Google account. Sign in with the email you backed up to. Then go to Settings. Contacts. Select Google as your default account. Your iPhone downloads all your backed-up contacts from Google’s servers.
If you’re switching from iPhone to Android, it’s even simpler. You don’t need to do anything special on the iPhone. Just make sure all contacts are backed up to Google first. Then on your new Android phone, sign in with the same Google account during setup. All your iPhone contacts appear on Android automatically.
The entire process is automated once you sign in with Google. That’s the point of backing up to Google. You don’t lose anything when you switch phones or change devices.
The Mistakes Most People Make When Backing Up Contacts
I’ve seen people lose thousands of contacts because of simple mistakes. Usually, it’s not about not knowing the process. It’s about small assumptions that turn out to be wrong. Let me walk through the mistakes I see most often.
The number one contact loss mistake is saving contacts to “Phone” or “iCloud” storage instead of Google Account. You create a new contact. You enter the information. You hit save. The contact never backs up because you accidentally saved it to the wrong location. The mistake happens because many phones and iPhones default to device or iCloud storage instead of Google Account. Most people don’t notice the storage location selector.
You think the contact is safe. It’s not. The fix is simple. Every time you create a contact, look at the storage dropdown before entering any information. Make sure it says your Google Account email, not “Phone” or “iCloud.” This takes one second and prevents complete data loss.
Another common mistake is assuming sync is on when it’s actually off. You enable automatic sync once. Then you assume it stays on forever. It usually does. But sometimes updates happen, device settings change, or sync gets accidentally turned off. And you have no idea because you’re not checking. Contacts stop backing up. You don’t find out until you switch phones and realize half your contacts are missing.
Check your sync status every month or two. Go to contacts.google.com. Or open the sync status card in Google Contacts app. Takes thirty seconds. If it says sync happened recently, you’re good. If the last sync was weeks ago, something is wrong. Go back to the sync setup instructions and re-enable it.
Not having your Google account actually signed into your device is another problem. You can’t sync contacts to a Google account that isn’t signed into your phone. If you never set up your Google account on your device, automatic sync can’t happen. Check Settings. Accounts. Make sure your Google account appears there. If it doesn’t, add it. Sign in. Then enable sync. This is rare but I’ve seen it happen.
Some people export their contacts as a .vcf file for backup. The file saves to phone storage. Then months later, they need that backup and can’t find where the file went. You think you have a backup but it’s lost on your phone somewhere. Always save exports to Google Drive, not just device storage. That way the file lives in the cloud and you can find it anytime. Or at minimum, create a specific folder on your phone for backups and remember where it is.
Another mistake is assuming SIM contacts automatically back up to Google. Your SIM card has contacts on it. You assume when you enable automatic sync, they automatically back up to Google. They don’t. Not by default. SIM contacts are separate from phone contacts. You have to explicitly import them to Google using the import from SIM method I showed above. Check your SIM card for contacts. If it has any, import them explicitly. Don’t assume sync handles it automatically.
The final common mistake is never verifying that backup actually worked. You go through all the steps. You enable sync. You import contacts. Then you just hope it worked. You don’t check. You don’t verify. You just assume. And when you switch phones and contacts don’t appear, you panic. Spend thirty seconds verifying. Go to contacts.google.com. See your contacts there. That’s it. The backup worked. Move on.
Why Google Contacts Is Better Than SIM Card or Phone Storage
If you’re wondering why I’m pushing Google Contacts so hard instead of just saving to your SIM card or phone, here’s the straightforward answer: Google Contacts does everything the other options can’t do. I’m going to break this down by actual differences. Not opinions. Real technical differences that affect whether your contacts survive or disappear.
Google Contacts holds 25,000+ contacts per account. Unlimited really. Your SIM card holds 250 to 500. Maybe 600 if it’s a new card. That’s a 50x difference. If you ever have more than a few hundred contacts, you’re out of space on a SIM card. Most people have 200-500 contacts. You won’t hit the Google limit. But you might hit a SIM limit if you have a large business contact list.
Google Contacts stores unlimited information about each person. Name, phone number, email, physical address, birthday, company, job title, notes, custom fields, photo. Your SIM card stores name and phone number. That’s it. No email. No address. No birthday. No notes. Just name and phone. This is the most obvious limitation. A SIM contact is basically useless compared to a full Google contact.
Google Contacts backs up continuously to Google’s servers. You never manually back up anything. It just happens automatically. Your SIM card has zero backup. If your SIM card gets damaged or lost, there’s no recovery. It’s gone permanently. A SIM card sitting in a drawer or in your wallet is physically vulnerable. It can break. It can be lost. It can be stolen. Google’s servers? They’re in data centers with redundant backups and disaster recovery. Way safer than a plastic card.
Google Contacts sync to every device. Your phone. Your tablet. Your computer. Your smartwatch. Anywhere you sign in, your contacts appear. You add a contact on your phone. It appears on your computer in seconds. Edit an email on your tablet. It updates everywhere. Your SIM card only works in one phone at a time. Move the SIM to a different phone and it only has the contacts that phone already has locally. There’s no sync. If you use multiple devices, a SIM card is basically useless. Google Contacts are essential.
Google Contacts keeps deleted contacts in Trash for 30 days. You can restore them with one tap. A SIM card has zero recovery. Delete a contact and it’s gone permanently. This alone is worth backing up to Google. Accidents happen. People tap delete by mistake. If your contacts are on Google, you have a 30-day window to recover. With a SIM card, there is no window.
Troubleshooting: Why Your Contacts Aren’t Syncing
Sometimes you enable sync and contacts still don’t appear. Or they sync for a while then stop. Or they sync on one device but not another. This is frustrating. But it’s usually a simple fix. Here’s how I troubleshoot sync problems systematically. Work through these steps in order. The earlier steps are most likely to be the actual problem.
First, just confirm that sync is actually enabled. People often think they turned it on but actually didn’t. Go to Gmail app. Profile icon. Manage Your Google Account. People & Sharing. Look for “Contact info from your devices.” Check if the toggle is ON or OFF. If it’s OFF, tap it to turn it ON. That one toggle fixes about 30% of sync problems immediately.
Sync requires an active internet connection. WiFi or cellular data. If your phone isn’t connected to the internet, contacts won’t sync. Check if WiFi is on or if you have cellular data. Try opening a website to confirm internet is working. If your phone shows a Wi-Fi connection but pages still won’t load, follow our fix for connected to network but no internet access first. Sync can’t happen while you’re offline.. Connect to the internet and wait. Contacts start syncing automatically.
Contacts can only sync if your Google account is actually signed into your device. Go to Settings. Accounts. Look for Google. Your email address should appear there. If it doesn’t, you’re not signed in. Tap “Add Account.” Select Google. Sign in with your email. Give the account permission to access contacts. After that, sync can happen.
If some contacts sync but others don’t, check where the missing contacts are saved. Open Contacts app. Find one of the missing contacts. Look at the details. Is it saved to “Phone” or “Google Account”? If it says “Phone,” that contact won’t sync. It’s not eligible for backup. You need to move it to Google Account. Use the import method to move phone contacts to Google.
Sometimes sync is on but hasn’t run recently. Manually trigger it. Open Google Contacts app. Look for a menu or settings icon. Look for “Sync” or “Refresh.” Tap it. The app immediately syncs with Google’s servers. Contacts update. This forces sync to run instead of waiting for the automatic schedule.
The nuclear option that fixes everything 50% of the time: restart your phone completely. Power it off. Wait 10 seconds. Power it back on. After restart, open Contacts app and wait. Sync often runs automatically after a restart. If sync still isn’t working, something else is wrong. But restart fixes most sync issues.
Android needs permission for Contacts app to access your contacts. Sometimes this permission gets revoked. Go to Settings. Apps. Find Google Contacts or Contacts app. Tap Permissions. Look for “Contacts” permission. It should say “Allowed.” If it says “Denied,” tap it to allow the app to access contacts. Sync can’t work without this permission.
If none of the above fixed it, try signing out of your Google account completely and signing back in. Settings. Accounts. Google. Select your email. Tap “Remove Account.” Confirm removal. Then Settings. Accounts. Add Account. Google. Sign back in. This refreshes your account connection and often fixes stubborn sync issues.
Frequently Asked Questions
If I Don’t Sync Contacts, Will They Be Lost if I Change Phones?
Yes. Contacts saved only on your phone or SIM card don’t transfer to a new phone automatically.
When you set up a new phone and sign into Google, only Google Contacts appear. Phone and SIM contacts stay on the old device.
If the old phone is gone or reset, those contacts are unrecoverable.
Sync is the insurance that prevents this. Enable it before you upgrade phones.
Can I Move Contacts from One Google Account to Another?
Yes. Export all contacts from the first account as a .vcf file. Import that file into the second account.
Go to contacts.google.com on the first account. Select all contacts. Click the menu. Export.
Save the file. Sign out. Sign into the second account. Import the file.
All contacts now live in the second account.
What If I Accidentally Delete a Contact?
Check your trash folder first.
Go to contacts.google.com. Click the trash icon on the left. You see deleted contacts there for 30 days.
Find the contact you deleted. Click the checkbox next to it. Click the menu. Restore.
The contact comes back to your main contact list.
If the contact isn’t in Trash because it was deleted more than 30 days ago, the simple restore won’t work. Other options may still help, so see our full guide on how to retrieve deleted contacts.
Will Syncing Cost Me Extra Money or Data?
No. Contact sync uses almost no data. A few kilobytes per sync. It’s negligible.
Sync works over WiFi or cellular data. Doesn’t matter which.
No extra charges. No data limits triggered. It’s completely free.
How Long Does Sync Take?
Usually 30 seconds to 5 minutes depending on how many contacts you have.
100 contacts? Seconds.
500 contacts? A minute or two.
1,000+ contacts? Maybe 5 minutes.
Internet speed matters too. Faster connection = faster sync.
After the initial sync, ongoing updates are nearly instant.
How to save my contacts to google?
Save your contacts to Google by enabling automatic sync in Settings (Android: Gmail app > Profile > Manage Account > People & sharing > toggle ON “Save contact info from your devices”; iPhone: Settings > Contacts > Accounts > Add Google account).
For new contacts, open Google Contacts app, tap the plus button, select your Google account from the dropdown BEFORE entering information, then save. For existing contacts, use Import feature in Contacts app to move phone or SIM contacts to your Google account.
Verify backup worked by visiting contacts.google.com on your computer and signing in—you should see all your contacts listed there.
Once saved to Google, your contacts sync automatically across all devices, transfer to new phones when you sign in, stay backed up on secure servers, and can be recovered from Trash if accidentally deleted within 30 days.
What You Should Do Right Now
You now know four different methods to back up your contacts. You know how to verify they’re safe. You know how to transfer them to a new phone. But knowing isn’t the same as doing. Let me tell you what to actually do right now.
If you’ve never backed up your contacts, stop reading and go enable automatic sync right now using the steps in the Method 1 section. It takes 3 minutes. Gmail app. Profile. Manage Account. People & Sharing. Toggle on. That one action protects every contact you have. And every contact you add going forward. Do it now. The rest of this information will still be here when you’re done.
If you have old contacts on your phone, enable automatic sync first. Then use Method 3 to move your existing phone contacts to Google. It takes 5 minutes. Contacts app. Menu. Import. Select Phone. Import to Google account. Both actions together mean your phone contacts are now protected by automatic backup.
If you’re getting a new phone soon, do automatic sync NOW. Before your new phone arrives. A few weeks before getting the new phone, run a final verification. Go to contacts.google.com. Make sure all your contacts are there. Then on your new phone, sign into your Google account during setup. Contacts appear automatically. You never lose a single contact. It just works.
If you’re paranoid about data loss, I get it. I’m the same way. Do automatic sync. Then do a manual export to Google Drive every month. Automatic sync protects you daily. Manual export is your insurance policy. If sync ever fails, you have a snapshot backup from last month.
Your contacts are now safe. The work is done. Your contacts live on Google’s servers. They sync across your devices. They’re protected by backup and recovery. If you lose your phone. If you switch to a new one. If you accidentally delete something. Your contacts survive. They’re safe. You won’t lose them. That’s the entire point of backing up to Google. Once it’s set up, you never think about it again. It just protects you quietly in the background. Your important contact information is now safe and accessible from any device, anywhere, anytime.