
Before You Do Anything, Read This First
Here is something most Mac guides will never tell you: clearing RAM on your Mac can actually make it slower, not faster.
I know that sounds backwards. But hear me out.
macOS doesn’t treat RAM the way Windows does. On a Mac, the operating system deliberately fills available RAM with cached data because pulling information from memory is significantly faster than reading it off your SSD. So when you force-clear that memory, your Mac has to go back to the slower drive to rebuild everything it just lost. For a few minutes after clearing, your Mac is doing more work, not less.
This is macOS memory management by design. Not a bug. Not an accident.
And yet every time someone’s Mac starts running slow, the first thing they do is look for a way how to clear RAM on Mac. I’ve done it too. The problem is that most of the time, RAM isn’t actually the issue at all.
The number you’re looking at is probably the wrong one.
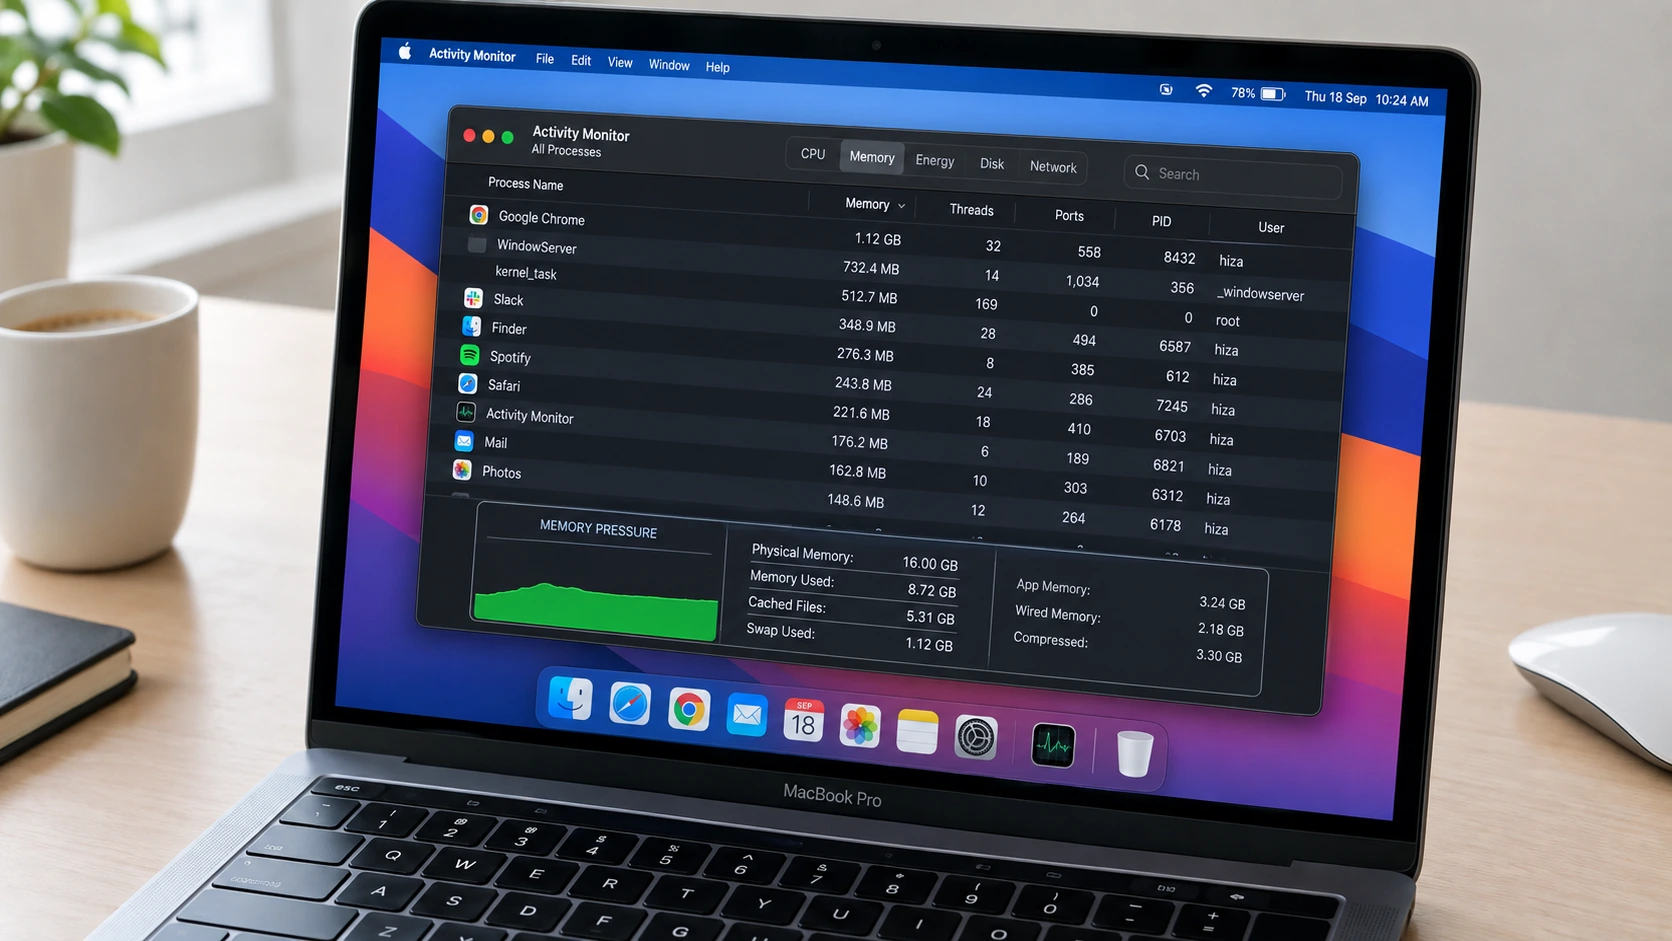
Open Activity Monitor right now and click the Memory tab. Most people stare at the “Memory Used” figure and panic when it’s high. But that number tells you almost nothing useful on its own. A Mac using 14 GB out of 16 GB can be running perfectly. Another Mac at the exact same number can be crawling.
The only number that actually tells you whether RAM is causing your slowdown is the memory pressure graph at the bottom of that window. Green means your Mac is handling everything fine, regardless of how high the memory used number looks. Yellow means things are getting tight. Red means action is genuinely needed.
That distinction matters more than anything else in this article.
Apple Silicon Macs, anything with an M1 through M4 chip, manage unified memory even more efficiently than older Intel models did. So if you’re on a newer MacBook Air or MacBook Pro, your Mac is almost certainly handling RAM better than you think.
Before you clear anything, check that graph.
If it’s green, you don’t have a RAM problem. Something else is slowing your Mac down, and clearing RAM won’t fix it.
If it’s yellow or red, keep reading.
How to Check RAM Usage on Mac Before Clearing Anything
Before you close a single app or run any command, check what’s actually happening with your RAM. This takes about 30 seconds, and it will tell you immediately whether you have a real problem or not.
Here’s how to check RAM usage on Mac using Activity Monitor:
Press Command + Space to open Spotlight, type Activity Monitor, and hit Enter. Once it opens, click the Memory tab at the top. You’ll see a list of every running process and how much memory each one is consuming. At the bottom of the window, you’ll find the memory pressure graph and all the key metrics.
That graph at the bottom is what you came here for.
Now click the Memory column header to sort the list by highest memory consumption. This shows you exactly which apps and processes are eating the most RAM right now. Most of the time, one or two culprits sit far above everything else, and seeing that list is genuinely more useful than any number at the bottom of the screen.
If you’ve never used Activity Monitor before and want a deeper understanding of what each metric means, Apple provides detailed documentation on how Activity Monitor works and what each measurement represents. The official guide covers everything from CPU and energy usage to network activity, but the Memory tab is where you’ll spend most of your time when diagnosing performance issues. Once you understand how to read memory pressure correctly, you’ll stop worrying about numbers that don’t actually matter.
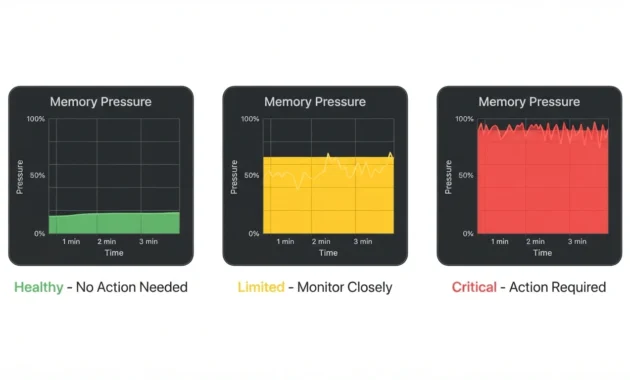
attention, red means take action immediately.
What the Memory Pressure Colors Actually Mean
The Memory Pressure gauge is the single most useful diagnostic tool for RAM usage on Mac. Apple designed it specifically to give you one clear signal instead of making you interpret five different numbers.
Green means your Mac is managing memory efficiently. Even if Memory Used looks high, green pressure means macOS has everything under control. You do not need to clear RAM.
Yellow means available memory is getting limited. Your Mac is working harder to manage its current workload. You won’t necessarily see slowdowns right now, but if you open more apps or tabs, you might. This is the “pay attention” signal.
Red means your Mac genuinely doesn’t have enough memory for what it’s currently doing. This is when clearing RAM actually makes sense.
Here’s the thing that surprises most people: a Mac can sit at 90% memory used and still show green pressure. And another Mac at the exact same usage percentage can be showing red. The Memory Used number doesn’t tell you how your Mac is coping, only how much RAM is occupied. Those are completely different things.
I’ve seen people restart their Mac, close six apps, and run Terminal commands trying to fix a “RAM problem” that was never a problem at all. The Memory Pressure graph was green the entire time.
The Other Numbers on the Memory Tab (And Whether to Worry)
Below the graph you’ll see several metrics that look technical but are worth knowing.
App Memory shows how much RAM your currently open applications are using. This is the memory your apps asked for directly.
Wired Memory is memory the system needs to keep running. macOS locks this down, and other apps can’t touch it. The number will look fixed and immovable because it basically is.
Compressed Memory shows data your Mac has shrunk to free up working space. When RAM gets tight, macOS compresses inactive data instead of immediately writing it to your SSD. This is actually a smart efficiency move, not a warning sign.
Cached Files shows information your Mac is holding in unused memory to help apps open faster next time. This number can look surprisingly large. That’s normal. macOS will release this cache immediately when another app needs the space.
Swap Used is the one to watch. Swap is what happens when RAM fills up completely and macOS starts using your SSD as overflow storage. Virtual memory via swap is much slower than real RAM, which is why heavy swap usage causes noticeable performance drops. If swap used is consistently high alongside yellow or red pressure, that’s a genuine signal that your Mac is struggling.
But if your pressure is green and the swap is low? Close the activity monitor and get back to work. Your RAM is fine.
Why Your RAM Fills Up So Fast (And What’s Actually Using It)
If your Mac is running slow and you open Activity Monitor expecting to find one obvious villain, you’ll usually find something more complicated. RAM usage on Mac builds up from several directions at once, and most of it happens quietly in the background while you’re focused on something else.
The first thing to understand is that some of that high usage is intentional. macOS fills available RAM with cache files on purpose because keeping data in memory means apps open faster and files load quicker. So part of what you’re seeing when RAM looks full is your Mac doing its job well.
But there’s a layer on top of that which actually causes problems.
Browser tabs are almost always the biggest culprit.
Chrome in particular runs a separate background process for each tab you have open, even tabs you haven’t looked at in three days. Those processes stay active and keep consuming memory the entire time. Most people don’t realize this. They think closing a tab frees the memory immediately, but Chrome’s helper processes can linger and stack up to a degree that genuinely surprises people when they see it in Activity Monitor.
If you sort Activity Monitor by the Memory column, Chrome entries will often sit at the very top of the list, sometimes by a wide margin. Browser extensions make this worse. Each extension runs its own process and adds to the total.
The second major source is login items and background processes that load at startup. These are apps you probably forgot you installed. They run silently, consume RAM from the moment your Mac boots, and never show up anywhere obvious. Things like cloud sync tools, messaging apps set to launch automatically, and software updaters all pile on before you’ve even opened a browser.
App memory leaks are the third cause and the hardest to spot. Some apps hold onto RAM after you’ve finished using them, or even after you’ve closed their windows without fully quitting. Closing a window is not the same as quitting an app on Mac. That distinction catches a lot of people.
If your Mac is running slow and you can’t figure out why, open Activity Monitor, sort by Memory, and look at what’s actually sitting at the top. Nine times out of ten, the answer is right there.
How to Clear RAM on Mac: 6 Safe Methods (Start Here)
If your memory pressure is showing yellow or red, here’s how to actually fix it. These methods are ranked by how safe and effective they are, so start at the top and work your way down. Most people never need to go past Method 2.
Method 1 — Restart Your Mac (The Most Effective Fix)
Restarting is the single best way to free up RAM on Mac. Not because it’s the most technical solution, but because it’s the most thorough one.
When you restart, macOS closes every running app, clears all active memory, and resets system-level processes that simple app-quitting never touches. It’s the only method that wipes the slate completely clean. Every other method on this list targets specific pieces of the problem. A restart handles all of it at once.
Before you do anything else, save your open work. Restarting without saving means losing whatever you had open.
To restart your Mac:
- Click the Apple logo in the top left corner of your screen
- Select Restart from the dropdown menu
- Confirm when prompted
That’s it. When your Mac comes back on, memory pressure will almost certainly be green.
Method 2 — Remove Apps That Launch at Startup
This one doesn’t clear RAM right now, but it stops RAM from filling up unnecessarily every time you boot.
Every app set to launch at startup consumes memory from the first second your Mac turns on, before you’ve even opened a browser. Most people have five to ten apps running in the background they completely forgot they enabled. Cloud sync tools, messaging apps, software updaters, and utility apps sitting in your menu bar—they all pile on quietly.
To remove unnecessary login items on macOS Ventura or later:
- Open System Settings
- Go to General, then Login Items
- Look through the list of apps set to open automatically
- Select any app you don’t need running at startup
- Click the minus (–) button to remove it
Go through that list carefully. You’ll probably find things you don’t recognize. If you’re not sure what something is, search for it before removing it.
Method 3 — Force Quit Apps That Won’t Release RAM
Save your work before doing this. Force-quitting an app immediately discards any unsaved changes. There is no undo.
Closing an app window is not the same as quitting the app. On Mac, many apps keep running in the background after you close their windows, continuing to consume RAM without any visible indication. Force-quitting actually stops the process completely.
Using Activity Monitor (recommended):
- Open Activity Monitor and click the Memory tab
- Click the Memory column header to sort by highest usage
- Select the app or process you want to close
- Click the Stop button (X) in the top left of the toolbar
- Choose Force Quit when prompted
Using the keyboard shortcut:
Press Option + Command + Esc to open the Force Quit Applications window. Select the app from the list and click Force Quit.
Use the Activity Monitor method when you want to see exactly how much memory you’re recovering. Use the keyboard shortcut when an app is completely frozen and you just need it gone.
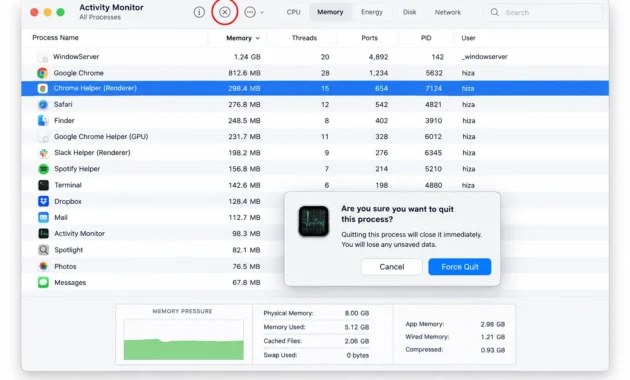
Force Quit from the confirmation dialog.
Method 4 — Close Excess Browser Tabs and Disable Extensions
Browser tabs are one of the fastest ways to push memory pressure into yellow territory, and closing them is one of the fastest ways to bring it back down.
Tabs don’t go idle when you stop looking at them. Chrome in particular keeps each tab running as an active background process. The memory stays occupied whether you’ve looked at that tab in three minutes or three weeks.
Open Activity Monitor and sort by Memory. If Chrome entries are dominating the top of the list, that’s your answer.
Close every tab you don’t actually need open right now. Bookmark them if you want to come back later. Then check your extensions. Each browser extension runs its own process and adds to the total memory load. Disable any extensions you don’t use regularly and test whether memory pressure improves.
Chrome also has its own built-in task manager. Open it by pressing Shift + Esc while Chrome is active. This shows you exactly which tabs and extensions are using the most memory, so you can target the specific ones worth closing rather than guessing.
Method 5 — Clear Cache Files (Advanced Users Only)
This method frees up storage space rather than RAM directly, but it matters because macOS uses free SSD space as swap memory when RAM runs low. The less free storage you have, the worse your Mac handles RAM pressure. Clearing cache files gives macOS more room to work with.
One person who followed this process cleared their Mac’s system data from 32 GB down to about 7.5 GB, recovering more than 24 GB of storage in a single session. Results vary, but there’s usually more recoverable space here than people expect.
To find and clear user cache files:
- Open Finder
- Press Command + Shift + G to open the Go to Folder window
- Type ~/Library/Caches and press Enter
- Press Command + J and select Calculate All Sizes—this shows you exactly how large each folder is so you can prioritize the big ones
- Sort by size, select the folders you want to remove, and press Command + Delete to move them to Trash
- Empty the trash when you’re done
Important safety note: If you’re not sure whether a folder is safe to delete, don’t guess. Type the folder name into an AI assistant and ask whether it’s safe to remove. This takes 10 seconds and prevents the kind of mistake that breaks an app you rely on.
Some files will refuse to move to Trash. That’s macOS protecting critical system files. Skip anything that resists deletion and move on.
After clearing cache files, restart your Mac and wait five to ten minutes for the system to re-index storage. The freed space will show up accurately after that.
Method 6 — Clean Up Your Desktop (The One Nobody Mentions)
This one surprises people. Your Mac’s desktop isn’t just a folder. Every file and folder sitting on your desktop is rendered as an individual active window by macOS’s window server, which consumes RAM proportional to how cluttered your desktop is. Fifty files on your desktop means fifty items your Mac is actively rendering.
The fix takes about two seconds.
Control-click on an empty space on your desktop and select Use Stacks from the menu. macOS will automatically group all your desktop files into organized stacks by file type. The visual clutter disappears, the window server overhead drops, and you haven’t deleted a single file.
It’s not a dramatic RAM fix on its own, but combined with the other methods it contributes. And it’s the one step that almost no Mac performance guide ever mentions, which is exactly why it’s worth knowing.
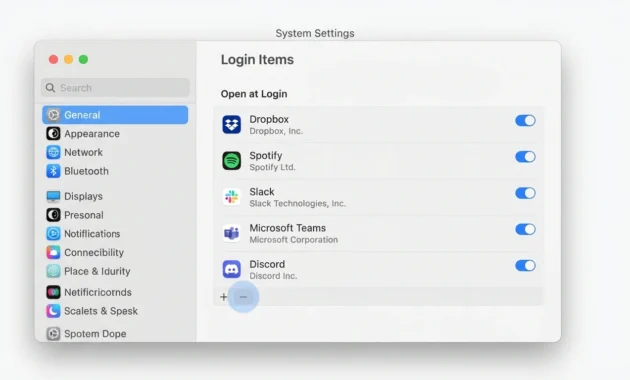
RAM from the moment your Mac boots.
The Terminal Purge Command—Why It’s Not What You Think
If you’ve searched for how to clear RAM on Mac, you’ve probably seen the sudo purge Terminal command recommended somewhere. It shows up in old forum threads, Reddit posts, and even some Mac guides that should know better.
Here’s what actually happens when you run it.
The purge command forces macOS to dump inactive memory and reclaimable cache files immediately. Your free memory number jumps. Cached Files in Activity Monitor drops. It looks like you just freed up a massive amount of RAM in one second.
And technically you did. But not in a way that helps.
macOS kept that cache in memory for a reason. Those cached files make apps open faster and help the system respond quicker because pulling data from RAM is significantly faster than reading it off your SSD. When you force-clear that cache, your Mac has to go back to the slower drive and rebuild everything it just lost.
For a few minutes after running purge, your Mac is actually working harder, not less. Apps that would have opened instantly now need an extra beat. Files that were ready to load now take a moment. You traded one number looking better for actual performance getting slightly worse.
The system refills that memory within minutes anyway. So the “fix” is temporary and cosmetic.
Using purge as regular maintenance is one of the most common advanced-user mistakes I see. Running it once a week or adding it to a script doesn’t keep your Mac faster. It just interrupts macOS’s memory management over and over for no real benefit.
CNET’s analysis of the purge command confirmed this directly: it bypasses the system’s automatic memory management and may even cause a small performance hit while the cache rebuilds.
If you still want to try it, here’s how:
- Open Terminal (press Command + Space, type Terminal, and hit Enter)
- Type sudo purge and press Enter
- Enter your administrator password when prompted
- Wait while the command runs—it takes a few seconds
You can open Activity Monitor while this runs and watch the Cached Files number drop and free memory rise. That visual change is real. The performance improvement is not.
I’m not saying the command breaks anything. It doesn’t. It’s safe to run. But it doesn’t do what most people think it does, and using it regularly won’t keep your Mac running faster. Restarting accomplishes the same thing more thoroughly and without the temporary slowdown.
Something Nobody Warned You About—RAM Shortage and SSD Wear
Here’s the part almost no Mac guide mentions, and it matters more than most people realize.
When your Mac runs out of RAM, it doesn’t just slow down. It starts wearing out your SSD.
Let me explain what’s happening.
When memory pressure hits yellow or red and your Mac has nowhere left to put active data, macOS uses a feature called swap memory. Swap takes a chunk of your SSD and treats it like overflow RAM. The system writes inactive data to your drive, frees up the physical RAM, and then reads that data back from the SSD whenever it’s needed again.
This happens constantly when RAM is tight. Data gets written to the drive, read back into memory, written out again, and read back again. Over and over.
Your SSD can only handle a finite number of write cycles before it degrades. Every SSD has a total write endurance limit built into the hardware. When you’re swapping heavily, you’re burning through that limit faster than you would under normal use.
Independent testing on 8 GB Macs running heavy multitasking workloads showed hundreds of gigabytes being written to the SSD per hour through swap alone. That’s not occasional overflow. That’s chronic, sustained writing that adds up quickly over weeks and months.
If you’re running an 8 GB Mac and your memory pressure regularly sits at yellow or red during normal work, you’re not just dealing with a slow Mac. You’re shortening the lifespan of the drive.
Most people assume RAM pressure is purely a performance issue. It slows things down, apps take longer to respond, and you see the spinning wheel more often. And all of that is true. But the hardware wear angle almost never gets mentioned, and it’s the more serious long-term consequence.
You can’t see swap writes happening in real time unless you’re monitoring disk activity in Activity Monitor. The system handles it silently in the background. But if Swap Used at the bottom of the Memory tab is consistently high and Memory Pressure is staying yellow or red, your SSD is taking the hit.
This is especially relevant now because 8 GB was the base spec for M1 and M2 Macs for years. Apple only bumped the base to 16 GB on M4 and M5 models. So there are millions of 8 GB Macs still in use, and a lot of those machines are being asked to do more than 8 GB can comfortably handle without constant swapping.
If that describes your Mac, clearing RAM temporarily helps in the moment. But the real fix is either reducing your workload to match your RAM or accepting that your Mac doesn’t have enough memory for what you’re asking it to do.
Ignoring yellow and red memory pressure isn’t just about tolerating slowness. It’s about running your SSD harder than it was designed to run long-term.
Apple Silicon vs. Intel Mac—Your RAM Works Differently Than You Think
If your Mac has an M1, M2, M3, or M4 chip, the RAM inside it doesn’t work the same way RAM worked on older Intel Macs. And understanding that difference changes how you should think about memory management entirely.
Apple Silicon Macs use something called unified memory. Instead of the CPU and GPU each having their own separate memory pools, they share one pool. Both processors pull from the same RAM at the same time.
That might sound like a small technical detail, but it has two major consequences you need to know about.
Why Unified Memory Is More Efficient (But Can’t Be Upgraded)
On traditional Intel Macs, when the CPU needed to send data to the GPU for graphics rendering, it had to copy that data from system RAM into the GPU’s dedicated memory. That copying process took time and used resources.
Unified memory eliminates that step completely. The CPU and GPU are working from the same data in the same memory pool, so there’s no copying, no duplication, and no wasted time moving information back and forth.
This is why 8 GB of unified memory on an M1 MacBook Air can feel faster than 8 GB of traditional RAM on an older Intel Mac for everyday tasks like web browsing, document editing, and light multitasking. The architecture is genuinely more efficient.
But here’s the part that catches people.
That RAM is soldered directly into the M-series chip. You cannot upgrade it. Ever.
On some older Intel MacBook Pros, you could pop open the bottom panel and add more RAM modules yourself or pay someone to do it. Apple Silicon Macs don’t have RAM modules. The memory is built into the processor itself as part of the unified architecture. What you buy at purchase is what you have for the life of the machine.
I’ve seen people buy an 8 GB MacBook Air, assuming they can upgrade later if they need to. They can’t. That decision is permanent.
How Much RAM Does Your Mac Actually Need in 2025?
Since you can’t add RAM later, you need to buy enough from the start. Here’s what different workloads actually require in 2025.
8 GB unified memory is now the absolute minimum, and honestly it’s only enough for very light use. Web browsing with disciplined tab management, email, basic document work, and streaming video. If that’s genuinely all you do, 8 GB can work. But it has no headroom. The moment you push beyond that, you’ll hit yellow memory pressure regularly.
16 GB unified memory is now the base spec on M4 and M5 Macs, and there’s a reason Apple made that jump. 16 GB is the minimum required to run Apple Intelligence, which is built into macOS going forward. Even if you don’t care about Apple Intelligence right now, 16 GB gives you enough room for normal multitasking, dozens of browser tabs, multiple apps running simultaneously, and light creative work without constant memory pressure warnings.
For most people buying a Mac in 2025, 16 GB is the right answer.
24 GB or 32 GB makes sense if you’re doing professional creative work. Video editing in Final Cut or Premiere, working with large Photoshop files, running virtual machines, and compiling code for large projects. These workloads can easily push past 16 GB during normal use. If your work depends on your Mac not slowing down under heavy load, the extra memory is worth it.
48 GB or 64 GB is for truly demanding workflows. 3D rendering, machine learning model training, massive datasets, and running multiple virtual machines simultaneously. If you’re in this category, you already know you need it.
The key thing to remember is this: if you’re not sure whether you need more RAM, get more RAM. You can’t add it later. Buying a MacBook Air or MacBook Pro with 8 GB to save money now means living with 8 GB forever, and that decision will hurt more in year three than it does on day one.
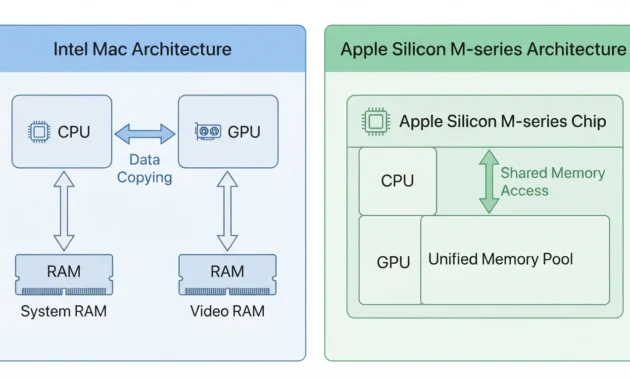
architecture, making Apple Silicon more efficient.
Do You Actually Need a RAM Cleaner App for Mac?
No, you almost certainly don’t.
RAM cleaner apps like CleanMyMac or similar third-party tools create a convincing visual effect that makes it look like they just freed up massive amounts of memory in one click. The free memory number goes up. Cached Files drops. Memory pressure might even shift from yellow to green for a moment.
And then five minutes later your Mac is right back where it started.
Here’s what a RAM cleaner for Mac actually does. The app forces macOS to discard inactive memory and cached files immediately, bypassing the system’s built-in memory management. That action makes the numbers look better in Activity Monitor. But macOS was keeping that cache in memory on purpose because having data ready in RAM makes everything faster than reading it off your SSD every single time.
When you clear that cache artificially, your Mac has to rebuild it. Apps that would have opened instantly now take an extra beat. Files that were ready to load need to be read from slower storage again.
macOS memory management already handles this automatically. The system keeps useful data in otherwise unused memory and releases that memory the moment another app genuinely needs it. A RAM cleaner interrupts this process for no real benefit.
CNET’s analysis confirmed this directly: memory cleaning tools usually don’t do much to cure low system memory problems, and they can cause a small temporary performance hit while the system rebuilds what the cleaner just stripped away.
Is there any situation where a RAM cleaner might help?
Maybe one.
If you have a specific app with a known memory leak that refuses to release RAM even after you quit it, forcing a memory purge through a cleaner app might clear out that stuck process. But that’s fixing a bug in one badly behaved app, not improving overall Mac performance. And honestly, restarting your Mac accomplishes the same thing more thoroughly.
I don’t use RAM cleaners regularly. I’ve tested them. They make numbers move. They don’t make Macs faster.
If Memory Pressure is green, you don’t need one. If memory pressure is yellow or red, a RAM cleaner won’t fix the root problem. You either have too many apps open, too many browser tabs consuming memory, or your Mac genuinely doesn’t have enough RAM for your workload.
Save your money and use Activity Monitor and restart instead.
When Clearing RAM Isn’t Enough—Long-Term Fixes That Actually Stick
If you’re restarting your Mac every other day just to keep memory pressure from turning red, you don’t have a clearing problem. You have a habits problem.
Or you have a Mac that doesn’t have enough RAM for what you’re asking it to do.
Clearing RAM is a temporary fix. It drops memory usage for an hour or two, and then everything builds back up again because you haven’t changed the behavior that caused the pressure in the first place.
Long-term RAM management on Mac comes down to four permanent habits.
First, keep your browser tabs under control. Not just for today, but every day. Close tabs when you’re done with them. Bookmark pages you want to revisit later instead of leaving them open for weeks. If you’re routinely running 40 or 50 tabs and wondering why your Mac feels slow, that’s the answer right there.
Second, manage what launches at startup. Go to System Settings > General > Login Items and remove anything you don’t need running from the moment your Mac boots. Every app in that list consumes memory before you’ve even opened a browser. Most people have forgotten half the apps in there. Trim that list down to essentials only.
Third, uninstall apps you don’t use anymore. Apps you stopped using months ago often leave background processes running that keep consuming memory. If you haven’t opened an app in six months and can’t remember why you installed it, get rid of it.
Fourth, keep macOS updated. New macOS releases include memory management improvements that genuinely help. Running an outdated version of the operating system means missing optimizations Apple already built for you.
And if you’re doing all four of those things and memory pressure still sits at yellow or red during normal work?
Your Mac doesn’t have enough RAM for your workload.
On older Intel Macs, you might be able to upgrade the RAM yourself or pay someone to do it. On Apple Silicon Macs, the RAM is soldered into the chip and cannot be upgraded. That decision is permanent. If an 8 GB MacBook Air can’t handle your workflow without constant memory pressure, clearing RAM more often won’t fix that. The machine needs more memory than it has, and you can’t add it.
If your Mac is still running slow even after managing RAM properly and following every step in this guide, the problem might be coming from somewhere else entirely. Not every performance issue is a RAM issue. Sometimes what looks like memory pressure is actually a failing hard drive, a corrupted system file, background malware eating up CPU cycles, or even a hardware component starting to fail. I’ve written a complete breakdown of the most common causes of slow computer performance and how to fix them step by step. That guide covers everything from disk errors and startup problems to driver issues and thermal throttling—basically all the other reasons your machine might be dragging even when RAM looks fine.
Quick Answers to the Questions Everyone Asks
Does clearing RAM actually make my Mac faster?
Not always. macOS keeps useful data in RAM as cache, so clearing it forces your Mac to re-read that data from slower SSD storage, which can temporarily slow things down.
What does it mean when my Mac says it’s low on memory?
It means Memory Pressure has reached yellow or red, and macOS can’t efficiently manage its current workload. Close unused apps and browser tabs first, then restart if needed.
How do I know if my Mac has enough RAM for what I’m doing?
Watch memory pressure in the activity monitor during your normal workflow. If it stays green, your RAM is sufficient, but if it regularly turns yellow or red during everyday tasks, your Mac needs more RAM.
Does restarting Mac clear RAM completely?
Yes, restarting closes all running apps, clears active memory, and resets system-level processes completely. Just save your open work first because unsaved changes will be lost.
Is it safe to use the Terminal purge command on Mac?
It’s technically safe but rarely helpful because the system immediately rebuilds the cache you just cleared, and you may notice a brief slowdown while it does. Restarting is more effective.