
I’ve changed laptop passwords more times than I can count, both on my own machines and while helping family members who called me in a panic because they got locked out. And honestly, most of the confusion isn’t about the actual steps. It’s about not knowing which steps apply to your situation in the first place.
Changing your laptop password means updating the credentials you use to log into your device, and the process takes less than five minutes on both Windows and Mac. But here’s the thing nobody tells you upfront: there isn’t just one way to do this. The method depends entirely on your account type, your operating system, and whether you even remember your current password.
I’m going to walk you through every scenario I’ve run into, including the ones that trip people up the most.
Why Changing Your Laptop Password Is Important (And When You Should Do It)
You should change your laptop password whenever you suspect it’s been compromised, shared it with someone, or just haven’t updated it in years. Not on some fixed schedule.
That last part surprises people. I used to believe the old advice too: change your password every 30 or 60 days, no exceptions. Turns out that advice is outdated. The National Institute of Standards and Technology, which sets security guidelines that most of the tech industry follows, now recommends changing passwords only when there’s actual evidence something went wrong. Not on a calendar.
Why the shift? Because forced password changes backfire. People get tired of coming up with new passwords every month, so they start picking weaker ones or just cycling between two or three they can remember. I’ve seen this happen with coworkers who’d add a number at the end of the same base password every time IT forced a reset. That’s not security. That’s just a workaround.
When Should You Actually Change Your Password?
If you think someone else knows your password, change it immediately. This includes:
- Friends or family members you’ve shared access with
- Colleagues who’ve watched you type it
- Anyone who may have seen it written down somewhere
- Cases where you’ve used it on another account that got compromised
If you’ve shared your laptop with a repair shop or borrowed it to someone for a while, change it. You never know who has access in these situations, and it’s better to be safe.
If you’re setting up a laptop you inherited or bought secondhand, definitely change it. The previous owner had full access, and you can’t guarantee they’ve forgotten the password.
If you’ve used the same password across multiple accounts, change it on all of them. If one service gets breached, attackers will try that password everywhere.
If it’s been years since you last updated it and you’re using something weak, that’s a good enough reason too. This is the only situation where time alone justifies a change.
If you notice suspicious login activity on accounts associated with that laptop, change immediately and check for other security issues.
External Resource: For more information on laptop security best practices, check out Microsoft’s official security guide which covers password management and account protection strategies.
What Doesn’t Happen When You Change Your Password
One thing I want to clear up right away: changing your password does not touch your files, your installed programs, or your settings. I’ve had people ask me if they’ll lose their photos or documents, worried that changing a password is somehow similar to wiping the laptop. It isn’t.
Your password change happens at the login level only. Everything else on your laptop stays exactly where it was:
- Your documents remain intact
- Your installed applications stay functional
- Your browser bookmarks don’t disappear
- Your desktop background and settings remain unchanged
- Your email accounts don’t disconnect
- Your personalization options persist
The only thing that changes is what you type to get past the login screen.
The whole process takes under two minutes once you know where to look. The confusing part usually isn’t the steps themselves. It’s figuring out which version of “change your password” applies to you, which is exactly what I’ll cover next.
Before You Change Your Password: Identify Your Account Type
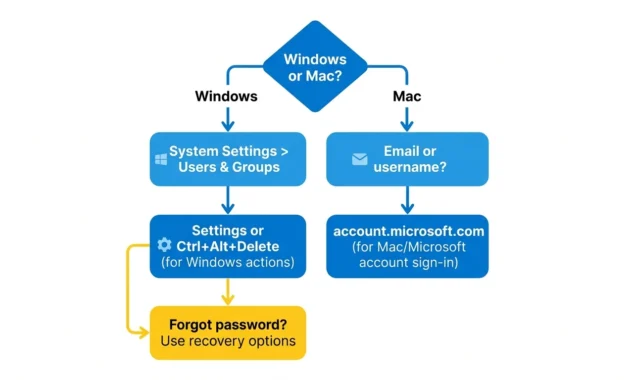
Here’s the step almost every tutorial skips, and it’s the reason so many people get stuck. Windows laptops use two completely different account systems, and the method for changing your password depends entirely on which one you have.
I learned this the hard way years ago when I tried to change a password using the standard Settings method, only to get an error message that made zero sense at the time. Turns out my account was signed in with an email address, which meant I had a Microsoft account, not a local one. The Settings method simply doesn’t work for that.
So before doing anything else, figure out which type you’re dealing with. This single decision determines your entire path forward.
How to Identify Your Account Type (2-Minute Check)
Step 1: Open your Windows Settings app
- Press Windows key + I on your keyboard, or
- Click the Start menu and select the gear icon (Settings)
Step 2: Click on Accounts from the left sidebar
Step 3: Look at the name displayed at the top under “Your info”
Here’s what to look for:
If you see an email address underneath your name, something like yourname@outlook.com, yourname@hotmail.com, yourname@gmail.com, or any other email format, you’re using a Microsoft account. The password for that account lives on Microsoft’s servers, not just on your laptop. This is the one that trips people up.
If you see just a username with no email attached, something like JohnSmith or Jane.Doe, you’ve got a local account. That password is stored only on your device, nowhere else.
This one detail changes everything about which method you’ll use next.
Local Account Password: What This Means
A local account password exists only on your specific laptop. It never syncs anywhere else, which means you can change it even without an internet connection. Windows stores this password directly on your device using encryption, which is why the standard Settings method works perfectly for this account type.
Advantages of a local account:
- Works offline
- Faster login since no server verification needed
- Full control over the password
- Simpler to manage if you’re the only user
Disadvantages:
- Can’t sync settings across devices
- Password recovery is harder if you forget it
- No cloud backup of your settings
Microsoft Account Password: What This Means
A Microsoft account password is managed online, through Microsoft’s servers, and syncs across every device where you’re signed in with that same email. This is the account type that trips people up, because the password change process happens on a completely different website, not inside Windows Settings at all.
Advantages of a Microsoft account:
- Your settings sync across all your Windows devices
- Easier password recovery through Microsoft’s verification system
- Integration with cloud services like OneDrive
- Tied to your Office 365/Microsoft 365 subscription if you have one
Disadvantages:
- Requires internet to verify password changes
- Password changes take a few minutes to sync to your device
- If Microsoft’s servers are down, you might have login issues
- Dependent on remembering your Microsoft email address
How to Change Your Local Account Password (The Standard Way)
If you’ve confirmed you have a local account, here’s the process that works on every Windows laptop, regardless of brand.
Complete Step-by-Step for Windows 11 Users
Windows 11 organizes things slightly differently than older versions, and once you know where to look, it’s actually pretty intuitive.
Step 1: Open Windows Settings
- Click the Start button on your taskbar (Windows logo in bottom left)
- Select Settings, or press Windows key + I on your keyboard, which jumps straight there
- The Settings window should open immediately
Step 2: Navigate to Accounts
- From the left side menu, click Accounts
- This section controls everything related to your user profile, sign-in methods, and login preferences
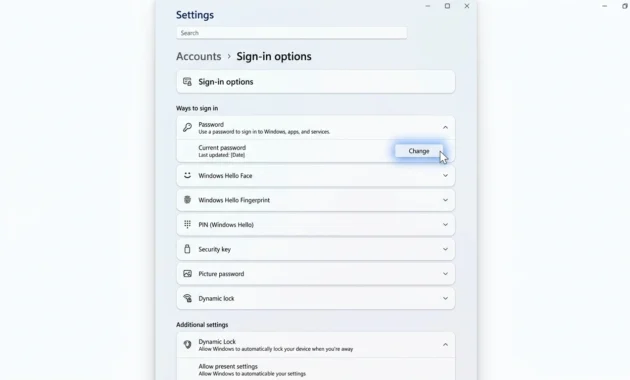
Step 3: Find Sign-in Options
- On the right panel, scroll down until you see Sign-in options
- Click on it to expand that section
- This is where Windows 11 groups together every way you can log in, including your password, PIN, fingerprint, and facial recognition if your laptop supports those features
Step 4: Locate the Password Section
- Scroll to the section labeled Ways to sign in
- Click on Password to expand it
- You’ll see a Change button appear below the password entry
- Click the Change button
Step 5: Verify Your Current Password
- Windows will ask for your current password first
- This is a security measure to confirm it’s really you making the change, not someone else who found your laptop unlocked
- Type your current password exactly as you remember it
- Click Next
- If you get an error, double-check for capital letters, numbers, and special characters you might have used
Step 6: Enter Your New Password
- You’ll now see a screen with two password fields
- Type your new password in the first field labeled New password
- Make it something you’ll remember but that’s hard for others to guess (we’ll cover strong passwords later)
- Important: Windows won’t show you what you’re typing for security reasons. Only dots or asterisks appear
Step 7: Confirm Your New Password
- Type the exact same password again in the field labeled Confirm password
- This second field exists specifically to catch typos
- If the two passwords don’t match exactly (including capital letters, numbers, and symbols), Windows will flag it and ask you to try again
- Nothing is more frustrating than setting a password you can’t remember how you typed it the first time
Step 8: Create a Password Hint (Optional but Recommended)
- Windows offers a field for a password hint
- This hint shows up on your login screen if you type the wrong password a few times
- Its entire purpose is to jog your memory, not to remind anyone else what your password is
- Important: Make it something only you would understand
- Bad hint examples: “my dog’s name” (if your password is literally your dog’s name), “my birthday,” “street I grew up on”
- Good hint examples: “the place I went in summer 2018,” “my favorite book character,” “where I first met my spouse”
Step 9: Save Your Changes
- Click Next to proceed
- Windows will verify your entries
- Click Finish to save the change
- You should see a confirmation message that your password has been changed successfully
Step 10: Lock and Test Your New Password
- Don’t skip this step
- Press Windows key + L to lock your screen immediately
- Try logging back in using your brand new password
- This confirms the change actually took effect before you walk away
- If it works, you’re genuinely done
- If it doesn’t, you’ll know immediately and can troubleshoot rather than discovering the problem later when you really need to get into your laptop
Complete Step-by-Step for Windows 10 Users
Windows 10 follows a similar path but without the “Ways to sign in” grouping that Windows 11 introduced. The actual password change process is identical once you get there.
Step 1: Open Windows Settings
- Click the Start menu in the bottom left
- Select Settings (gear icon)
- Or press Windows key + I
Step 2: Select Accounts
- From the list of settings options, click Accounts
- This should be near the top of the main Settings menu
Step 3: Navigate to Sign-in Options
- On the left sidebar, click Sign-in options
- You’ll find Password listed directly under a section about managing how you sign in to your device
- Look for the heading “Password” in the main panel
Step 4: Click Change
- Under the Password section, click on the Change button
- This will launch the password change wizard
Step 5: Verify Your Current Password
- Enter your existing password in the field provided
- Click Next to proceed
- Windows confirms it’s you before allowing the change
Step 6: Enter Your New Password (Twice)
- Type your new password in the first box
- Retype the identical password in the confirmation box right below it
- If the two don’t match exactly, Windows will flag it and ask you to try again
- Remember that passwords are case-sensitive (capital A is different from lowercase a)
Step 7: Add a Password Hint
- This is the step most people rush through, and it’s worth slowing down on
- A password hint shows up on your login screen if you type the wrong password a few times
- Its entire purpose is to jog your memory, not to spell out the answer for anyone watching your screen
- I’ve seen people write hints like “my dog’s name” when their password literally includes their dog’s name
- That defeats the whole point
- A better approach is something oblique and personal to you alone
Step 8: Click Finish
- Once everything’s entered correctly, click Finish
- Windows saves the change immediately
- You should see a confirmation that your password has been successfully changed
Step 9: Verify Your New Password Works
- Don’t skip this part
- Press Windows key + L to lock your screen right away
- Try logging back in using your brand new password
- This confirms the change actually took effect
The Faster Way: Using Ctrl+Alt+Delete (Keyboard Shortcut Method)
If you want a quicker route than navigating through Settings menus, Ctrl+Alt+Delete gets you there in seconds. This shortcut brings up Windows’ secure screen directly, skipping the menu navigation entirely.
How to Use Ctrl+Alt+Delete to Change Password
Step 1: Press the Keyboard Combination
- Press Ctrl, Alt, and Delete at the exact same time
- All three keys must be held down together
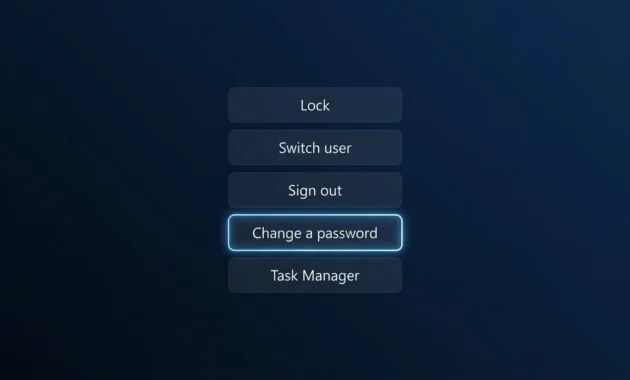
- A blue screen appears with several options
- This is Windows’ secure screen, designed specifically for sensitive operations
- It’s one of the few screens where background programs can’t interfere
Step 2: Look for the Change Password Option
- On the blue screen, you’ll see several options including:
- Sign out
- Change a password
- Task Manager
- Lock the computer
- Other options depending on your Windows version
- Click Change a password (this exact wording)
Step 3: Enter Your Credentials
- A dialog box will appear asking for your old password
- Type your old password first
- Click in the next field and type your new password
- Click in the third field and type your new password again to confirm
- Make sure the new passwords match exactly
Step 4: Save the Change
- Press Enter or click OK
- Windows will save your new password
- You’ll typically be returned to the login screen or locked state
When to Use This Method vs. Settings
Use the Settings method if:
- You’re doing this for the first time
- You’re not familiar with keyboard shortcuts
- You want to see each step clearly explained on screen
- You want to set up a password hint while you’re at it
Use the Ctrl+Alt+Delete method if:
- You’ve done this before and want to be faster
- Your Settings app is acting up or loading slowly
- You want to skip navigating through multiple menus
- You need to change your password quickly
Important note: Both methods only work for local accounts. If you’ve got a Microsoft account, neither of these will get you where you need to go. You’ll need to use the online method instead.
If You’re Using a Microsoft Account: Changing Your Password Online
This is the section that solves the most common frustration I see, and it’s the part almost every other guide completely skips.
If you sign into your laptop using an email address, your password cannot be changed through Windows Settings. You have to change it online, at account.microsoft.com, because Microsoft stores that password on their own servers, not on your device.
I ran into this exact confusion myself years ago, and it’s also the question I’ve seen pop up repeatedly in online forums. Someone tries the Settings method, it doesn’t work, and they assume something’s broken. Nothing’s broken. They’re just using the wrong method for their account type.
How to Tell If You’re Using a Microsoft Account
Quick recap from earlier:
- Open Settings
- Click Accounts
- Look under your name at the top
An email address there means Microsoft account. No email, just a username, means local account.
Step-by-Step: Change Your Microsoft Password Online
Step 1: Open Your Web Browser
- Launch any web browser (Chrome, Edge, Firefox, Safari, etc.)
- Make sure you have an active internet connection
- This is one of the few password changes that requires online access
Step 2: Navigate to Microsoft Account Website
- Go to account.microsoft.com
- You can type this directly into the address bar
- The page should load to Microsoft’s account sign-in screen
Step 3: Sign In With Your Current Credentials
- Click the Sign in button
- Enter your email address (the one you use to log into your laptop)
- Enter your current password
- Complete any multi-factor authentication if prompted (like entering a code from your phone)
- Microsoft takes security seriously, so they might ask you to verify you’re really you
Step 4: Locate the Security Section
- Once logged in, look for Security or Security info in the left menu
- This section contains password management, recovery options, and linked devices
- Click on it to access security-related settings
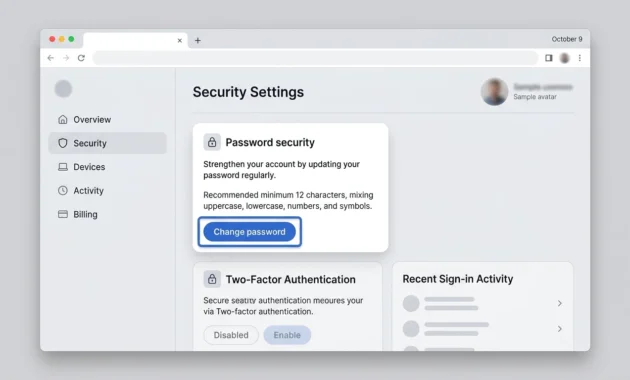
Step 5: Find the Password Change Option
- Look for an option labeled Change password or Update password
- This might be under a heading like “Password and security” or similar
- Click on it
- Microsoft will ask you to confirm your identity again
- This might involve entering a security code sent to your phone or backup email address
- This extra verification step ensures that someone who gained access to your email can’t immediately change your password
Step 6: Enter Your Current and New Password
- You’ll see a form with fields for:
- Current password (what you’re using now)
- New password (what you want to use)
- Confirm new password (type it again)
- Enter your current password in the first field
- Think of a strong new password that’s different from your current one
- Type that new password in the second field
- Type it again exactly in the third field to confirm
Step 7: Submit Your Changes
- Click the Next or Save button (wording varies)
- Microsoft will verify your entries
- You should see a confirmation message that your password has been successfully changed
- The change happens immediately on Microsoft’s servers
Step 8: Test on Your Laptop
- Close your browser and go back to your laptop
- Lock your screen with Windows key + L
- Try signing in with your new Microsoft account password
- If it works immediately, you’re all set
- If it doesn’t work, see the troubleshooting section below
What to Do If the New Password Doesn’t Sync to Windows Immediately
Sometimes your laptop doesn’t immediately recognize the new password, even though you just changed it online successfully. This happens because Windows caches your old credentials temporarily.
What to try:
Option 1: Sign Out and Back In (Most Common Fix)
- Sign out of your laptop completely
- To do this: Click Start → Account icon → Sign out
- Wait a few seconds
- Sign back in using the new password you just created
- In most cases, this forces Windows to grab the updated credentials from Microsoft’s servers
- This usually solves the problem immediately
Option 2: Check Your Internet Connection
- Verify you have an active internet connection
- Your laptop needs to communicate with Microsoft’s servers to verify the sync
- A spotty connection can delay this process
- Try restarting your router if your connection seems slow
- Wait 5-10 minutes and try signing in again
Option 3: Restart Your Laptop
- Turn off your laptop completely
- Wait 30 seconds
- Turn it back on
- This gives Windows time to fully sync with Microsoft’s servers
- Try logging in with your new password
- Often works when other methods haven’t
Option 4: Verify Your Email Address
- Make sure you’re signing in with the exact same email address you used to make the change
- If you have multiple email addresses associated with your Microsoft account, use the primary one
- Capitalization doesn’t matter for emails, but everything else should match exactly
Option 5: Remove and Re-add Your Account (Last Resort)
- Only try this if nothing else works
- You can remove the Microsoft account from your laptop entirely through Settings
- Then add it back using your new password
- This forces Windows to completely refresh the connection to Microsoft’s servers
- I’ve only needed to do this once myself, but it worked immediately when nothing else did
Steps for removing and re-adding:
- Go to Settings → Accounts
- Click on your account name
- Click Remove (at the bottom)
- Confirm the removal (your files won’t be deleted, just the account)
- Go back to Accounts → Email & accounts
- Click Add a Microsoft account
- Enter your email and new password
- Complete the setup process
For Mac Users: Changing Your macOS Password
Mac password changes are honestly simpler than Windows, with fewer screens to click through. The entire process usually takes under a minute once you know where to find the option.
Step-by-Step for macOS (Newer Versions – Monterey and Later)
Step 1: Open System Settings
- Click the Apple icon in the top left corner of your screen
- Select System Settings (this is what it’s called in newer macOS versions)
- In older versions it was called “System Preferences”
- The System Settings window should open
Step 2: Navigate to Users & Groups
- Look for General in the left sidebar first
- Scroll down and you should see a section about users and login options
- Click on Users & Groups if available
- On some newer Macs, this might be under a different name like “General” or might require scrolling
- You need to find the section that manages user accounts
Step 3: Select Your Account
- You’ll see your account listed in the Users & Groups section
- You might see a small lock icon next to your account name
- If there’s a lock, click on it and enter your current password to unlock it
- You need admin privileges to change your password
- Click on your account to select it
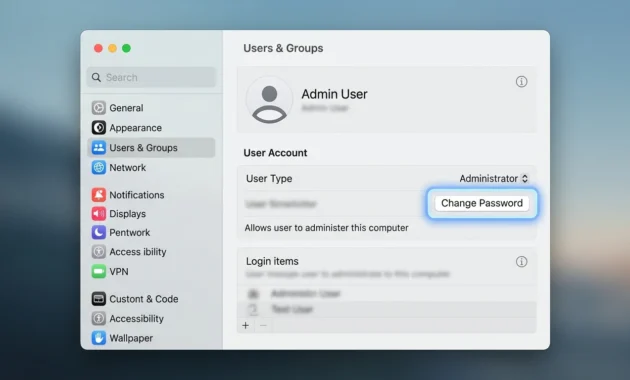
Step 4: Access the Change Password Option
- Look for a button labeled Change Password next to your account name
- You might need to scroll or look carefully for this button
- Click it when you find it
- A dialog box should appear
Step 5: Enter Your Current Password
- The dialog will ask for your current password first
- Type it in the field provided
- This verifies you’re authorized to make the change
Step 6: Enter Your New Password
- Type your desired new password in the field labeled New password
- Type it again in the Verify field below
- Make sure both entries match exactly
Step 7: Add a Password Hint (Optional)
- You can add a hint that will appear if you forget your password
- Make it something meaningful only to you
- Click the hint field and type your hint
- You can skip this if you prefer not to have a hint
Step 8: Save the Change
- Click the Change Password button to save
- macOS will update your password immediately
- You should see a confirmation that the change was successful
Step 9: Test Your New Password
- Log out of your Mac: Apple menu → Log Out
- Log back in using your new password
- This confirms the change worked correctly
For Older macOS (Mojave and Earlier)
The process is nearly identical, but you’ll find it under System Preferences instead of System Settings. Apple renamed this section in later updates, though the actual functionality stayed the same.
Updated Steps for Older Versions:
- Click the Apple icon in the top left
- Select System Preferences (not System Settings)
- Click Users & Groups
- If there’s a lock icon, click it and enter your current password
- Select your user account on the left
- Click the Change Password button
- Follow steps 5-9 from the newer macOS instructions above
- Everything else is identical
If You Forgot Your Mac Password: Using Apple ID Recovery
If you set up Apple ID during your Mac’s initial setup, you’ve got a built-in safety net. This is one of Mac’s best security features.
How it works:
- After three failed password attempts at the login screen
- macOS will typically offer an option to reset using your Apple ID credentials instead
- You’ll be asked to enter your Apple ID email and password
- After verification, you can set a completely new Mac password
Important caveat: This only works if Apple ID recovery was enabled when you first configured your Mac. If you skipped that step during setup, this option won’t appear, and you’ll need to look into other recovery methods instead.
If you don’t see the Apple ID recovery option:
- You might need to use Mac Recovery Mode
- This involves restarting your Mac and holding down Command + R
- This is more technical and beyond the scope of this guide
- Contact Apple Support or take your Mac to an Apple Store for assistance
Do Laptop Brands Like Lenovo, HP, and Dell Change the Process?
Short answer: No.
The brand of your laptop doesn’t change how you update your Windows password. A Lenovo, HP, Dell, ASUS, or any other Windows laptop all run the same Windows operating system, which means they all follow the identical Settings or Ctrl+Alt+Delete process I covered earlier.
I get asked about this a lot, usually from people who assume their specific brand has some proprietary method hidden somewhere in manufacturer software. It doesn’t. Windows controls your login password, not the laptop manufacturer.
“I Have a Lenovo/HP/Dell Laptop – Is the Process Different?”
The steps are exactly the same regardless of brand. Some manufacturers bundle extra security software alongside Windows, things like:
- Fingerprint managers
- Additional login layers or security utilities
- Biometric authentication
- Recovery tools specific to their brand
But these work alongside your Windows password rather than replacing the process entirely. The core Windows password change method remains identical.
What you might see different:
- The fingerprint sensor or facial recognition system might require setup through manufacturer software
- Some laptops have custom startup screens or recovery partitions
- Dell, HP, and Lenovo sometimes include their own password reset utilities
- But the Windows password itself is managed by Windows, not the manufacturer
Why This Matters
It means you don’t need to research your laptop’s specific brand. Whatever instructions work for “Windows 10” or “Windows 11” will work for your machine, no matter who manufactured it. This simplifies things significantly.
BIOS Password vs. Windows Password: Understanding the Difference
Here’s something that genuinely confuses people, and I’ve seen it cause real headaches.
Your BIOS password and your Windows password are two completely separate systems that have nothing to do with each other.
What is BIOS?
BIOS stands for “Basic Input/Output System” (or UEFI on newer computers – Unified Extensible Firmware Interface). Think of it as the firmware that runs before Windows even loads. It’s the very first thing that runs when you turn on your laptop.
Your BIOS password protects your laptop at the firmware level, before Windows even starts loading. You’d typically set this up through something called:
- Computer Setup
- System Setup
- BIOS Setup
- Accessed by pressing a specific key like F2, Esc, Del, or F10 right when your laptop powers on (the key varies by manufacturer)
What is Your Windows Password?
Your Windows password controls access after your operating system has already loaded. It’s what you type when you see the Windows login screen.
The Critical Difference
Changing one does absolutely nothing to the other. They’re completely independent:
- Changing your Windows password doesn’t affect BIOS
- Changing your BIOS password doesn’t affect Windows
- You can have both, just one, or neither
I’ve seen people spend hours trying to figure out why changing their Windows password didn’t affect a password prompt they saw at startup, not realizing they were dealing with two unrelated systems the whole time.
How to Tell Which One You’re Seeing
If you see a password prompt immediately when you turn on your laptop, before the Windows logo appears:
- That’s your BIOS password
- It’s typically a simple prompt with few options
- Requires different steps to change (varies by manufacturer)
- Needs to be changed in BIOS/Computer Setup, not Windows Settings
If you see a password prompt after the Windows logo and the initial loading screen:
- That’s your Windows password
- That’s what this entire guide covers
If you’re unsure which one you have:
- Restart your laptop
- Watch carefully from the very first moment
- A BIOS password appears first, within the first 2-3 seconds of startup
- The Windows login screen comes after all the initial loading
Changing Your BIOS Password (If Needed)
This varies significantly by laptop brand, so I won’t provide specific steps here. But generally:
- Restart your laptop
- Immediately start pressing the designated key (usually shown during startup: “Press F2 for Setup” or similar)
- Enter the BIOS/Computer Setup interface
- Look for Security or Password settings
- Follow the on-screen instructions to set a new BIOS password
- Save and exit
For specific steps: Search “how to change BIOS password” + your laptop brand for detailed instructions.
Creating a Strong Laptop Password (So Your Change Actually Protects You)
Changing your password is only useful if your new password is actually strong. A weak password makes the whole exercise pointless.
What Makes a Password Strong?
Three things, really:
- Length – This matters more than anything else
- Unpredictability – Not based on patterns or information about you
- Avoiding personal information – Nothing tied to data someone could find about you online
Longer passwords beat more complex shorter passwords almost every time. A 16-character password using just lowercase letters is often harder to crack than a 10-character password with uppercase, lowercase, numbers, and symbols mixed in.
Length matters more than most people realize. This runs counter to what a lot of older security advice taught us, which focused heavily on complexity rules rather than overall length.
What NOT to Use (Common Weak Passwords)
Your pet’s name, your birthday, your street address – these are all things people often think are clever password choices. They’re not. Anyone who’s spent five minutes on your social media could probably guess half of these.
Definitely avoid:
- Your name or a loved one’s name
- Your birthday (full or partial: 1990, Jan15, etc.)
- Your street address or city
- Your spouse/partner’s name
- Your pet’s name
- “password” or “1234567890”
- Keyboard patterns like “qwerty” or “asdfgh”
- Common phrases like “welcome” or “letmein”
- Anything that appears in a dictionary
- Sequential numbers like “123456” or “999999”
- Your username
- Anything you’ve used before on another account
- Information that’s easily findable on your social media
Examples: Strong vs. Weak Passwords
Weak password:
- “Password1” – Too common, uses the word “password”
- “123456” – Sequential, too short, no letters
- “JohnSmith1990” – Uses real personal information
- “Dog123” – Pet name plus numbers
- “Qwerty!” – Keyboard pattern
Strong password:
- “PurpleElephantSnowdrift42!” – Long, mixes unrelated words, includes numbers and symbols
- “CorrectHorseBatteryStaple2024” – Uses four random words, includes numbers
- “BlueMercuryThunderFebruary8!” – Random combination, personal only to you
- “MushroomCloudVioletTiger#99” – Lengthy, complex, unpredictable
Notice how the strong passwords are longer and use combinations of words and characters that don’t naturally belong together.
The Passphrase Approach (Easier to Remember)
Here’s a trick I’ve started recommending more often. Instead of trying to remember something like “Xk9#mPqL2”, string together three or four random unrelated words.
How to create a passphrase:
- Think of four random words that have nothing to do with each other
- Capitalize the first letter of each (or do random capitalization)
- Optionally add numbers and symbols
- Don’t use common phrases – the words should be random
Examples:
- “SnowboardCoffeeNebula” – Three random nouns
- “CorrectHorseBatteryStaple” – Famous example of a strong passphrase
- “MushroomThunderVioletFebruary42” – Random words plus numbers
- “BlueMercury!BlackTiger@2024” – Words with symbols and numbers
Why this works:
- It’s long enough to be secure (usually 20+ characters)
- Your brain has an easier time holding onto actual words compared to a random string of characters and symbols
- It’s easier to type consistently without typos
- It still includes variety and unpredictability
Password Length Guidelines
- Minimum: 12 characters (acceptable for most purposes)
- Better: 16 characters (recommended)
- Best: 20+ characters (excellent security)
Every additional character makes the password exponentially harder to crack. A 20-character password is vastly more secure than a 12-character one.
Passwords to Avoid
Skip anything on this list:
- Common dictionary words
- Birthdays (yours or anyone close to you)
- Pet names or names of loved ones
- Sequential numbers like 123456
- Keyboard patterns like qwerty
- Any password you’ve used before on another account
- Your address, street name, or city
- Important dates or anniversaries
- Your username
- Common phrases from books, movies, or songs
I know reusing passwords feels convenient. But if one account gets compromised, every account sharing that same password becomes vulnerable too. If a website gets hacked and your password is stolen, attackers will try that same password on your email, bank, social media, and dozens of other places.
Should You Use a Password Manager?
A password manager generates and stores strong passwords for you, which solves the problem of trying to remember dozens of different complex passwords across every account you own.
How Password Managers Work
- You create one strong master password
- The password manager remembers all your other passwords
- When you visit a website, it auto-fills your credentials
- It stores passwords encrypted on your device and in cloud backup
- You only need to remember the master password
Popular password managers:
- 1Password
- LastPass
- Bitwarden
- Dashlane
- KeePass
- Windows Credential Manager (built into Windows)
For Your Laptop Login Specifically
I’d still recommend memorizing a strong passphrase directly for your laptop login, since you need to access your device even if your password manager isn’t immediately available or isn’t set up yet. What if:
- Your password manager is on a phone that’s dead?
- You need to log into the laptop to set up the password manager?
- You’re on a different computer?
- The password manager software fails?
For your actual laptop password, memorization is your backup.
For Everything Else
For everything else – email accounts, banking sites, shopping accounts, social media, streaming services – a password manager takes a massive amount of pressure off your memory. You can use completely random 20-character passwords for every service without worrying about remembering them.
Benefits of a password manager for other accounts:
- Use truly unique, strong passwords everywhere
- Auto-fill makes logging in faster
- Built-in security alerts if your passwords are compromised
- Stores secure notes and credit card information
- Syncs across all your devices
- Better than trying to remember multiple complex passwords
Beyond Passwords: Modern Alternatives That Might Be More Secure
A short PIN can actually be more secure than a long password, which sounds backwards until you understand how it actually works.
I was skeptical about this myself at first. It seems to go against everything we’ve been taught about password length equaling security. But the architecture behind a Windows Hello PIN is fundamentally different from a traditional password.
Windows Hello PIN: More Secure Than You Think
Here’s how it works:
- Your PIN gets stored locally on your device
- It’s stored inside a security chip called the TPM (Trusted Platform Module)
- This PIN never travels anywhere
- It’s not sent to a server for verification like a traditional password is
- Only your laptop can verify your PIN
- The PIN is cryptographically bound to your device’s hardware
Why this is more secure than traditional passwords:
- A traditional password gets transmitted and checked against a server somewhere
- This transmission creates opportunities for interception or theft through phishing attacks
- Your PIN simply never leaves your laptop
- This closes off an entire category of attack that passwords remain vulnerable to
- Even if Microsoft’s servers get hacked, your PIN is safe because it’s not stored there
This is why Microsoft actually recommends PIN over password for many users, even though a PIN is often shorter and uses fewer characters.
When a PIN Makes Sense
Use a PIN for your laptop login if:
- Your laptop has a TPM chip (most modern laptops do)
- You’re concerned about password interception attacks
- You want something easier to remember than a long password
- You rarely log into your laptop from different locations
PIN examples:
- 6-digit PIN: “482961” (secure despite being short)
- 8-digit PIN: “48296137” (even better)
- 4-digit PIN: “1234” (less secure, not recommended)
Facial Recognition and Fingerprint: Windows Hello Biometric Options
If your laptop has the right hardware, facial recognition and fingerprint scanning add another layer of convenient security. These work through Windows Hello, the same system that manages your PIN.
What you need:
- For facial recognition: An infrared camera (built into many modern laptops)
- For fingerprint: A fingerprint sensor (less common but increasingly available)
How it works:
- Your biometric data is stored on your device’s TPM
- Never sent to servers or stored in the cloud
- You can still use your password or PIN as a backup
- Faster than typing, nearly as secure
Not all laptops have this hardware, so check your device before expecting this feature to appear. Newer MacBook Pros, for example, have Face ID built in. Many newer Windows laptops have infrared cameras for Windows Hello Face.
The Future: Passkeys and Passwordless Authentication
Microsoft made passkeys the default sign-in method for new accounts back in May 2025, which tells you where authentication is heading overall.
What are passkeys?
- They work similarly to a PIN in that they’re device-bound
- But they add cryptographic verification that makes them even harder to compromise
- They’re not transmitted over networks
- They’re more phishing-resistant than passwords
- They work across devices in some implementations
The future of login might be:
- No passwords at all
- Passkeys or biometric verification
- Multi-factor authentication by default
- Passwordless sign-in for most services
Passwords aren’t disappearing overnight. But understanding how to change one is becoming more of a transitional skill rather than something you’ll need forever, as more services shift toward passwordless login methods entirely.
Troubleshooting: “My Password Change Isn’t Working” – Solutions
Most password change failures come down to one of five specific causes, and each one has a straightforward fix.
“I’m Using a Microsoft Account But Tried the Settings Method”
This is far and away the most common issue I see. If you’ve got a Microsoft account and tried changing your password through Windows Settings, it simply won’t work that way. You’ll likely get an error like “Unable to update password” or “The operation was not successful.”
The fix:
- Head to account.microsoft.com instead
- Follow the steps I covered earlier in the Microsoft Account section
- Sign out and back into your laptop to sync the change
- This is the only method that works for Microsoft accounts
“I Got an Error About Group Policy Restricting Password Changes”
If you’re seeing a message about Group Policy preventing changes, your laptop is likely managed by an organization – your employer or school, for example.
What this means:
- Someone in IT has set policies on your device
- You can’t change your password through normal methods
- The IT department controls password policies on managed devices
The fix:
- Contact your IT department or help desk directly
- They can either:
- Temporarily unlock policies so you can change it
- Change the password for you
- Direct you to an internal password change portal
- Provide alternative methods
- Don’t try to bypass these restrictions – they exist for security reasons
“I Don’t Have Administrator Rights”
Here’s something worth clarifying. You don’t need administrator rights to change your own password. Standard user accounts can update their own credentials without any special permissions.
Important distinction:
- Administrator access is only required if you’re trying to change someone else’s password on a shared device
- If you’re trying to change your own password and getting an error about admin rights, something else might be wrong
- Your account should have permission to change its own password by default
If you’re trying to change someone else’s password:
- You need administrator access to do this
- Ask the person with admin rights to change it for you
- Or have them add you to the administrators group first
“Password Doesn’t Meet Requirements”
Windows sometimes enforces minimum password requirements, depending on how your laptop is configured. Requirements might include:
- Minimum length (often 8 characters, sometimes more)
- Must include uppercase letters
- Must include lowercase letters
- Must include numbers
- Must include special symbols
- Can’t be based on previous passwords
If you’re getting this error:
- Try lengthening your password to at least 14-16 characters
- Add a mix of uppercase, lowercase, numbers, and symbols
- Avoid using any of your previous passwords
- Try something like “BlueMercuryThunder#2024” instead of “Pass123”
If the error persists:
- Contact your IT department (especially if it’s a work laptop)
- Write down the exact error message and error code if shown
- They can tell you exactly what requirements your specific laptop enforces
“I Changed Microsoft Password Online But Windows Still Asks for Old Password”
This is frustrating but common. Your new password changed successfully on Microsoft’s servers, but your laptop hasn’t synced yet.
What’s happening:
- Windows cached your old credentials
- It hasn’t pulled the updated password from Microsoft yet
- This is temporary and resolves itself
Step-by-step fix:
- Wait 5-10 minutes for automatic sync
- Check your internet connection is stable and strong. If you’re having connection issues, check out our guide on connected to network but no internet access
- Try signing out and back in with your new password
- If that doesn’t work, restart your laptop
- Try connecting to a different internet network if available
- Check that you’re using the exact same email address you changed the password for
- If none of this works, try removing and re-adding your Microsoft account (see the Microsoft Account section for steps)
“I Got Locked Out and Can’t Remember Any Password”
This is the most serious situation. You have a few options depending on your account type:
For Microsoft accounts:
- Go to account.microsoft.com on another device
- Click “Can’t access your account?”
- Follow the recovery process using backup email or phone verification
- Reset your password
- Sign back into your laptop
For local accounts:
- Use a password reset disk if you created one previously
- Or use Windows password recovery options (see recovery section below)
What to Do If You Forgot Your New Passwd: Recovery Options
If you’ve forgotten your password entirely, your recovery options depend on your account type and whether you prepared ahead of time with a reset disk.
Terminology First: “Change” vs. “Reset” (Why It Matters)
These two words get used interchangeably, but they mean different things and it’s important to understand the distinction:
Changing a password:
- Requires knowing your current password
- You use the current password to verify your identity
- You then create a new password
- This is what we’ve covered in most of this guide
Resetting a password:
- Means recovering access without knowing the old password at all
- Usually through some form of identity verification instead
- You might verify through security questions, backup email, or authenticator app
- The result is the same (new password) but the method is different
If You’re Using a Microsoft Account (Account.microsoft.com Recovery)
Step 1: Go to Microsoft Account Login Page
- On any device, go to account.microsoft.com
- On the sign-in page, look for a link like “Can’t access your account?” or “Forgot password?”
- Click it
Step 2: Enter Your Email Address
- Type the email address associated with your Microsoft account
- Click Next
Step 3: Complete Identity Verification
- Microsoft will walk you through verification
- This might involve:
- Entering a code sent to your backup email
- Entering a code texted to your phone
- Answering security questions you set up previously
- Using an authenticator app if you set one up
- Complete whichever verification method(s) appear
Step 4: Create a New Password
- Once verified, you’ll be prompted to create a new password
- Make it strong and different from previous passwords
- Type it again to confirm
Step 5: Sign Back Into Your Laptop
- Go to your laptop’s Windows login screen
- Enter your email and the new password you just created
- Give it a moment to sync if it’s your first attempt
- You should be able to log in
If You’re Using a Local Account Without a Reset Disk
This situation is trickier. Without a reset disk prepared ahead of time, your main option becomes the Windows recovery environment. This method requires some technical comfort and isn’t something I’d recommend for someone who’s never done it before.
The options:
- Use a password reset disk if you created one previously (best option)
- Use Windows recovery environment (technical, complex)
- Use third-party password recovery tools (risky, may cause data loss)
- Contact Microsoft support or take to a repair shop
Honestly, this is exactly why the next section matters so much. Prevention is far better than trying to recover access.
The Prevention Approach: Create a Password Reset Disk Now (BEFORE You Forget)
Do this while you still remember your current password, because it takes two minutes now and could save you hours of frustration later.
This only works for local accounts, not Microsoft accounts.
Step-by-Step:
Step 1: Insert a USB Drive
- Get a USB drive or external drive
- Make sure it’s formatted and empty (or you don’t mind files being on it)
- Insert it into your laptop
- Windows should recognize it
Step 2: Search for Password Reset
- Type “password reset” into your Start menu search bar
- Select “Create a password reset disk” from the search results
- This launches the Forgotten Password Wizard
Step 3: Follow the Wizard
- Click through the first screen
- Select your USB drive as the location to save the reset key
- Click Next
Step 4: Enter Your Current Password
- When prompted, enter your current local account password
- This verifies you have permission to create a reset disk
- Click Next
Step 5: Wait for the Disk to Be Created
- Windows creates an encrypted key file on your USB drive
- This takes a minute or so
- Don’t interrupt this process
- Wait for the confirmation message
Step 6: Finish and Store Safely
- Click Finish
- Eject your USB drive properly
- Store that USB drive somewhere safe, away from your laptop itself
- In a desk drawer, your bag, or another secure location
- You don’t need the drive for normal use – only for password recovery
If you ever do forget your local account password:
- Insert this USB drive at the Windows login screen
- Try logging in and get the “incorrect password” message
- Click “Reset password” (this option appears after failed attempts)
- Windows will walk you through resetting your password using the drive
- You’ll immediately be able to log in with your new password
Third-Party Password Recovery Tools (Option of Last Resort)
Tools like Lazesoft or AOMEI exist for recovering access without a reset disk, but I’d treat these as a genuine last resort for good reasons.
They carry real risks:
- Potential data loss if your files are encrypted through BitLocker
- They might not work on every system
- They can be slow and complicated
- There’s no guarantee they’ll work at all
- Some require technical knowledge to use
- They might trigger security software and cause false alarms
If official recovery options aren’t available to you, these tools are out there as a backup option. But go in understanding the risks involved rather than expecting a guaranteed fix.
Better than these tools:
- Restore from a backup if you have one
- Contact Microsoft Support
- Take your laptop to an authorized service center
- Reinstall Windows (will erase your data, but recovers access)
Frequently Asked Questions
Does it matter which Windows version I have when I change the password of the laptop?
Not really, no. Whether you’re running Windows 10 or Windows 11, the core method stays the same: Settings, then Accounts, then Sign-in options, then Password. Windows 11 just groups things slightly differently under a section called Ways to sign in, which can throw people off for a second if they’re used to the older layout.
But once you find that Password option, the actual steps how to change the password of the laptop are identical on both versions. I’ve walked people through this on older Windows 10 machines and brand new Windows 11 laptops, and the confusion is never about the process itself. It’s just about adjusting to where things moved.
Do I lose any files or data if I change my laptop password?
No. Changing your password happens entirely at the login level and has zero effect on your files, installed programs, or system settings. I know this worries people, especially if they’re imagining something similar to a factory reset, but the two processes aren’t related at all.
How long does it take to change my laptop password?
Using the Settings method, expect two to five minutes depending on how quickly you navigate the menus. The Ctrl+Alt+Delete shortcut cuts that down to under a minute once you’re familiar with it.
Can I change my password if I don’t know my current password?
Not through the standard change process, which requires your existing password for verification. What you’re looking for in that case is a password reset instead, which recovers access without needing the old password. Check the recovery section above for specific steps based on your account type.
What if I have both a PIN and a password? Do I have to change both?
No. Your PIN and your password operate as completely independent sign in methods. Changing one has zero effect on the other, so you can update your password without touching your PIN at all, or vice versa.
If I change my Microsoft account password, do I have to update my laptop?
Not immediately, though it’s good practice to sign out and back in afterward. Windows will eventually sync the new password automatically, but manually signing out speeds up that process and confirms everything’s working correctly right away.
Getting This Right the First Time
I’ve walked through a lot of ground here, and if there’s one thing I want you to take away, it’s this: knowing how to change the password of your laptop isn’t really about memorizing steps. It’s about knowing which steps apply to you.
Most of the frustration I’ve seen over the years comes from people trying the wrong method for their account type. Someone with a Microsoft account tries the Settings path and gets stuck, not because they did anything wrong, but because nobody told them that particular method only works for local accounts. Once you know whether you’re dealing with a local account or a Microsoft account, the rest falls into place pretty quickly.
The actual mechanics are simple:
- Settings → Accounts → Sign-in options → Password → Change
- Or Ctrl+Alt+Delete if you want to skip the menus entirely
- Or account.microsoft.com if you have a Microsoft account
- Mac users just need System Settings → Users & Groups
What matters more than the clicks themselves is what happens after:
- Create a password hint that actually protects you instead of giving away the answer
- Test your new password immediately instead of assuming it worked
- Make your password strong – long, unpredictable, and unique
- If you’re on a local account, set up a password reset disk now, while you still remember your current password, not after you’ve locked yourself out
- Consider alternatives like PINs or passkeys for your laptop login if you’re ready to move beyond passwords
I’d also push you to think beyond just passwords entirely. A PIN tied to your device through Windows Hello is often more secure than a long password you type in every time, even though that sounds backwards at first. Passwordless authentication is where things are heading anyway, so getting comfortable with these alternatives now isn’t a bad idea.
Whatever method you end up using, the whole process should take you a few minutes at most. If something doesn’t work on the first try, go back through the troubleshooting section and figure out which specific issue you’re running into. There’s almost always a straightforward fix.
Your laptop password is one small habit that protects everything else you do on that device. It guards access to your files, your personal information, your email, your banking data, your photos, and everything else stored on that machine. Worth getting right.
If you need help with other laptop-related tasks, you might want to check out our guides on how to screen record on HP laptop or how to clear RAM on Mac for additional productivity tips.