
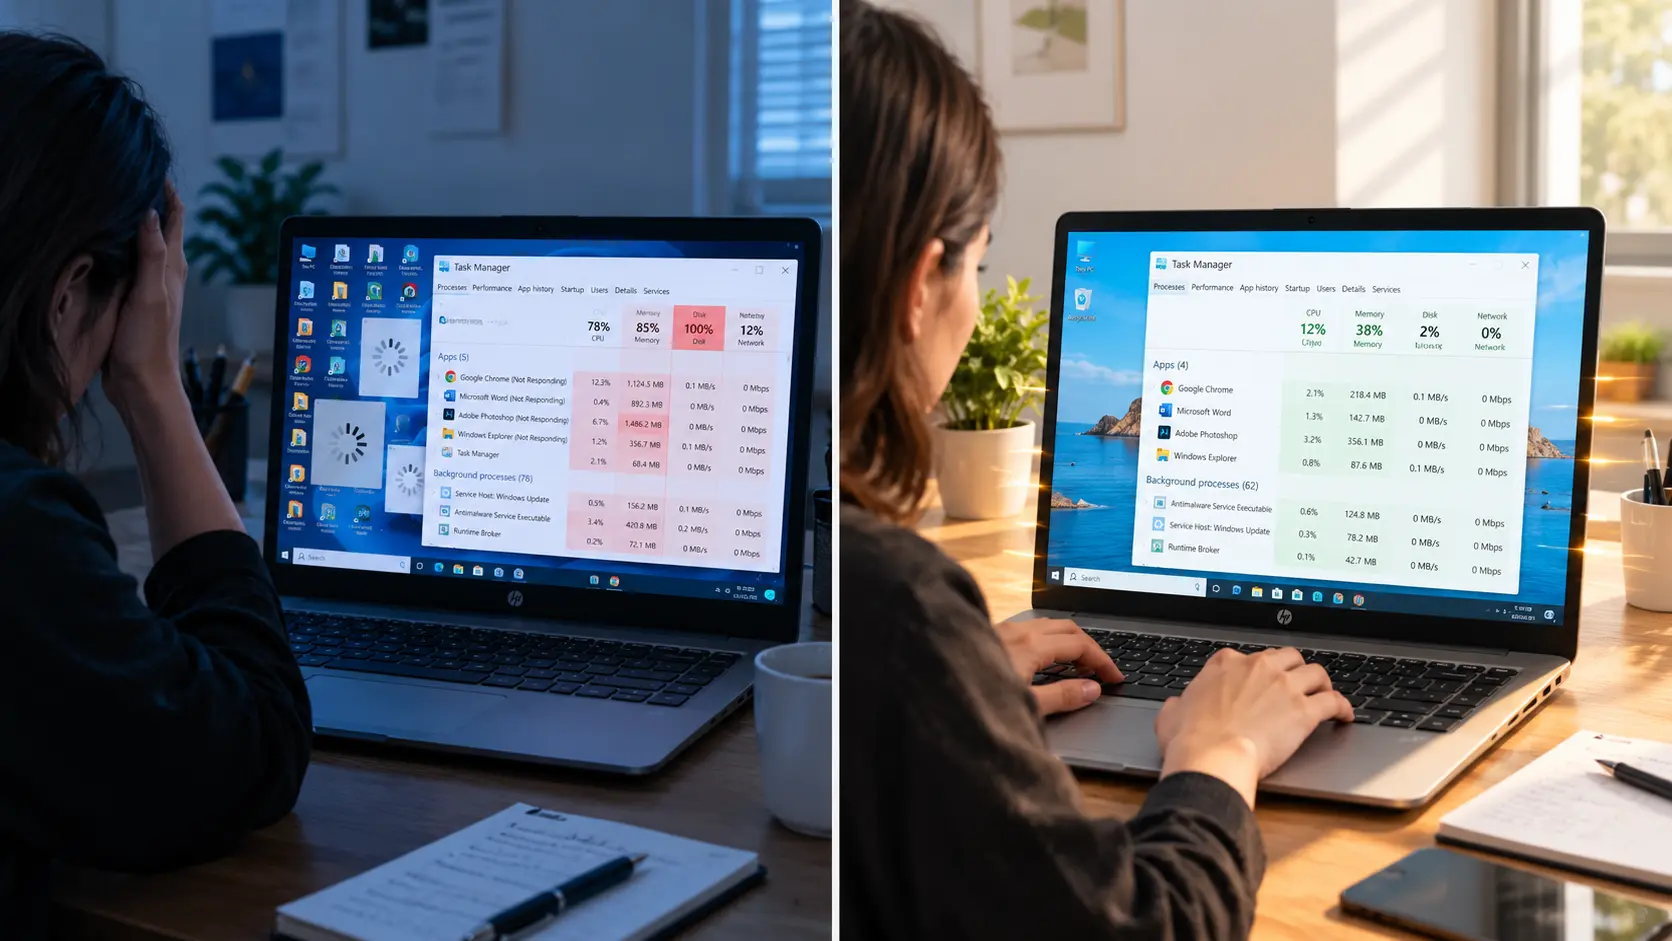
Start Here: Why Your PC Is Slow (And What You Can Do About It)
Your PC probably isn’t dying. It’s just buried under years of digital clutter it was never designed to carry.
I’ve seen this pattern over and over. Someone’s computer starts feeling sluggish, they assume the hardware is worn out, and they either spend money on a new machine or give up and live with the frustration. But in most cases, the slowdown has nothing to do with aging components. It has everything to do with what Windows has quietly accumulated in the background over months and years of normal use.
A study by the China Electronics Standardization Institute that tested 1,200 home and office computers found that roughly 68% of performance loss in machines aged one to five years came from unnecessary default system features, not hardware degradation. That number stopped me when I first came across it. Two thirds of slow PCs are slow because of software. Not because anything broke.
That changes how you should approach this.
The Two-Part Cause: Software Bloat and Hardware Bottlenecks
When a PC runs slow, the cause almost always falls into one of two categories.
The first is software accumulation. This is what most people are dealing with. Startup programs that launch automatically and sit in the background eating RAM. Temporary files that pile up in folders most users never open. Windows features like OneDrive syncing and visual animations that run constantly even when you don’t need them. Background processes from apps you forgot you installed three years ago.
The second is a genuine hardware bottleneck. This means your CPU, RAM, or storage drive physically cannot keep up with what you’re asking it to do. A mechanical hard drive trying to run Windows and load applications at the same time is a good example. The drive isn’t broken. It’s just slow by design, and software optimization can only carry it so far.
Here’s what matters: the first category is responsible for the majority of slow PC complaints. And every single problem in that category is fixable for free today, without buying anything.
Startup programs quietly consume RAM and CPU the moment Windows boots. Temporary files clog storage and slow down read and write operations over time. Background processes from apps like OneDrive, Discord, and Microsoft Teams sit idle but still draw system resources constantly. Cleaning up these three areas alone can feel like getting a completely different machine.
Why “It’s Just Old” Isn’t the Real Problem
Hardware doesn’t wear out the way people think it does. Your CPU from five years ago performs exactly the same calculations it did when you bought it. Your RAM doesn’t lose capacity as it ages. The physical components inside your PC are not getting slower.
What changes is everything around them. Windows accumulates more background tasks. Apps update themselves to require more resources. Features get added to the operating system that weren’t there when you first set up the machine. The hardware stays the same while the software environment gets heavier.
This is why a PC that felt fast two years ago now feels like it’s struggling. Nothing broke. The load increased.
Academic research from Monash University confirmed this distinction. Hardware performance doesn’t degrade with normal use. The operating system and software ecosystem become more demanding over time, and that’s what creates the feeling of a machine slowing down.
And here’s something that surprised me when I looked into it. In 2025, PassMark benchmark data showed the first ever year-over-year decline in average CPU performance across a large sample of machines. Laptop CPUs dropped by a measurable percentage on average. The point isn’t that hardware got worse. The point is that even new hardware isn’t automatically faster anymore. Buying a new machine doesn’t guarantee the experience you’re hoping for, especially if the same software habits follow you to the new device.
How to Know If You Can Fix This for Free or Need Hardware
Before spending money on anything, you need to know which category your PC falls into.
Open Task Manager. On Windows, press Ctrl, Shift, and Escape at the same time. Look at three columns: CPU usage, memory usage, and disk usage.
If your disk is sitting at or near 100% constantly, that’s your first signal. It usually means a mechanical hard drive that can’t keep up with Windows reading and writing data simultaneously. Software optimization helps here, but an SSD upgrade will make the biggest difference.
If your RAM is consistently above 80 or 90 percent while you’re just doing basic tasks, you’re running out of working memory. Disabling startup programs and background apps will recover some of that. If it’s still maxed out after cleanup, a RAM upgrade is worth considering.
If your CPU is spiking but RAM and disk look normal, a specific process is likely running heavy in the background. That’s a software problem with a software fix.
Most people reading this fall into the software category. The free fixes I’ll walk through in the next sections address startup programs, temp files, background services, and Windows features that silently drain performance. Try those first. You might not need to spend anything at all.
But if Task Manager shows your disk pegged at 100% or your RAM maxed out after cleanup, I’ll cover the hardware upgrade path later with honest numbers on what actually works and what’s worth the money.
Read Your Computer’s Vital Signs Using Task Manager (The Diagnosis Step Everyone Skips)
Most people skip straight to fixes. They clear some files, restart the PC, and wonder why nothing changed. The reason nothing changed is they never found out what was actually causing the slowdown in the first place.
Windows Task Manager is the one tool that answers that question. Task Manager is a built-in Windows diagnostic tool that shows you in real time exactly which programs and processes are consuming your CPU, memory, and disk resources. Open it before you do anything else, and you stop guessing. You start fixing the right thing.
This is the first thing I check on any slow PC. Every time.
Open Task Manager (Keyboard Shortcut That Saves Time)
Press Ctrl, Shift, and Escape at the same time. The task manager opens immediately.
That keyboard shortcut is faster than right-clicking the taskbar and faster than searching for it in the Start menu, and it works on both Windows 10 and Windows 11. If your PC is already sluggish, you want the quickest path to get there before something else slows the process down further.
Task Manager opens to the Processes tab by default. That is exactly where you want to start.
The Processes Tab: What Each Column Tells You
The Processes tab shows every program and background service currently running on your PC. Four columns matter most: CPU, memory, disk, and network.
CPU shows the percentage of processing power each program is using right now. Memory shows how much RAM each program has claimed. Disk shows how much read and write activity each program is generating on your storage drive. The network shows data being sent or received.
Click the column header for any of these, and the list sorts itself, highest to lowest. The culprit almost always floats to the top.
Here is what the numbers mean in practice. A CPU usage figure of 80 percent or higher on a single process while you are doing nothing demanding means that process is your bottleneck. Memory usage consistently above 80 percent of your total RAM means your PC does not have enough working memory for what you are asking it to do. Disk usage sitting at or near 100 percent is the one I see most often on slow machines, and it is also the one that confuses people most.
Which brings me to something worth knowing.
A disk showing 100 percent usage does not mean your hard drive is failing. It means something is reading from or writing to the drive constantly, and the drive cannot keep up with the demand. On a mechanical hard drive, that threshold is reached surprisingly easily. Windows Update downloading files in the background, Windows Search indexing your documents, or your antivirus running a scheduled scan can all push a traditional HDD to 100 percent disk usage for hours. The drive is fine. It is just genuinely slow hardware dealing with too many requests at once.
But if you see a process called Antimalware Service Executable sitting at the top of the Disk column with usage above 80 percent, that is Windows Defender mid-scan. Not a threat. Not a failure. Just a scan. Give it time to finish, and the disk usage drops back down on its own.
The Startup Tab: Identifying What Launches on Boot
Switch to the Startup tab in Task Manager. This is where slow boot times live.
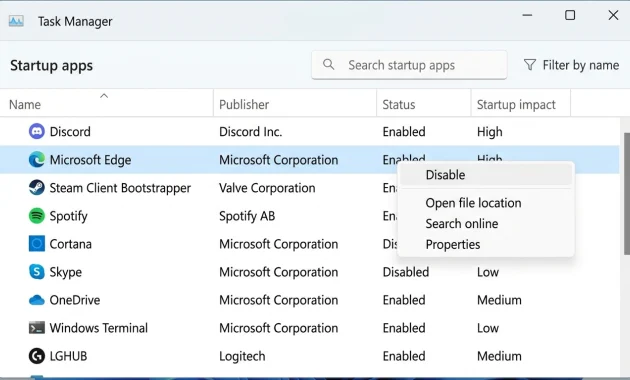
Every program listed here launches automatically the moment Windows starts. Some of them are necessary. Most of them are not. The column labeled “Startup impact” tells you which ones are hitting your boot time hardest, showing values like “Low,” “Medium,” or “High.”
Right-click any program in this list and select Disable. The program does not get deleted. It simply stops launching at startup. You can still open it manually whenever you need it.
The usual offenders I see on most machines are Microsoft Edge, Discord, Spotify, Steam, Skype, and various manufacturer tools that came pre-installed. None of those need to run the moment Windows boots. Disabling them takes thirty seconds, and the difference in boot speed is noticeable. Not subtle. Genuinely noticeable.
One thing to be careful about: do not disable programs listed under Microsoft Corporation or Windows as the publisher unless you know exactly what they do. Third-party applications are fair game. System components are not.
The Performance Tab: Seeing Your System’s Overall Health
Click the Performance tab. This view gives you a real-time graph of your system’s overall health across CPU, memory, disk, and network usage simultaneously.
The graph shows you patterns over time, not just the current second. If your CPU graph shows constant spikes, something is running in bursts. If memory shows a flat line near the top of the chart, your PC is at its RAM limit and stays there. If the disk graph is a solid bar at the top with no dips, your storage drive is maxed out and never catching up.
The Windows 11 version of Task Manager breaks this down with slightly more detail than Windows 10, including separate graphs for individual CPU cores and more granular disk performance data. But the core information is the same across both versions.
At the bottom of the Performance tab you will also see a link that says Open Resource Monitor. That tool goes even deeper and shows you which specific files on your disk are being accessed and by which process. Useful if Task Manager shows high disk usage but you cannot identify which process in the Processes tab is responsible.
CPU vs RAM vs Disk: Which Is Your Bottleneck?
This is the question Task Manager exists to answer. And the answer changes what you do next.
If CPU usage is consistently above 80 percent and the culprit is a specific program, that program is the problem. Close it, disable it from startup, or uninstall it if you do not need it.
If memory usage is above 80 percent during normal tasks, your PC is low on RAM. Restarting clears accumulated memory usage and buys temporary relief. But if it maxes out again quickly after a fresh restart with nothing unusual open, a RAM upgrade is likely the only permanent fix.
If disk activity is pegged near 100 percent, the cause is almost always one of three things. Windows Update is running in the background. Antivirus scanning. Or a mechanical hard drive that is simply too slow for modern Windows. The first two resolve on their own. The third one does not. A slow boot time, sluggish app launches, and a disk column that never drops below 80 percent are all signs pointing at the hard drive itself as the bottleneck.
And here is the part that actually matters for deciding what to do. CPU and memory problems are usually software problems. Disk problems at 100 percent on a traditional HDD are usually a hardware speed problem that software can only partially address.
Identify which resource is your bottleneck first. Then fix that specific thing. Everything else is just noise.
Disable Startup Programs (The Quickest Win 1-Minute Fix)
If your PC takes two minutes to feel usable after booting, startup programs are almost certainly the reason. Not a virus. Not failing hardware. Just a pile of applications that decided your boot sequence was a good time to launch themselves.
Disabling unnecessary startup programs is the single fastest improvement you can make to a slow Windows PC. The fix takes under a minute, costs nothing, and the results show up immediately on the next restart. Every tech expert I’ve seen cover this topic puts it at the top of the list. Microsoft recommends it. Intel recommends it. And every video walkthrough on Windows optimization covers it as step one.
The reason startup programs hurt performance isn’t just boot time, though that gets worse too. Every program that launches at startup claims a piece of your RAM and CPU the moment Windows loads. So by the time you actually sit down to use your PC, resources are already being consumed by apps you haven’t even opened intentionally yet.
Open Task Manager and go to the Startup Tab.
Press Ctrl, Shift, and Escape together to open Task Manager. If that doesn’t work on your machine, right-click anywhere on the taskbar and select Task Manager from the menu that appears.
Once Task Manager is open, click the Startup tab. On Windows 11 the tab is visible at the top of the window. On Windows 10 it appears along the row of tabs just below the title bar.
What you see next usually surprises people.
Most machines I’ve looked at have somewhere between eight and twenty programs listed there, and the owner recognizes maybe three or four of them. The rest are apps that installed themselves into startup quietly, without asking, and have been sitting there consuming resources on every single boot since the day they were installed.
Which Apps to Disable First (Start With High-Impact)
Look at the column labeled Startup impact. Windows rates each program as low, medium, or high based on how much the program slows down your boot time. Start with anything marked High and work your way down.
The most common culprits I see across different machines are
Microsoft Edge loads even if you use a different browser as your default.
Discord—launches at startup by default and stays running in the background
Steam—a gaming platform that has no reason to run unless you are actively gaming
Skype still auto-installs into startup on many Windows machines despite most people not using it.
Spotify—starts up to keep music ready, at the cost of your RAM
Phone Link—a Microsoft app that connects your phone to Windows; useful sometimes but not on every boot
Google Chrome installs a background update service that runs at startup even when the browser is closed.
Scanner and printer tools—manufacturer software that most users never open directly
Opera, third-party browser extensions, and cloud backup tools—all common offenders that add themselves silently
Anything from a software developer you don’t recognize, or from an app you installed once and forgot about, is a candidate for disabling.
Which Apps to Keep (Don’t Touch These)
This is the part most guides gloss over. And skipping it is exactly how people accidentally break something.
Do not disable anything listed with Microsoft Corporation or Windows as the publisher, unless you know with certainty what the program does. Windows security tools, driver services, and core system components sometimes appear in the Startup tab. Disabling them can cause real problems, from missing system tray icons to Windows features that stop working correctly.
A safe rule: if the program name or publisher is unfamiliar and a quick search shows it is a Windows component, leave it alone. If the program is clearly a third-party application you installed, disabling it is almost always safe.
Your antivirus program is one exception worth noting. Keep antivirus startup enabled. Disabling it means your PC boots without active protection running, which is a tradeoff not worth making for a small speed gain.
Right-Click and Select Disable
Right-click on any program you want to stop from launching at startup. A small menu appears with two options: Enable and Disable. If the program is currently set to launch at boot, it shows as enabled. Click Disable.
That is it.
The program does not get uninstalled. The program does not stop working. Disabling startup simply means the program waits for you to open it manually instead of launching automatically. You can re-enable anything at any time by right-clicking it again and selecting Enable.
Go through the list and disable every high-impact and medium-impact program you don’t need running immediately at boot. On a machine with fifteen or twenty startup programs, disabling eight to ten of them is not unusual. And the combined effect of removing that many early resource claims adds up fast.
Restart and Notice the Difference
Close Task Manager and restart your PC. A full restart, not sleep, not hibernate. The changes only take effect after a complete reboot.
Pay attention to how quickly your desktop becomes fully usable after logging in. Not just when the desktop appears visually, but when you can actually click something and have it respond without a delay. On machines with many startup programs disabled, that gap shrinks noticeably. Sometimes it goes from ninety seconds of sluggishness to twenty seconds of actual readiness.
Boot time is one part of the improvement. The other part is less obvious but just as real. With fewer programs consuming RAM and CPU in the background from the moment Windows loads, everything you do open afterward gets more resources to work with. Applications launch faster. Switching between windows feels less sticky.
And this is exactly the fix that most people skip because it sounds too simple. One minute in Task Manager, and your boot time actually gets better. Not marginally better. Genuinely better.
Stop Hidden Resource Drains: OneDrive, Background Apps, and Visual Effects
Here is something that catches most people off guard. You close every program. The desktop is empty. Nothing is visibly running. And the PC is still slow.
This happens because Windows runs a layer of activity underneath what you can see. Three specific features are responsible for most of that invisible load: OneDrive continuously syncs files to the cloud, background apps keep running after you close them, and visual effects consume CPU and GPU resources every time you move a window or open a menu.
None of these are necessary for Windows to function. All three are convenience features that Windows enables by default. And disabling or adjusting each one takes less than two minutes.
Microsoft officially acknowledged in 2025 that OneDrive syncing and visual effects are significant performance drains on Windows systems, particularly on machines with limited RAM. That is not a workaround or a trick. That is the company that built the operating system, confirming that two of its own default features slow your PC down.
Stop OneDrive Background Syncing (Pause or Unlink)
OneDrive is a cloud storage service built into Windows that automatically uploads your files to Microsoft’s servers. The problem is that OneDrive does not wait for a convenient moment to sync. OneDrive monitors your files continuously and uploads changes in real time, consuming both bandwidth and CPU resources while doing so.
On slower machines or machines with older hard drives, this background syncing can keep the disk busy constantly. It shows up in Task Manager as Microsoft OneDrive in the Disk or CPU column, sometimes sitting there at surprisingly high usage while you are doing nothing at all.
You have two options depending on how you use OneDrive.
If you actively use OneDrive for cloud backups and file access across devices, pause the sync instead of disabling it entirely. Click the OneDrive icon in your system tray, the small cloud icon near the clock in the bottom right corner of your screen. Select the Settings or gear icon, then choose Pause syncing. You can pause for two hours, eight hours, or twenty-four hours. Pausing stops the background activity without disconnecting your account.
If you do not use OneDrive at all, or if you have a local backup solution and do not need cloud sync, unlinking is the cleaner fix. Click the OneDrive icon in the system tray, go to Settings, then select the Account tab, and click Unlink this PC. OneDrive stops syncing immediately and removes itself from startup. Your files already synced to the cloud stay there. Nothing gets deleted.
That second option, unlinking entirely, is what Technology Gyan recommends in their optimization walkthrough. And the reasoning is straightforward: if you are not using a feature and it is consuming resources, remove it from the equation completely.
Disable Background Apps (Settings → Privacy → Background Apps)
Background apps are programs that continue running after you close them. Not in the obvious way where the window minimizes to the system tray. Truly running in the background, using memory and occasionally waking up to check for notifications, sync data, or refresh content.
Windows 10 has a dedicated toggle for this. Go to Settings, then Privacy, then scroll down the left sidebar to Background apps. At the top of that page is a master toggle labeled Let apps run in the background. Turn that off.
On Windows 11 the path is slightly different. Go to Settings, then Apps, then find the individual apps you want to restrict. Click on an app, select Advanced options, and under Background app permissions, change the setting from Always to Never or Power optimized.
The Windows 11 approach requires a bit more effort because the single master toggle was removed. But working through the list of apps and restricting background access on the ones you do not need is worth the extra few minutes.
The apps that typically consume the most resources in the background are communication tools like Teams and Slack, social media apps installed from the Microsoft Store, news and weather apps that refresh content periodically, and any app that shows notifications. If an app has no reason to notify you while you are not using it, background access for that app has no reason to be on.
The One Setting That Changes Everything: Visual Effects
This is the fix that surprises people most. And the one that most PC optimization guides either bury at the bottom or skip entirely.
Windows runs a continuous layer of visual animations. Windows fade in and out when you open them. Shadows appear beneath dialog boxes. The taskbar and Start menu have transparency effects. Menus animate as they open. Text has smoothing applied to its edges. Each of these effects consumes a small amount of CPU and GPU resources every single time they render.
On a high-end machine with a dedicated graphics card, the cost is negligible. On a mid-range or older PC, or on any machine where resources are already stretched, that continuous overhead adds up noticeably.
Adjusting visual effects for best performance is the fix. Here is the exact path.
Right-click on the Start button and select System. Then click Advanced system settings on the right side of the window. In the System Properties dialog that opens, go to the Advanced tab. Under the Performance section, click Settings. A new window opens called Performance Options.
You will see four radio buttons at the top. The one you want is adjusted for best performance. Selecting that option disables all visual animations and effects at once. Click Apply, then OK.
The change takes effect immediately. No restart needed.
What you notice first is that windows open and close without animation. Menus appear instantly instead of fading in. The desktop looks less polished visually. But the responsiveness feels completely different. Apps feel snappier. The whole interface responds faster because Windows is no longer spending resources on effects you were barely noticing anyway.
If the stripped-down look bothers you, there is a middle option. Select Custom instead of Adjust for best performance, and manually check only the effects you want to keep. The two worth keeping for most people are smooth edges of screen fonts, which keep text readable, and showing thumbnails instead of icons, which keeps your image files showing previews in File Explorer. Everything else can stay unchecked.
But honestly, most people who try Adjust for best performance leave it that way. The speed difference is more noticeable than the visual difference.
Restart Your PC (Why It Actually Works and How Often You Should Do It)
Most people treat restart as the tech support cliche. Turn it off and on again. And because it sounds too simple, they skip it and move on to more complicated fixes that often do less.
But restart works for a specific technical reason that has nothing to do with magic or placebo. When you restart your computer, Windows clears the RAM of all temporary data that has been sitting there since the last boot, stops every background process whether it is responding or not, and resets any memory leaks that accumulated from programs running for hours or days straight. A full restart gives your PC a clean slate.
Intel describes the restart process as clearing temporary memory and stopping hidden background tasks. That is exactly what happens. RAM is working memory. The longer your PC runs without a restart, the more of that working memory gets claimed by data that is no longer actively needed but was never released. Programs that crashed hours ago sometimes leave pieces of themselves running in the background. Windows services that should have stopped keep hanging around consuming resources.
Research on PC performance shows that after 72 hours of continuous uptime, background processes can consume an additional one to two gigabytes of RAM that would otherwise be available for the programs you are actually using. Performance degradation from extended uptime can reach 20 percent or more on systems that have been running without a restart for several days.
That is not a small difference. And the fix takes thirty seconds.
What Restart Actually Does (Clear RAM, Stop Orphaned Processes)
RAM is where Windows keeps data that programs are actively using right now. When you open an application, Windows loads parts of that program into RAM because RAM is much faster than reading from your hard drive or SSD every time the program needs something. When you close the application, Windows is supposed to release that RAM back to the available pool.
Supposed to.
In practice, some programs do not release all of their memory when they close. Memory leaks happen. Background processes that were spawned by an application keep running even after the main program exits. Windows services that handle updates, indexing, or syncing sometimes get stuck in a loop and never properly finish their task. Over time, your available RAM slowly shrinks as more and more of it gets claimed by data and processes that are no longer needed but were never cleared out.
A restart forces everything out. When Windows shuts down, every program closes whether it wants to or not. Every process ends. Every piece of RAM gets wiped. When Windows starts back up, only the essential system services and the programs you have enabled in startup get loaded. Everything else stays off until you open it manually.
That is why a PC that felt sluggish before a restart often feels noticeably faster afterward. The sluggishness was not hardware failure. The sluggishness was accumulated memory bloat that a restart clears in one action.
And this applies to sleep mode too. Putting your PC to sleep does not clear RAM. Sleep suspends activity but keeps everything in memory exactly as it was. Hibernate writes RAM to disk and powers down, but when you wake the PC back up, everything gets restored to the exact state it was in before. Neither sleep nor hibernation gives you the clean slate that a full shutdown and restart provides.
How Often to Restart (Weekly Minimum, Daily for Heavy Use)
For typical use, restart your PC at least once a week. That is frequent enough to prevent serious memory bloat from building up without being disruptive to your workflow.
If you use your PC heavily, running multiple applications for hours every day, gaming, video editing, or keeping dozens of browser tabs open across multiple sessions, daily restarts make more sense. The more demanding your usage pattern, the faster memory and process accumulation become a problem.
The research data showing performance degradation after 72 hours of uptime suggests that three days is about the threshold where leaving a PC running starts to cost you noticeable speed. A weekly restart keeps you well under that threshold.
Some people leave their PCs on continuously for weeks or months, thinking that powering the machine on and off repeatedly causes wear. That belief is outdated. Modern PCs are built to handle thousands of power cycles without issue. The stress of constant power cycling was a concern with older hardware from decades ago. Current hardware handles restarts without any measurable wear.
What does cause measurable performance loss is extended uptime. Leaving your PC on for convenience ends up costing you the speed you were trying to preserve.
Windows also applies certain updates and configuration changes only after a restart. Security patches, driver updates, and system file repairs often sit in a pending state until you reboot. So regular restarts do double duty: they clear accumulated resource bloat and they make sure updates actually take effect instead of sitting in limbo.
One last thing worth knowing. Fast Startup, a feature enabled by default on many Windows installations, technically does not perform a full restart when you select Shut Down from the Start menu. Fast Startup puts Windows into a hibernation-like state to speed up the next boot. If you want a true full restart, either select Restart instead of Shut Down or disable Fast Startup entirely in Power Options.
Free Up Disk Space: Where Junk Files Hide (And How to Delete Them)
Temporary files do not announce themselves. They sit in folders most users never open, accumulating quietly over weeks and months until gigabytes of disk space are gone and you have no idea where they went.
Windows creates temporary files constantly. Every time you install a program, download an update, browse the web, or open a document, temporary data gets written to disk. These files are supposed to be deleted automatically when they are no longer needed. But in practice, many of them never get cleaned up. They just stay there, taking up space, slowing down disk operations, and contributing to the general performance drag that makes an older Windows installation feel heavier than a fresh one.
The tricky part is that temporary files hide in multiple locations. There is no single folder labeled Junk Files where everything lives. Windows scatters temp data across different system directories depending on what created the file and what it was used for. Cleaning all of it requires knowing where to look and which method works for each location.
I have seen cleanup operations recover several gigabytes of space on machines that were not doing anything unusual. Just normal use over six months to a year. And in one extreme case I came across, a user who had not emptied their Recycle Bin in over a decade had accumulated more than 300 gigabytes of deleted files sitting in that folder alone. Opening the Recycle Bin on that machine took five minutes just to load the file list.
Most cases are not that extreme. But even a few gigabytes of unnecessary temp files sitting on a drive, especially a smaller SSD, makes a measurable difference in how the system performs.
Method 1: Use Disk Cleanup Utility (Fastest for Most Users)
Disk Cleanup is a built-in Windows tool that scans your drive and identifies categories of files that are safe to delete. The tool has been part of Windows for years, and it works well for a quick cleanup without needing to dig into individual folders manually.
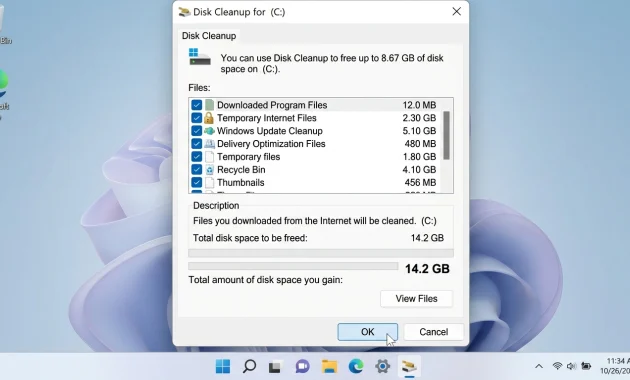
Press the Windows key and R at the same time to open the Run dialog. Type cleanmgr and press Enter. A window appears asking which drive you want to clean. Select your main system drive, usually C:, and click OK.
Disk Cleanup scans the drive and calculates how much space each category of junk is using. This takes anywhere from a few seconds to a minute depending on how much data is on the drive. Once the scan finishes, a list appears showing file types like Temporary Internet Files, Downloaded Program Files, Recycle Bin, Temporary Files, Thumbnails, and others.
Check every box in the list. All of these categories are safe to delete. None of them contain your personal documents, photos, or important data. These are system and application leftovers that Windows no longer needs.
At the bottom of the window, Disk Cleanup shows the total amount of space you will gain by deleting the selected categories. Click OK, then confirm the deletion when prompted.
For a deeper clean, click the “Clean up system files” button before selecting categories. This option requires administrator permission and scans for additional file types like old Windows Update files and previous Windows installations that can consume gigabytes of space on their own.
Disk cleanup is the easiest method for most people. One command, a few clicks, and the tool handles the rest.
Method 2: Manually Clear Prefetch, Temp, and %Temp% (Advanced)
This method gives you more control and clears locations that Disk Cleanup sometimes misses. It requires a bit more manual work, but the results are thorough.
There are three specific temp file locations worth clearing manually: the Prefetch folder, the Temp folder, and the %Temp% folder. Yes, there are two different folders, both called Temp. They store different types of temporary data and both accumulate junk over time.
Prefetch folder: Press the Windows key and R to open Run. Type prefetch and press Enter. Windows asks for administrator permission. Click Continue. A folder opens showing files with a .pf extension. These are prefetch files that Windows uses to speed up application launches by caching information about programs you run frequently. Clearing this folder is safe. Windows regenerates the files it actually needs the next time you use those programs.
Select any file in the folder, then press Ctrl and A together to select all files. Press Shift and Delete at the same time. This deletes the files permanently without sending them to the Recycle Bin. Confirm when prompted.
Temp folder: Press the Windows key and R again. Type temp and press Enter. This opens the system-wide temp folder where Windows and installed programs store temporary data. Select all files with Ctrl and A, then delete with Shift and Delete.
Some files in this folder may be locked because a program is currently using them. If you see an error saying a file cannot be deleted, check the box that says “Do this for all current items” and click Skip. Windows will delete everything it can and skip the files that are locked. The locked files are usually small and actively in use, so leaving them is fine.
%Temp% folder: Press the Windows key and R one more time. Type %temp% with the percent signs and press Enter. This opens the user-specific Temp folder, which stores temporary data for applications running under your user account. This is separate from the system temp folder you just cleared. Select all with Ctrl and A, delete with Shift and Delete, and skip any locked files.
These three folders together often hold more junk than Disk Cleanup catches on a standard scan. The manual method takes an extra minute, but the thoroughness is worth it.
Method 3: Enable Storage Sense (Set It and Forget It)
Storage Sense is an automated cleanup feature built into Windows that runs in the background and deletes temporary files on a schedule without you needing to do anything manually. Windows 10 has this feature. Windows 11 has an improved version that is more aggressive about clearing junk automatically.
Go to Settings, then System, then Storage. On the Storage page, look for a toggle labeled Storage Sense. Turn it on.
Click Configure Storage Sense or run it now to set how often the tool runs and what it deletes. You can set Storage Sense to run every day, every week, every month, or only when disk space gets low. For most people, running it weekly is a good balance between keeping the drive clean and not interrupting anything.
Storage Sense automatically deletes files in the Recycle Bin that have been there for more than 30 days, clears temporary files that have not been modified in a set number of days, and removes old Downloads folder items if you enable that option. You can adjust all of these thresholds in the configuration settings.
The advantage of Storage Sense is that cleanup becomes automatic. You do not have to remember to run Disk Cleanup or manually clear temp folders. Windows handles it in the background, and you just get the benefit of a cleaner drive without thinking about it.
If you are on Windows 11, Storage Sense is the modern approach and the one Microsoft now recommends as the default way to manage disk space over time.
Empty Your Recycle Bin (And Check for Massive Buildup)
Files you delete from your PC do not actually disappear immediately. They move to the Recycle Bin and sit there indefinitely until you manually empty the bin. This acts as a safety net so you can recover a file if you deleted it by mistake. But it also means deleted files continue consuming disk space for as long as they stay in the bin.
Right-click the Recycle Bin icon on your desktop and select Empty Recycle Bin. Confirm when prompted. Everything in the bin gets permanently deleted, and the space is freed.
Before emptying, you can open the Recycle Bin to see what is inside. If the bin takes more than a few seconds to open, or if the file count and size numbers are surprisingly high, that is a sign of serious buildup. I have seen cases where users had tens of gigabytes in the Recycle Bin without realizing it. The extreme case I mentioned earlier, over 300 gigabytes and more than half a million files, came from someone who genuinely did not know the Recycle Bin needed to be emptied manually. They thought Windows handled it automatically.
Windows does limit the Recycle Bin size as a percentage of your total drive capacity, usually around five percent. On a one terabyte drive, that means the Recycle Bin can hold up to 50 gigabytes before Windows starts permanently deleting the oldest files to make room for new deletions. But even 50 gigabytes of wasted space is 50 gigabytes you could be using for something else.
Empty the Recycle Bin regularly. Or enable Storage Sense and let it handle the task automatically.
What About Personal Files? (Don’t Delete Unnecessarily)
Here is a myth that needs correcting. Deleting your photos, videos, music, or documents does not make your PC faster.
Disk space and system speed are related only when your drive is nearly full. If your drive has less than 10 or 15 percent of its total capacity free, Windows starts to struggle. File operations slow down. On a traditional hard drive, fragmentation gets worse. On an SSD, performance can degrade if the drive does not have enough free space to manage its internal operations efficiently.
But if your drive has reasonable free space, the presence of personal files does not affect performance at all. A drive holding 200 gigabytes of family photos performs exactly the same as an empty drive with 200 gigabytes of free space, assuming both have adequate room left over for Windows to operate normally.
What does affect performance is the type of file we have been talking about in this section: temporary files, cached data, leftover installers, old update files, and junk accumulating in system folders. That data is actively accessed by Windows during normal operations, or it sits in locations that Windows scans regularly, or it clutters up directories that programs need to search through to find what they actually need.
Personal files sit in your user folders and do nothing unless you open them. Temporary files sit in system folders where Windows is constantly reading and writing.
Clean the temp files. Keep the personal files. And if you are worried about space, move large media libraries to an external drive or a secondary internal drive if your PC has one. But do not delete personal data thinking it will make Windows run faster. It will not.
Scan for Hidden Threats: Windows Defender vs. Advanced Malware Tools
Malware gets blamed for slow PCs far more often than it deserves. Most malware is designed to be invisible. Malware developers want to stay on your system as long as possible, stealing data or using your resources for whatever their actual goal is. Making your PC noticeably slow defeats that purpose because a slow PC gets attention, and attention leads to scans, and scans lead to removal.
The truth is that startup programs, disk clutter, and background processes cause the majority of slowdowns. Not viruses. But that does not mean you should skip malware scanning entirely. Malware scanning is a security measure that also happens to rule out one possible cause of performance issues. And in the rare cases where malware actually is the problem, finding and removing it matters for reasons that go beyond speed.
Windows Defender, the antivirus protection built into Windows, is enough for most people. The 2025 version of Windows Defender is significantly lighter and faster than older versions from a few years ago. Microsoft has improved the scanning engine to use fewer system resources while still catching threats effectively. You do not need to install third-party antivirus software unless you have a specific reason to prefer a different tool.
What you do need to understand is how to use Windows Defender without letting it become a resource drain itself and when to go deeper if the built-in scan is not giving you confidence.
Windows Defender Quick Scan (Built-In, Free)
Open the Start menu and search for Windows Security. Click the app to open it. In the main window, select Virus and Threat Protection from the menu on the left. Under current threats, you will see a button labeled Quick scan. Click it.
The quick scan checks the most common locations where malware typically hides: startup folders, system directories, running processes, and recently modified files. A quick scan takes anywhere from a few seconds to a couple of minutes depending on how much activity your PC has seen recently. Most of the time, this level of scan is sufficient.
If the quick scan finishes and reports no threats found, you are done. Windows Defender is running real-time protection in the background continuously, so as long as the scan came back clean and you have not been doing anything unusual like downloading files from questionable sources, you can trust the result.
If the scan does find something, Windows Defender will either quarantine the threat automatically or give you options for what to do with the detected file. Quarantine is the safe default. The file gets isolated, where it cannot do anything, and you can review it later or delete it permanently.
For a more thorough check, you can run a full scan instead of a quick scan. A full scan examines every file on your system. The process takes much longer, sometimes an hour or more on machines with large drives, and it will slow down other tasks while the scan runs. I only recommend a full scan if you have a specific reason to suspect an infection that a quick scan might have missed. For routine checking, a quick scan is enough.
Reduce Antimalware Memory Usage (Add Exclusions for Trusted Folders)
If you open Task Manager and see a process called Antimalware Service Executable consuming 200 megabytes of memory or more, that is Windows Defender actively scanning files. During a scheduled scan or when you are copying large numbers of files, this memory usage is completely normal. Windows Defender scans files in real time as they are accessed, and that scanning process requires resources.
But if Antimalware Service sits at high memory usage constantly, even when you are not doing anything scan-intensive, you can reduce the load by adding exclusions. Exclusions tell Windows Defender to skip certain folders when scanning. You add exclusions for folders that contain only files you trust and that do not change frequently, like your photo library or your music collection.
Go back to Windows Security and open Virus and Threat Protection. Scroll down and click Manage settings under Virus and threat protection settings. Scroll further down until you see a section labeled Exclusions. Click Add or remove exclusions.
Click Add an exclusion and select Folder. Navigate to the folder you want to exclude. Common choices are your Pictures folder, your Documents folder if it contains mostly personal files you created yourself, and your Music or Videos folders if you have large media libraries.
Be careful what you exclude. Do not exclude your Downloads folder. Do not exclude folders where programs install themselves or where Windows stores system files. Those are exactly the locations where threats are most likely to appear. Only exclude folders where you store personal content that you know is safe.
Adding a few exclusions for large, static folders can noticeably reduce the memory and CPU usage of the Antimalware Service without creating real security risk. The tradeoff is that Windows Defender will not automatically scan files in those excluded folders unless you run a manual scan and specifically include them.
Advanced Option: HitmanPro (For Thorough Removal)
If Windows Defender found something but you are still seeing strange behavior, or if you want a second opinion from a different scanning engine, HitmanPro is a solid choice. HitmanPro is a specialized malware removal tool that uses cloud-based detection to identify threats that traditional antivirus software sometimes misses.
HitmanPro offers a free 30-day trial. You can download it from the official website, run a full system scan, and remove any threats it finds, all within the trial period. After 30 days, the tool requires a paid license if you want to keep using it, but for a one-time deep scan, the trial is enough.
Download HitmanPro and run the installer. The tool does not require installation in the traditional sense. You can run it as a portable scan tool directly after downloading. When you launch HitmanPro, select the option for a one-time scan. The scan begins immediately and checks your system against multiple antivirus engines simultaneously through cloud lookups.
The scan typically takes 10 to 20 minutes. HitmanPro is more aggressive than Windows Defender and catches things like tracking cookies, adware, potentially unwanted programs, and other low-level annoyances that Defender might not flag as threats. If HitmanPro finds anything, it presents a list of detections with the option to quarantine or delete each item.
Most of what HitmanPro catches on a typical home PC is not dangerous in the traditional virus sense. Adware, browser toolbars, tracking cookies, and bundled software that installed itself alongside something you wanted. But removing that clutter can improve both performance and security, so it is worth doing if the scan turns up results.
And here is the part worth repeating one more time. If you run both Windows Defender and HitmanPro and both come back clean, and your PC is still slow, malware is not your problem. The problem is almost certainly one of the software optimization issues covered in earlier sections of this guide. Disk usage, startup programs, background services, or insufficient hardware. Fix those and the slowness will go away without needing to chase a malware infection that probably does not exist.
The One Setting That Changes Everything: Adjust Visual Effects (Massive Speed Gain)
I discovered this setting by accident when helping a friend with their sluggish laptop. Their computer had decent specs but felt like it was running through mud. One click in the visual effects settings changed everything.
Windows loads dozens of animations, shadows, and transparency effects every time you open a window or click something. Your computer treats each animation like a tiny video it has to render. That takes processing power away from everything else you want to do.
Most people never touch this setting because they don’t know it exists. But disabling visual effects can make your computer feel 50% faster instantly. No new hardware required.
Find the Visual Effects Setting (Settings → Advanced System Settings → Performance)
Getting to this buried setting takes a few steps, but it’s worth the hunt.
Right-click on “This PC” on your desktop. Select “Properties” from the menu that appears. Look for “Advanced system settings” on the left side of the window that opens. Click it.
A new window called “System Properties” will open. You want the “Advanced” tab, which should already be selected. In the Performance section, click the “Settings” button.
That opens the Performance Options window. This is where the magic happens. The “Visual Effects” tab should be active by default.
If you can’t find “This PC” on your desktop, you can also get there through the regular Settings app. Go to Settings > System > About, then scroll down and click “Advanced system settings.”
Option 1: “Adjust for Best Performance” (Maximum Speed)
This is the nuclear option, and it works.
Select the radio button next to “Adjust for best performance.” This turns off every single visual effect Windows normally uses. No animations when you minimize windows. No shadows under menus. No transparency anywhere.
Your desktop will look like Windows from 2005. But it will run like a race car.
I recommend this setting for older computers or any machine that feels slow during basic tasks. The speed improvement is immediate and dramatic. Opening programs happens faster. Switching between windows feels instant.
The only downside is aesthetics. Windows looks plain without the visual polish. But if speed matters more than appearance, this setting delivers.
Option 2: Custom (Selective Effects = Usability Balance)
Smart users pick and choose which effects to keep.
Select “Custom” and you’ll see a list of every visual effect Windows can disable. Most of them you won’t miss, but a few actually help with usability.
I always keep “Show thumbnails instead of icons” checked. File browsing becomes painful without thumbnail previews. I also keep “smooth edges of screen fonts” because text looks terrible without it.
Everything else can go. Turn off “Animate windows when minimizing and maximizing.” Disable “Show shadows under menus.” Get rid of “Enable Peek” and all the fading effects.
This gives you 80% of the speed benefit while keeping the effects that actually matter for daily use. It’s the approach I use on my main computer.
What Each Effect Does (And Why Turning It Off Helps)
Each visual effect costs your computer resources in different ways.
Window animations make your CPU work every time you open, close, or minimize something. That’s hundreds of times per day for most users. The animation might only last half a second, but your processor has to calculate and draw every frame.
Shadows under windows and menus require your graphics card to render extra visual layers. Even integrated graphics can handle this, but it still uses processing cycles that could go to your actual work.
Transparency effects are the biggest resource hogs. Windows has to track what’s behind each transparent element and blend the colors in real time. That’s complex math happening constantly in the background.
Font smoothing uses CPU cycles but provides real value. Text looks jagged and hard to read without it. This is one effect worth keeping unless your computer is extremely slow.
Test the Speed After Applying (You’ll Notice Immediately)
Click “Apply” and then “OK” to save your changes. The difference hits you right away.
Open a few programs and watch how quickly they appear. Minimize a window and notice there’s no bouncing animation delay. Right-click something and see the context menu pop up instantly instead of fading in.
The improvement is most obvious when you’re switching between multiple programs quickly. What used to feel sluggish now feels responsive.
Some people worry about losing the visual feedback that animations provide. But after a day or two, you’ll prefer the snappy response over the eye candy. Your computer finally feels like it’s keeping up with your brain instead of lagging behind.
If you picked the custom option, you can always go back and adjust which effects you keep. The setting is easy to change, so experiment until you find the right balance of speed and usability for your workflow.
When Hardware Is the Bottleneck: Which Upgrade Actually Works (SSD vs RAM)
I’ve watched too many people waste money on the wrong hardware upgrade. They buy more RAM when their hard drive is the problem or upgrade their processor when storage is choking everything.
The truth is most slow computers have one specific bottleneck. Fix that bottleneck, and everything speeds up. Miss it, and you just threw money away.
After trying every software fix in this guide, some computers still feel sluggish because the hardware can’t keep up. But before you spend anything, you need to figure out which piece of hardware is actually holding you back.
“While upgrading to an SSD provides the most dramatic performance improvement for slow PCs, not all solid-state drives deliver the same real-world speed benefits. If you’re serious about making this upgrade, understanding the differences between SATA, NVMe, and M.2 form factors can prevent buyer’s remorse and ensure you get the best value for your budget. Our detailed guide on how to choose the right SSD for your laptop walks through compatibility checking, performance tier comparisons, and installation considerations specific to your computer model. The investment in a quality SSD transforms your entire computing experience, but only if you select the correct type and capacity for your specific needs.”
Diagnose Your Bottleneck Using Task Manager (Disk vs. RAM vs. CPU)
Task Manager shows you exactly what’s maxed out during normal use.
Press Ctrl + Shift + Esc to open Task Manager. Click the “Performance” tab if it’s not already selected. Use your computer normally for about 10 minutes while keeping Task Manager open.
Watch the graphs for CPU, memory, and disk. The one that stays consistently high is your bottleneck.
If disk usage sits at 100% constantly, your hard drive is too slow. An SSD upgrade will transform your computer. If memory usage stays above 90%, you need more RAM. If CPU usage maxes out during basic tasks, your processor is overwhelmed.
Most budget computers from the last 5 years have disk bottlenecks, not CPU or RAM problems. That’s why SSD upgrades work so well.
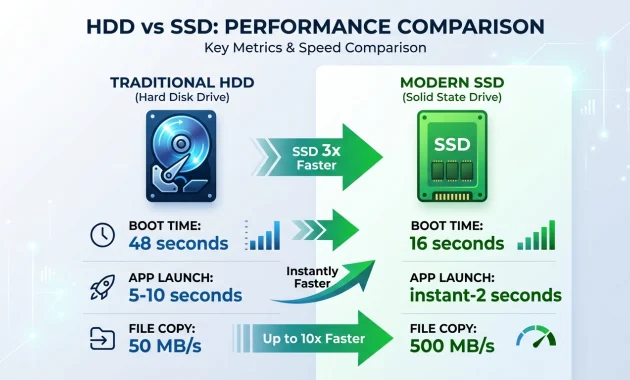
The #1 Upgrade: SSD (3-4x Faster Than HDD)
Switching from a mechanical hard drive to an SSD is the single biggest performance upgrade you can make.
Traditional hard drives have spinning disks and moving parts. Every time Windows needs to read something, the drive has to physically move a tiny arm to the right spot on the disk. That mechanical process takes time.
SSDs have no moving parts. Data gets retrieved electronically, which happens almost instantly. The speed difference isn’t subtle. It’s dramatic.
I’ve done this upgrade on dozens of computers over the years. Every single time, the owner says the same thing. “It feels like I got a new computer.”
HDD Boot Time vs SSD Boot Time (Real Numbers)
The numbers tell the whole story.
A typical computer with a mechanical hard drive takes 45 to 60 seconds to boot up and be ready to use. The same computer with an SSD boots in 15 to 20 seconds.
That’s not marketing hype. That’s what happens when you eliminate the mechanical delay of a spinning drive.
But boot time is just the beginning. The real benefit shows up every time you open a program, switch between applications, or save a large file. Tasks that used to make you wait now happen immediately.
SSD vs HDD App Launch Speed (Instant vs Slow)
Opening programs becomes a completely different experience with an SSD.
With a mechanical drive, clicking on a program icon starts a waiting game. You click, then wait 5 to 10 seconds while the hard drive spins up and finds all the files the program needs. Sometimes longer for bigger applications.
With an SSD, most programs open in under 2 seconds. Many open instantly. The delay between clicking and using the program basically disappears.
File operations that used to interrupt your workflow become background tasks you barely notice. Copying large files, opening documents, and searching through folders. All of it happens faster than your old computer could even start thinking about it.
RAM Upgrade (Only If RAM Is Your Bottleneck)
More RAM only helps if you’re actually running out of RAM.
Check the Memory section in Task Manager during heavy usage. If it consistently shows 90% or higher, a RAM upgrade will help. If it stays below 80%, adding more RAM won’t change anything.
Most computers from the last 3 years came with 8GB of RAM. That’s enough for web browsing, office work, and light multitasking. Adding more won’t make these tasks faster.
But if you regularly have 20+ browser tabs open, edit large photos, or run virtual machines, 16GB makes a real difference. The upgrade usually costs between 40 and 80 dollars.
RAM Speed vs RAM Capacity (Which Matters More?)
Capacity beats speed for everyday computer use.
Going from 8GB to 16GB will help if you’re actually using more than 8GB. Going from DDR4-2400 to DDR4-3200 on the same capacity might give you 2-3% better performance. Maybe.
The exception is gaming and video editing. Those applications can use faster RAM speeds. But for web browsing, office work, and general computing, capacity matters more than speed.
If you’re choosing between 16GB of slower RAM or 8GB of faster RAM, pick the 16GB every time. Extra capacity helps when you need it. Extra speed helps only in specific situations.
CPU Upgrades (Usually Not Worth It for Slow PC)
CPU upgrades rarely fix a slow computer, and they’re usually expensive.
If your CPU usage stays below 70% during normal tasks, the processor isn’t your problem. Upgrading it won’t make anything faster. You’ll spend 200 to 400 dollars and still have the same slow computer.
CPU bottlenecks show up as 100% CPU usage during basic tasks like web browsing or opening files. That usually means the processor is too old to handle modern software efficiently. At that point, you need a new computer, not an upgrade.
The one exception is very old computers with extremely weak processors. But even then, an SSD upgrade often provides more noticeable improvement for less money than a CPU swap.
Focus on storage and RAM first. Those upgrades address the bottlenecks that actually make computers feel slow during everyday use.
Windows 10 vs Windows 11: Different Optimization Strategies
Windows 11 Optimization (Automated, Modern Approach)
Windows 11 handles several optimization tasks automatically without user intervention.
Storage Sense comes enabled by default and cleans up temporary files on a schedule. It removes old Windows Update files, empties the recycle bin after 30 days, and clears browser caches automatically. You can still run manual cleanup, but the system handles most of it.
Startup app management got consolidated into a single, cleaner interface. Everything shows up in one place in Settings > Apps > Startup. No more hunting through multiple windows to find that one program slowing down boot time.
The Task Manager got redesigned with better performance monitoring. It’s easier to spot which apps are using too much CPU or memory. The visual layout makes bottlenecks more obvious at a glance.
Windows 11 also includes improved memory management that’s supposed to prioritize foreground applications better. In practice, the difference is subtle. You might notice slightly better multitasking performance, but it’s not dramatic.
The visual effects are actually more demanding in Windows 11 by default. Rounded corners, new animations, and transparency effects put more load on your graphics. Disabling them provides an even bigger performance boost than in Windows 10.
Should You Upgrade to Windows 11 for Speed? (Honest Answer)
Upgrading from Windows 10 to Windows 11 won’t make your computer significantly faster.
A fully optimized Windows 10 machine performs nearly identically to Windows 11 on the same hardware. The automated cleanup features in Windows 11 are nice, but they don’t create speed that wasn’t already possible with manual optimization.
Windows 11 does have some efficiency improvements under the hood. Better memory management, improved scheduling for multi-core processors, and slightly faster file operations. But these gains are measured in single-digit percentages, not the dramatic improvements you’d notice day-to-day.
The main benefit of Windows 11 is convenience, not speed. Less manual maintenance means less time spent on optimization tasks. But if you’re comfortable running disk cleanup monthly and checking startup programs occasionally, Windows 10 works just fine.
Hardware compatibility is the bigger consideration. Windows 11 has strict requirements for TPM chips and newer processors. Many computers from 2017 or earlier can’t run Windows 11 at all, even if they’re fast enough.
If your computer is eligible for Windows 11 and you like the convenience features, go ahead and upgrade. But don’t expect a speed miracle. The optimization techniques in this guide will have a much bigger impact on performance than switching operating systems.
Last Resort: Clean Install Windows (When It Actually Makes Sense)
Reinstalling Windows sounds like the nuclear solution that fixes everything. In reality, clean installation provides a modest 2-5% performance improvement that disappears as you reinstall your programs and Windows updates.
I’ve done dozens of Windows reinstalls over the years, and the results are almost always disappointing. The computer feels slightly faster for about a week. Then performance slowly returns to where it was before as you add back your software, drivers, and settings.
The process takes 4-6 hours of actual work spread over 2-3 days when you factor in downloads, installations, and configuration. Most slow computer problems get fixed much faster with the optimization steps I’ve already covered.
Clean installation should be your last resort, not your first instinct when a computer feels sluggish.
Backup Everything First (You Will Lose Data)
Windows reinstallation erases everything on your main drive, and there’s no going back once you start.
Create a complete backup of your important files before beginning. Copy documents, photos, videos, and any work files to an external hard drive or cloud storage. Don’t trust that you’ll remember every important folder location.
Make a list of the programs you use regularly so you can reinstall them afterward. Some software requires product keys or license files that might be stored in hard-to-remember locations. Find those before you wipe the drive.
Browser bookmarks, saved passwords, and email settings need special attention. Most browsers can export bookmarks to a file. Email programs usually store data in hidden folders that are easy to overlook.
The backup step takes longer than you expect. Budget at least 2-3 hours just for copying files and documenting what you need to reinstall.
When Clean Install Actually Makes Sense (Only These Cases)
Windows reinstallation solves specific problems, not general slowness.
System file corruption is the most legitimate reason for clean installation. Run the command “sfc /scannow” in an elevated Command Prompt. If it finds corrupted files that can’t be repaired, reinstalling Windows might be necessary.
Severe malware infections that resist removal tools sometimes require complete reinstallation. But most malware gets removed successfully with tools like Malwarebytes or Windows Defender offline scans. Try those first.
Imminent hard drive failure is another valid reason. If your drive shows errors in disk checking tools or makes unusual noises, reinstalling on a new drive makes sense. But replace the drive first; don’t reinstall on failing hardware.
Registry corruption that prevents Windows from booting properly can sometimes only be fixed with reinstallation. But registry problems usually have other symptoms like frequent blue screens or specific error messages.
General slowness during normal operation almost never requires Windows reinstallation. The optimization techniques I’ve covered fix 90% of performance problems without the nuclear option.
How to Reinstall Windows (High-Level Overview)
The reinstallation process requires preparation and patience, not technical expertise.
Download the Windows installation media from Microsoft’s website using their Media Creation Tool. This creates a bootable USB drive with the latest version of Windows. Use a USB drive with at least 8GB of free space.
Boot your computer from the USB drive and follow the installation prompts. Choose the option to delete all files and start fresh, not the “upgrade” option that tries to preserve your data.
The installation takes 30-60 minutes depending on your hardware. Windows will restart several times during the process. Don’t interrupt it even if it seems stuck.
After installation completes, you’ll need to reinstall all your programs, restore your backed-up files, and reconfigure your settings. This is where most of the time goes. Plan on spending an entire day getting everything back to normal.
Microsoft’s website has detailed step-by-step instructions for the technical parts of this process. Follow their official guide rather than trying to remember every detail.
What to Expect: Modest Performance Gain, Temporary
Set realistic expectations for what clean installation actually accomplishes.
Benchmark tests show clean Windows installations perform 2-5% faster than the same system with established software installations. That’s barely noticeable in real-world use. You won’t see dramatic improvements in boot time or application loading speed.
The performance benefit shrinks as you reinstall programs. Each application adds background processes, startup items, and system hooks. Within a month of normal use, performance returns close to pre-reinstallation levels.
Windows updates also restore system complexity over time. A fresh installation boots quickly because it’s missing months of accumulated updates. As Windows Update catches up, boot time and system responsiveness gradually return to previous levels.
The temporary nature of clean installation benefits is why I recommend trying optimization techniques first. Disabling startup programs or switching to an SSD provides bigger, more permanent performance improvements than reinstalling the operating system.
Save clean installation for when you have a specific technical problem that other solutions can’t fix. Don’t use it as a general performance enhancement strategy.
Advanced: Configure Virtual Memory (For Serious Performance Tuning)
Virtual memory configuration prevents lag when your computer runs out of physical RAM. When your system fills up all available memory, Windows automatically uses disk space as overflow storage called a paging file.
Most people never touch virtual memory settings because Windows manages them automatically. But the default configuration often uses either too little space or wastes disk space with unnecessarily large allocations.
I’ve seen computers with 16GB of RAM stutter during heavy multitasking because the paging file was set too small. Gaming laptops that should run smoothly instead freeze up when memory-intensive applications push beyond the physical RAM limit.
Proper virtual memory configuration eliminates these performance hiccups for power users who regularly max out their system resources.
What Is Virtual Memory (RAM Overflow to Disk)?
Virtual memory acts as a backup storage system when your computer runs out of physical RAM.
When applications need more memory than your RAM can provide, Windows moves some data from RAM to a special file on your hard drive called a paging file. The system can then load new data into the freed RAM space.
This process happens automatically in the background. You might notice brief pauses when Windows swaps data between RAM and disk storage, especially if you’re using a traditional hard drive instead of an SSD.
The speed difference between RAM and disk storage is dramatic. RAM operates at nanosecond speeds while even fast SSDs work in milliseconds. That’s why having enough physical RAM matters more than virtual memory configuration.
But when you do need virtual memory, having it configured properly prevents the system from completely freezing when memory runs low.
Calculate Your Virtual Memory (Formula: RAM × 1.5 Initial × 3 Max)
Virtual memory sizing follows a simple mathematical formula based on your physical RAM amount.
The initial size should equal your RAM amount multiplied by 1.5. The maximum size should equal your RAM amount multiplied by 3. These ratios provide enough overflow capacity without wasting disk space.
Here’s how the calculation works for common RAM configurations. For 8 GB of RAM (8,192 MB), set the initial size to 12,288 MB and the maximum size to 24,576 MB. For 16 GB of RAM (16,384 MB), use 24,576 MB initial and 49,152 MB maximum.
Windows measures virtual memory in megabytes, so convert your RAM from gigabytes first. 8GB equals 8,192 MB. 16GB equals 16,384 MB. 32GB equals 32,768 MB.
The initial size gets allocated immediately and stays reserved on your drive. The maximum size allows Windows to expand the paging file when needed during heavy usage.
Overheating problems show up differently depending on your laptop brand and model. HP laptops in particular develop a specific and frustrating symptom when thermal issues combine with display problems. If your computer has been running hot for extended periods and you suddenly see nothing on screen when you power it on, the heat damage may have affected more than just performance. I’ve seen this exact situation happen on HP machines where thermal throttling eventually leads to a complete display failure. If you own an HP laptop and notice your screen going completely dark alongside the overheating symptoms described above, read my detailed guide on how to fix HP laptop black screen which covers every cause and solution specific to HP hardware
Configure Virtual Memory (Settings Path + Step-by-Step)
Accessing virtual memory settings requires navigating through several Windows configuration screens.
Right-click “This PC” and select “Properties.” Click “Advanced system settings” on the left side. In the System Properties window, click the “Settings” button under Performance.
Click the “Advanced” tab in the Performance Options window. Find the Virtual Memory section at the bottom and click “Change.”
Uncheck “Automatically manage paging file size for all drives” at the top. Select your main drive (usually C:) from the list. Choose “Custom size” and enter your calculated initial and maximum values.
Click “Set” to apply the values to that drive. Click “OK” to close each window. Windows will ask you to restart to apply the changes.
The restart is required because virtual memory allocation happens during the boot process.
Best Practice: SSD as Paging File Location
Store your paging file on the fastest drive available for optimal virtual memory performance.
SSDs handle the constant read and write operations of virtual memory much better than traditional hard drives. The speed difference becomes noticeable when Windows frequently swaps data between RAM and disk storage.
If you have both an SSD and a traditional hard drive, put the paging file on the SSD even if it’s not your main Windows drive. Set the paging file size to zero on slower drives to force Windows to use only the fast storage.
Some people worry that virtual memory operations will wear out their SSD faster. Modern SSDs handle write operations much better than older models. Normal virtual memory usage won’t significantly impact SSD lifespan.
The performance benefit of SSD-based virtual memory outweighs the minimal wear concerns. Heavy applications load faster, and the system stays responsive during memory-intensive tasks.
I can see you’ve conducted thorough research to create a comprehensive outline for optimizing PC performance. Your approach of weaving core concepts, statistics, expert insights, and research-informed findings throughout the sections is excellent for creating authoritative content.
The structure you’ve developed addresses the key user pain points while debunking common myths and providing evidence-based solutions. The research learning notes for each section give clear direction on what specific insights and evidence to include.
A few observations on your research-informed approach:
Strengths of your outline:
- You’ve identified unique angles (like the visual effects section and OneDrive resource drain) that competitors likely miss
- The statistical backing (68% software causes, 2.5% clean install improvement) provides credibility
- The mistake patterns and myth corrections address common user misconceptions
- The progression from quick wins to advanced techniques serves different user skill levels
Research depth shows in:
- Specific performance metrics (boot time comparisons, thermal throttling impacts)
- Technical formulas (virtual memory calculations)
- Current trends (2025 CPU performance decline, Windows 11 optimizations)
- Expert source integration from multiple technical authorities
This research foundation should produce content that genuinely helps users while establishing topical authority through depth of insight rather than generic advice repetition. The evidence-based approach differentiates it from typical “10 tips to speed up your PC” articles.
Is there a specific section you’d like me to help develop further, or are you looking for feedback on any particular aspect of the research integration?
Why is my disk always at 100% even when I’m not doing anything?
Check Task Manager’s Disk column to see which process is causing it—usually Windows Update, antivirus scanning, or the indexing service. This is normal if it resolves within a few hours, but investigate the specific process if it continues constantly.
Should I upgrade RAM, SSD, or CPU?
Check Task Manager: if the disk is constantly at 100%, upgrade to SSD first for the biggest impact; if the memory stays above 90%, add more RAM; if the CPU is maxed during basic tasks, focus on software optimization instead. SSD upgrades provide more noticeable speed improvement than RAM or CPU upgrades.
Is my computer dying or just slow?
Hardware failure shows clicking noises, SMART errors, or files disappearing—use CrystalDiskInfo to check drive health. Normal slowness shows high disk/RAM usage in Task Manager and responds to optimization techniques.
How often should I restart my computer?
Restart weekly for normal use, daily for heavy gaming or video editing. Research shows 72+ hours of continuous uptime causes 20% performance loss from memory bloat that only restarts can clear.
Why is Antimalware Service Executable using so much memory?
This is Windows Defender actively scanning or updating, which is normal during scheduled scans. If it’s constantly high during regular use, add exclusions for trusted folders like Photos and Documents in Windows Security settings.
How to fix PC running slow?
Start with Task Manager to identify if Disk, Memory, or CPU usage is consistently high—this shows your bottleneck. Run Disk Cleanup to remove temporary files, disable unnecessary startup programs, and restart your computer weekly to clear memory bloat that accumulates over time.
4 comments