
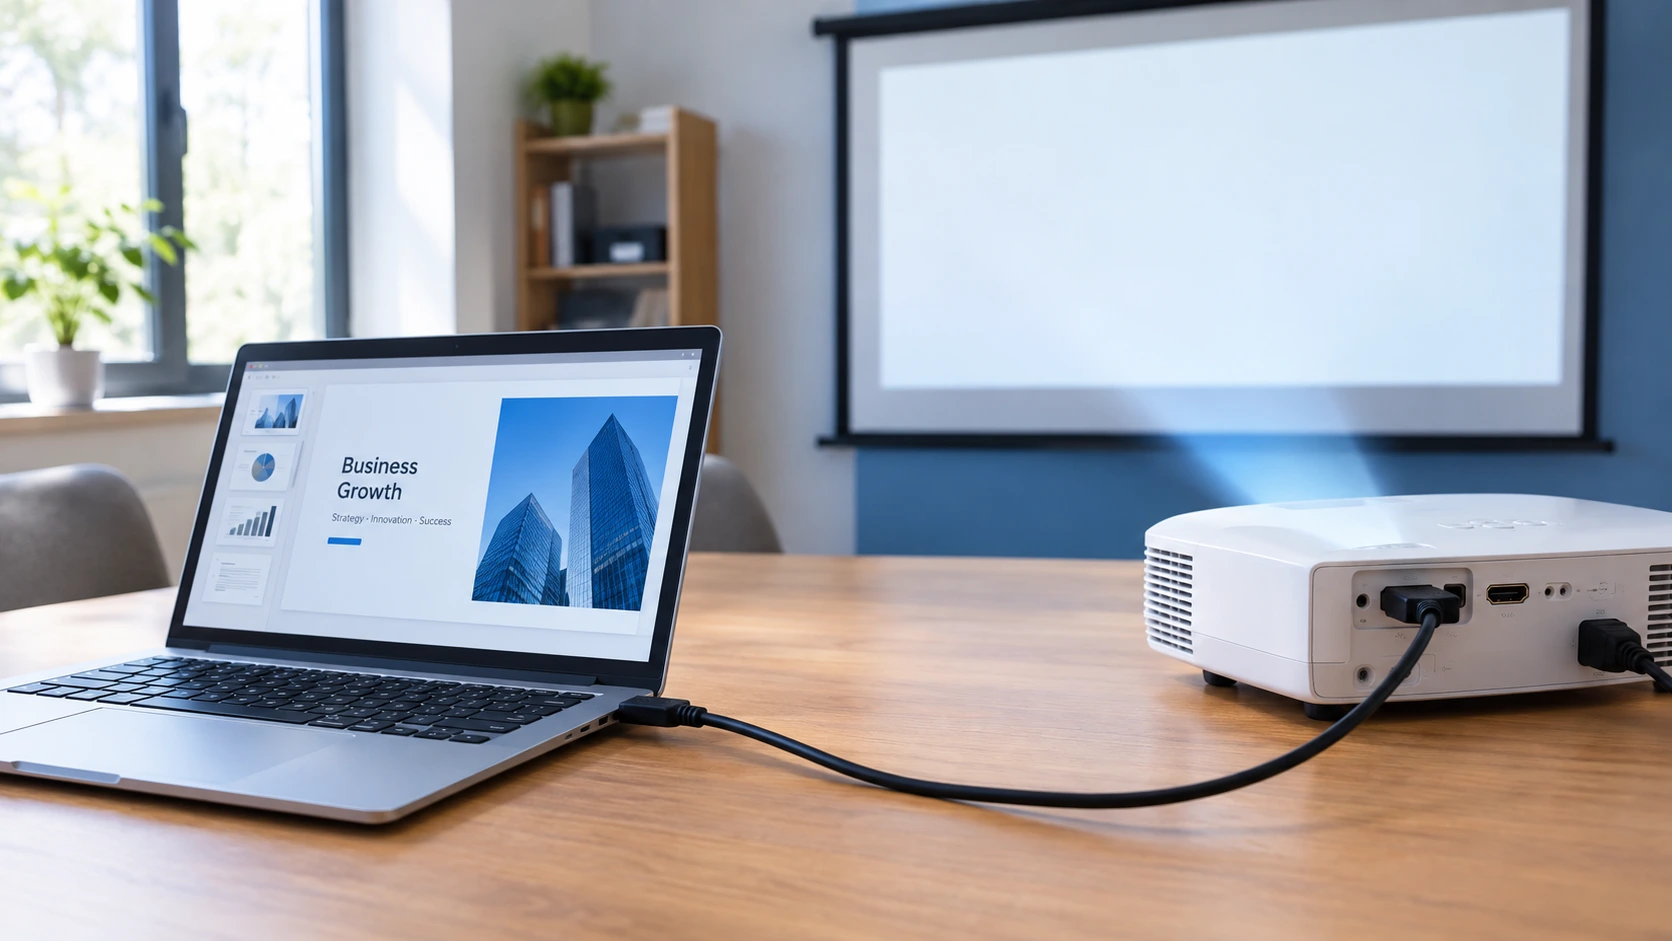
I have set up more projectors than I can count, in classrooms, meeting rooms, and my own living room, and the problem is almost never the one people think it is. You plug in the cable, the projector lights up, and then nothing happens. Or something half happens. The wallpaper shows up, but your actual screen does not.
Connecting a projector to a laptop just means getting the video signal from your laptop to show up on the projector’s screen, and in almost every case that comes down to three things working together: the right cable, the right input selected on the projector, and the right display mode on your laptop. Miss any one of those three and you get a black screen, a blank wallpaper, or a “no signal” message even though everything looks plugged in correctly.
This guide covers every method I actually use, HDMI, VGA, USB-C, and wireless, along with the specific fixes for the problems that show up most often in real rooms with real equipment.
What You Need Before You Plug Anything In
You do not need much to connect a laptop to a projector. Just the right cable and a couple of minutes.
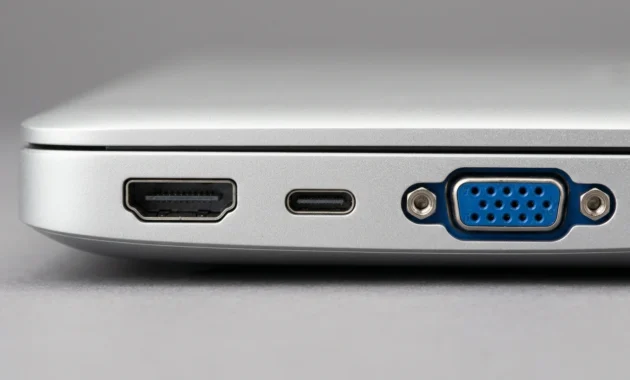
Before you touch a single cable, take a quick look at the ports on your laptop. Most laptops have one of three options: a full-size HDMI port, a USB-C port, or, on older machines, a VGA port shaped like a small rectangle with pins inside it. The projector will usually have matching inputs on the back, sometimes labeled HDMI 1 and HDMI 2 if there’s more than one.
Here’s the thing nobody explains clearly enough. If your laptop port matches one of the projector’s input ports, you are already most of the way there. Hook up a projector the same way you would hook up a monitor at your desk. It is really that simple at the hardware level.
I think of the whole process as three steps that happen in order. First, you connect the physical cable to hook up the projector. Second, you tell the projector which input to look at. Third, you tell your laptop how you want the picture to show up. Most guides only explain step one and then act confused when readers say it is not working. The actual troubleshooting almost always lives in steps two and three, which I will get into shortly.
One more thing worth knowing now. A lot of newer, thinner laptops do not have a full-size HDMI port anymore. If you have a MacBook Air, a Dell XPS, or basically any ultrabook made in the last few years, you are probably working with USB-C only. That is not a problem, but it does change which cable you need, and I will walk through that in the next section.
How to Connect a Projector to a Laptop with HDMI
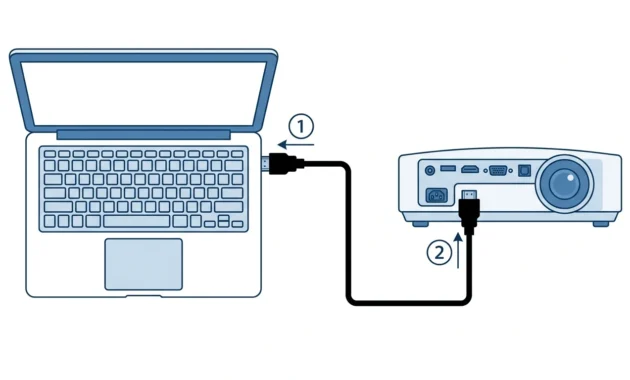
HDMI is the easiest and most reliable way to connect a laptop to a projector, and it is what I reach for first every single time. One cable carries both video and audio, so you are not juggling two connections for one picture.
Start by finding the HDMI port on your laptop and the HDMI input on the back of the projector. Plug one end of the HDMI cable into the projector first, then plug the other end into your laptop. I know that sounds like a minor detail, but connecting the projector side first tends to help the laptop recognize the signal right away instead of needing a reconnect or a restart.
Turn on the projector, then turn on your laptop if it is not already running. Give the projector a minute. The lamp inside takes a short while to warm up, and on most models you will see an indicator light change from orange to green once it is ready. If your screen stays black for that first minute, that is normal. It is not a sign something is broken.
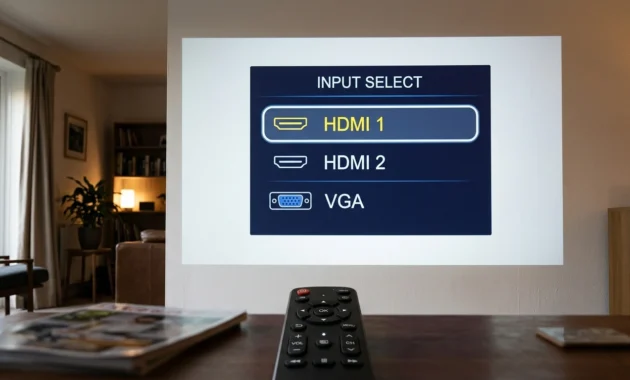
Once the projector is on, use its remote control or the buttons on the unit itself to select the correct HDMI input, especially if your projector has more than one HDMI port. I will cover exactly how to do that properly in the input source section below, because this is the step most people skip without realizing it.
After the projector shows a signal, check your laptop’s display settings to confirm the connection registered. On Windows, you can open Settings, then System, then Display, and scroll down to Multiple Displays to see if the projector is detected.
No HDMI Port? Here’s What to Use Instead
If your laptop only has USB-C, you will need a USB-C to HDMI adapter or a cable that goes directly from USB-C to HDMI. This is common on newer ultrabooks and MacBooks, and the adapters themselves are inexpensive and easy to find.
Here is the part that trips people up. Not every USB-C port on a laptop actually supports video output. Some USB-C ports are built for charging and data transfer only, and plugging in a video adapter there will do nothing, even though the connector fits perfectly. If your picture does not appear after trying a USB-C adapter, that mismatch is usually why. Check your laptop’s specifications or try a different USB-C port if your laptop has more than one.
Connecting With a VGA Cable (For Older Projectors)
VGA still works for connecting a laptop to a projector, but I only recommend it when HDMI genuinely is not an option. It gets the job done. It just does less than HDMI does.
The physical setup is straightforward. Plug one end of the VGA cable into your laptop’s VGA port and the other end into the projector’s VGA input. Turn on both devices, then adjust your laptop’s display settings the same way you would for any other connection method.
Here’s the catch with VGA that catches a lot of people off guard. VGA only carries video, not audio. So if you connect everything correctly and the picture looks perfect but there is zero sound coming from the projector, that is not a malfunction. That is just how VGA works. You will need to run a separate audio cable from your laptop’s headphone jack to the projector or to a speaker system to get sound.
I would not call VGA inferior across the board, but at higher resolutions the image quality does start to show its age compared to HDMI’s digital signal. For a simple slideshow on an older classroom projector, it is still perfectly usable.
Nothing Showing Up? Select Your Input Source First
If your screen is black or the projector says “no signal,” check the input source before you assume anything is broken. This single step solves more projector problems than anything else I have come across.
Projectors do not automatically detect which cable you just plugged in, especially if there is more than one input available. Unlike a modern TV that often switches sources on its own, most projectors wait for you to tell them where to look. Grab the remote or use the buttons on the projector itself, press the Source or Input button, and cycle through until you land on the correct HDMI or VGA input.
I have watched people spend twenty minutes convinced their cable was defective, only to realize the projector was simply sitting on HDMI 2 while the laptop was plugged into HDMI 1. Swap the input, and the picture appears instantly.
If your projector has a Source Search or Auto Search function, use it. It will scan through the available inputs automatically and land on whichever one is actively receiving a signal, which saves you from manually cycling through each option by hand.
This is also where classroom and conference room setups get a little trickier, since the wall panel or control unit might have its own dedicated input buttons separate from the projector remote. If you are in a shared space, check the wall panel first before touching the projector directly.
Why Your Projector Only Shows the Wallpaper (Not Your Screen)
This is the single most common complaint I see, and it has a very simple explanation. If your projector shows your desktop background but not one of your icons, your PowerPoint slides, or anything you are actually trying to present, your laptop is almost certainly set to Extend mode instead of Duplicate.
I have seen this exact problem reported over and over, by different people, on different laptops, across different years. It is such a predictable pattern that I no longer think of it as a glitch at all. It is just what happens by default when Windows or macOS detects a second screen and does not know what you want to do with it.
Here is what is actually happening. When your laptop connects to a projector, the operating system treats it like a brand new monitor and defaults to extending your desktop across both screens. Your laptop screen keeps your icons and open windows. The projector becomes a second, mostly empty space sitting off to the side, which is why all you see on the big screen is the plain wallpaper.
The fix takes about five seconds once you know where to look.
Windows Key + P: What Duplicate, Extend, and Second Screen Actually Do
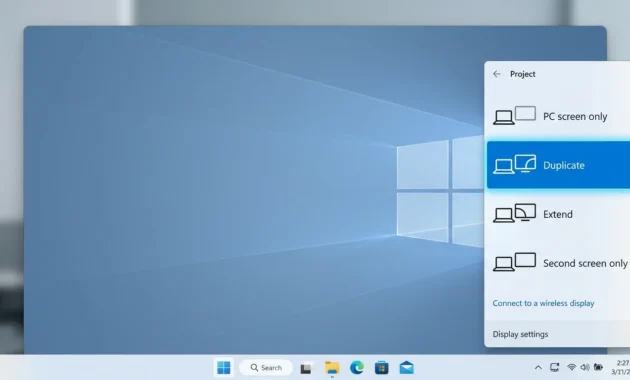
Press the Windows key and the letter P at the same time, which is the shortcut Microsoft also recommends in its guide to setting up multiple monitors in Windows. A small menu will pop up on the right side of your screen with four options.
The PC screen only keeps everything on your laptop and sends nothing to the projector. Duplicate your laptop screen exactly onto the projector so both displays show the same thing at the same time. Extend turns the projector into additional desktop space, letting you drag windows between the two screens. Second screen only turns your laptop display off completely and shows everything exclusively on the projector.
For most presentations, Duplicate is the one you want. It guarantees the audience sees exactly what you see, with no surprises. Extend is genuinely useful too, but mainly when you want to use the projector as a second monitor, or when you are running a slideshow in presenter mode and want your notes visible only to you while the audience sees just the slides.
Connecting on a Mac
On a Mac, click the Apple menu, then System Settings, then Displays. Click the Arrangement tab.
To mirror your laptop screen onto the projector, check the box labeled Mirror Displays. If that box is unchecked, your Mac is treating the projector as extended space instead, which produces the same wallpaper-only problem that Windows users run into.
Advanced Fix: The Greyed Out Checkbox Trick
Sometimes the Extend or Duplicate option in your display settings appears greyed out entirely, meaning you cannot even select it. That is a different problem than a simple mode mismatch.
A greyed out checkbox usually means your laptop is not actually detecting the projector as a connected display at all. Before troubleshooting anything else, double check that the cable is fully seated on both ends, and confirm the projector has fully powered on and warmed up. Once the laptop properly detects the second screen, that checkbox should become selectable again.
The Keyboard Shortcut Older Laptops Still Use
On older laptops, you connect to a projector by holding the Fn key and pressing a function key like F4, F5, F7, or F8, depending on the brand.
This shortcut predates the modern Windows Key plus P menu and still works on plenty of machines today, especially business laptops a few years old. Dell laptops commonly use Fn plus F8 to cycle through display options. Other brands assign the same function to a different key, so check your keyboard for a small icon that looks like two overlapping rectangles, usually sitting on one of the function keys near the top row. That icon marks the display toggle key for your specific laptop.
Pressing that combination cycles through the same basic options as the Windows Key plus P menu: laptop only, projector only, or both at once. If you are on a newer laptop, you likely will not need this shortcut at all, since Windows Key plus P covers the same ground more reliably.
How to Connect to a Projector Wirelessly
You can connect a laptop to a projector wirelessly if both devices support the same wireless display technology, but it genuinely depends on your hardware rather than being guaranteed to work everywhere.
On Windows, press the Windows key and K at the same time to open the Connect panel, which searches for nearby wireless displays using a technology called Miracast. If your projector supports Miracast and both devices are on, it should appear in that list within a few seconds. Select it, and your screen should start mirroring wirelessly.
On a Mac, open Control Center from the menu bar and look for Screen Mirroring. This uses AirPlay rather than Miracast, and it only works if your projector either supports AirPlay natively or is paired with a receiver device that does.
If your projector or AirPlay device does not show up in the list, make sure your laptop is actually online. If your laptop says it is connected to a network but has no internet access, fix that first, because wireless casting depends on a working connection.
I will be straightforward here instead of making wireless sound more seamless than it actually is. A wired HDMI connection is still noticeably more consistent than wireless casting, particularly for anything involving video playback or a time sensitive presentation. Wireless introduces a small amount of lag and occasional dropped frames that a cable simply does not have. For casual use at home, that tradeoff rarely matters. For an important client presentation, I would still bring a cable as backup.
More projectors now ship with built in wireless casting rather than requiring a separate dongle, which has made this process smoother than it used to be a few years back. But it is still worth checking your specific projector model’s supported standards before assuming wireless will just work out of the box.
Why Mac Users Can’t Use the Same Wireless Method as Windows
Mac computers cannot use Miracast at all. It is built around a different wireless standard than the one Apple uses.
If you are on a Mac and your projector only advertises Miracast support, wireless casting from that Mac will not work no matter how you configure it. You will need either AirPlay support on the projector itself, or an AirPlay compatible streaming device plugged into the projector’s HDMI port as a bridge. This trips up a surprising number of Mac owners who assume wireless screen mirroring is one universal feature that works the same way across every laptop.
Getting Sound to Actually Come Out of the Projector
HDMI carries audio automatically, so in most cases sound comes through the projector’s built in speaker without any extra setup on your part.
If you are using a small room or a quick meeting, that built in speaker is usually enough. You can control the volume directly from the projector’s remote or its side keypad.
For a larger room or a proper audio setup, you have a couple of real options depending on how your space is arranged. One approach is running an audio cable from the projector’s headphone jack to an external mixer or sound system, which works well if the mixer sits close to the projector or if multiple people will be swapping laptops throughout an event. The other approach is running an audio cable directly from your laptop’s headphone jack to the sound system instead, bypassing the projector’s audio output completely.
If you have picture but no sound despite using HDMI, check your Windows sound settings before assuming something is wrong with the projector. Right click the small speaker icon in the bottom right corner of your taskbar, open Sound Settings, and confirm the projector or external display is selected as the active output device. Windows sometimes defaults back to your laptop’s internal speakers even after a successful video connection.
Mistakes That Make People Think Their Projector Is Broken
Most projector problems that feel like hardware failures are actually simple configuration issues, and I would guess the majority of frustrated troubleshooting sessions could be avoided entirely by checking a few small things first.
If you have not restarted your laptop in a while, do that before anything else. It sounds too simple to matter, but a stale display driver or a stuck background process causes more connection failures than actual broken hardware ever does.
Pay attention to the order you connect your cable in. Plugging the HDMI cable into the projector first, then into your laptop, tends to get recognized faster than doing it the other way around. It is a small habit, but it genuinely cuts down on the number of times I have had to unplug and replug a cable just to get the signal to register.
If you are using VGA, do not expect sound to come through automatically. I covered this earlier, but it is worth repeating here because it is one of the most common “something is broken” complaints that is not actually a malfunction at all.
And when you are finished with the projector, let the cooling fan run its course before unplugging it or packing it away. Projector bulbs get genuinely hot during use, and cutting the power before the fan finishes its cooldown cycle can shorten the bulb’s lifespan over time.
One habit worth mentioning from older advice: powering everything off before connecting cables used to be the standard recommendation, especially back when VGA was the main connection type. Modern HDMI and USB-C connections are designed to be plugged in while both devices are already running, so you do not strictly need to power down first anymore. Some people still do it out of habit, and there is nothing wrong with that either.
If your laptop’s own screen is also black, that is a separate problem, and this guide on how to fix an HP laptop black screen will help.
Making the Picture Look Sharper Once You’re Connected
Once your laptop and projector are talking to each other correctly, a few quick physical adjustments make a real difference in how sharp and clean the final image looks.
Start with the zoom ring on the projector to get the image to the right size for your screen or wall. Then adjust the focus ring until text and edges look crisp rather than soft or doubled. Finally, use the adjustable feet on the bottom of the projector to level the image and fix any tilt, since an uneven projector produces a trapezoid shaped picture instead of a clean rectangle.
If the image still looks stretched or cut off at the edges, check that your laptop’s screen resolution roughly matches what the projector is designed to display. Most business and classroom projectors are built around a standard resolution, and setting your laptop to match that resolution in your display settings usually clears up any stretching or black bars around the picture.
One small trick that comes in handy more often than you would expect: most projector remotes have a Freeze button. Pressing it pauses the current projected image on screen while you adjust something on your laptop in the background, so your audience does not see you clicking around or opening a different file. Press it again to resume the live feed once you are ready.
how to Connect projector to laptop really just means plugging in the right cable, like HDMI or VGA, turning on both devices, and then selecting the correct input source directly on the projector itself. Once that part is done, press Windows key plus P on your laptop and choose Duplicate to mirror your screen, or Extend if you want the projector to act as a second display. Most people get stuck not because something is broken, but because the projector is sitting on the wrong input or the laptop defaulted to Extend mode instead of Duplicate. Get those three things lined up, the cable, the input source, and the display mode, and connecting a laptop to a projector takes less than two minutes.
Frequently Asked Questions
Why is my projector not displaying my laptop?
In most cases, this comes down to one of two things. Either the projector is set to the wrong input source, which you can fix using the remote or the source button, or your laptop’s display mode is set to Extend instead of Duplicate, which you can fix with the Windows Key plus P menu. Check the input source first, since it is the quicker fix.
What key do I press to connect my laptop to a projector?
It depends on your laptop. Older laptops typically use Fn plus F4, F5, F7, or F8 to toggle the display output, with the exact key varying by brand. Dell laptops commonly use Fn plus F8. Newer laptops rely on the Windows Key plus P menu instead of a dedicated function key shortcut.
How do I connect my laptop to a projector without an HDMI port?
Use a USB-C to HDMI adapter or cable if your laptop only has a USB-C port. Just confirm that the specific USB-C port you are using actually supports video output rather than being limited to charging and data transfer only, since that distinction causes a lot of confusion.
How do I connect an Epson projector to my laptop?
The process is the same as any other projector. Connect via HDMI or VGA, then use the Source button on the Epson remote or the projector’s own control panel to select the correct input if it does not appear automatically.
How do I connect a laptop to a projector on Windows 7?
The cable connection process is identical to newer Windows versions. For display settings, Windows 7 often shows a “Connect to a Projector” option directly in the Start menu rather than relying on the Windows Key plus P shortcut used in later versions.
Can I connect to a projector wirelessly without buying anything extra?
Only if your laptop and projector already support the same wireless standard. Windows laptops use Miracast and Mac laptops use AirPlay, and these are not interchangeable. If your projector does not support the matching standard for your laptop, you will need an external transmitter or receiver device to bridge the gap.
I have gone through every method I actually use myself, from a basic HDMI cable to wireless casting, along with the fixes that solve the problems people run into most. If your picture still is not showing up after trying everything here, go back to the input source step and the Windows Key plus P menu. Between those two, they solve the overwhelming majority of connection problems I have ever come across.
Final Thoughts
Connecting a laptop to a projector really comes down to three things working together: the right cable, the correct input source, and the proper display mode. Once you understand that, every strange glitch stops feeling like a mystery and starts feeling like a checklist.
Most people panic the moment the screen stays black or only the wallpaper shows up. I get it. It feels like something broke. But in almost every case I have run into, the hardware is fine. It is the projector sitting on the wrong input, or the laptop quietly defaulting to Extend mode instead of Duplicate.
If you remember nothing else from this guide, remember this order. Check the cable connection first. Check the input source second. Check the display mode third. That sequence alone fixes the vast majority of projector problems, whether you are setting up for a client meeting, a classroom lesson, or a movie night at home.
HDMI will serve you well for almost every modern setup, and it is what I reach for without thinking twice. VGA still has its place for older equipment, wireless casting keeps getting more reliable, and the keyboard shortcuts I covered will save you when you are stuck on an older machine with no obvious menu in sight.
Projectors are not complicated once you know where the usual trip-ups hide. Give it one more try with the input source and display settings in mind, and there is a good chance you will have that screen mirrored or extended within the next couple of minutes.