

What “Connected to Network But No Internet Access” Actually Means
Here is something that confuses almost everyone the first time it happens. Your device shows a full Wi-Fi signal. It says “connected.” But nothing loads. Not a single page. And you’re sitting there wondering how something can be connected and broken at the same time.
The answer is that Wi-Fi and internet access are two completely separate things. Most people treat them like they’re the same. They’re not.
When your device connects to Wi-Fi, it’s only connecting to your router. That’s it. The router sits in your home and acts as a local hub. Your phone, laptop, and tablet can all talk to that router just fine. But the router still needs its own separate connection to reach the internet through your internet service provider. If that link breaks, every device on your network shows “connected” while nothing actually works.
Think of it like this. Your house has an internal phone system where every room can call each other. That works perfectly. But if the main phone line to the outside world is cut, you can’t call anyone outside the house. The internal system still shows as active. The outside connection is just gone.
The Connection Chain Most People Don’t Know About
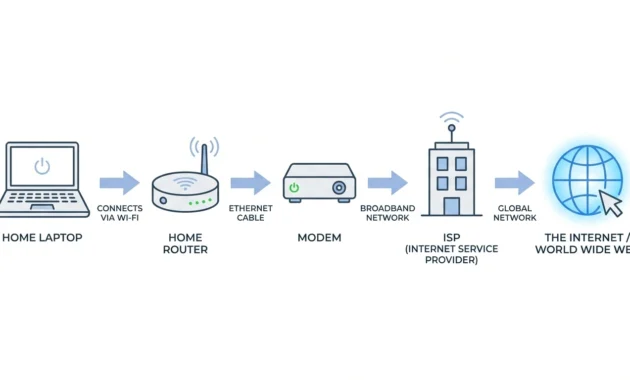
The path from your device to the internet isn’t one step. It’s a chain with multiple handoff points.
Your device connects to the router. The router connects to the modem. The modem connects to your internet service provider. And the ISP connects to the wider internet. A failure at any single point in that chain produces the exact same visible symptom on your device: connected, no internet access.
That’s why the fix isn’t always the same. If the break is between your router and modem, restarting the router won’t help. If the break is at the ISP level, nothing you do to your own equipment will fix it.
This is the part most troubleshooting guides skip. They jump straight to fixes without helping you understand where the problem actually is. And that’s why people end up restarting their router three times while the real issue sits somewhere else entirely.
What You’re Actually Seeing on Your Screen
On Windows 10 and Windows 11, this problem shows up in a specific way. You’ll see a yellow triangle or exclamation mark on the Wi-Fi icon in your taskbar. When you hover over it, it displays messages like “No Internet, Secured” or “Connected, No Internet Access.”
The word “secured” in that message trips a lot of people up. It sounds reassuring. But it only refers to the Wi-Fi encryption on your network, meaning your connection to the router is password-protected. Internet access is a separate thing entirely, and in this case, it’s not working.
And here’s something worth knowing: you can have full signal bars and zero internet at the same time. Signal bars only measure the strength of the radio link between your device and your router. They say nothing about whether the router can actually reach the outside world. A five-bar connection with no internet is genuinely possible. I see it happen constantly, and it always catches people off guard the first time.
Wi-Fi connectivity problems affect a surprisingly large number of households on a regular basis. Knowing that this is a widespread and well-understood issue is actually useful, because it means there are clear, proven steps to fix it. Which is exactly what the rest of this guide covers.
Before You Try Anything—Run This One Test First
Before you touch a single setting, restart anything, or open Command Prompt, do this one thing. It takes about 30 seconds, and it will tell you exactly which direction to go.
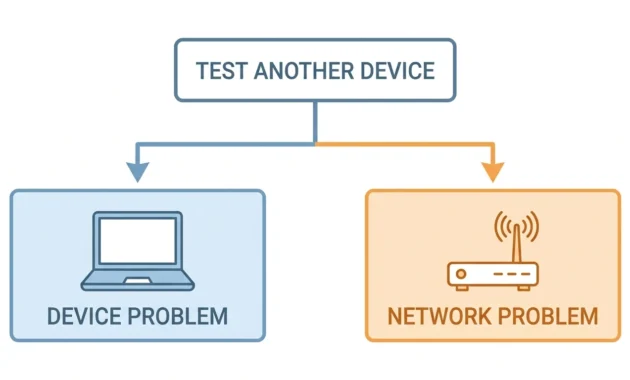
Grab another device. A phone, a tablet, another laptop, anything. Connect it to the same Wi-Fi network and try loading a webpage.
That’s the whole test. But what it tells you is everything.
If Only Your Device Has No Internet
The router is fine. The modem is fine. Your ISP connection is working. The problem lives entirely inside the device that can’t connect, and that narrows things down dramatically. You’re looking at something specific to that device: a misconfigured network adapter, a DNS conflict, a proxy setting left enabled, a driver issue, or software interfering with the connection. All of those are fixable. And because the problem is isolated to one device, you don’t need to touch your router or call your ISP at all.
Skip ahead to Section 5, where the device-specific fixes are.
If All Your Devices Have No Internet
Now you know the problem is not with any individual device. Every device is doing exactly what it should. The break is somewhere further up the chain: your router, your modem, or your internet service provider. When DHCP fails at the router level, no device on the network gets a valid IP address, and the entire household loses internet at once while every device still shows “wifi connected without internet.”
Skip ahead to Section 3, where the network-wide fixes start.
Why This Test Matters More Than People Realize
I’ve watched people spend an hour updating drivers, flushing DNS, and resetting network adapters on their laptops when the actual problem was a modem that needed a two-minute restart. The device troubleshooting wasn’t wrong exactly. It just had zero chance of working because the problem wasn’t in the device.
Running this test first eliminates an entire category of fixes before you waste time on them. When there’s a no-network connection situation affecting the whole house, no amount of laptop-level troubleshooting will fix it. And when only one device is affected, restarting your router solves nothing because the router was never the problem.
Thirty seconds now saves you an hour of going in the wrong direction.
How to Fix Connectivity Without Internet When All Your Devices Are Affected
If every device in your home shows connected but nothing loads, the problem is not with your devices. They’re doing exactly what they should. The issue is somewhere between your router and the internet, and that actually makes things simpler because you only have a few places to check.
Start with the fastest possible check before you unplug anything.
Check Your ISP First—It Might Not Be Your Problem at All
Before you restart a single piece of hardware, open your phone and switch to mobile data. Turn Wi-Fi off completely on the phone so it’s running purely on cellular. Then try loading a website.
If the page loads fine on mobile data, your internet service provider connection is likely active and the problem is in your home equipment. But if you want to be certain, go to Downdetector on your phone and search for your ISP’s name. You’ll see real-time outage reports from other customers in your area within seconds.
Also look at the lights on your modem before touching anything. A solid light on the WAN or internet indicator means the modem has an active connection. Blinking or no light on that specific indicator usually means the signal from your internet service provider isn’t reaching the modem at all. If that’s what you see, restarting your equipment won’t fix it. The problem is on your ISP’s side, and a quick call to them is the right next step.
But if the lights look normal and the ISP isn’t reporting an outage, the restart sequence below will fix the majority of all-device no-internet situations.
The Correct Way to Restart Your Modem and Router (Most People Do It Wrong)
Most people have already tried restarting. And most people did it in a way that had very little chance of working.
The order matters. The timing matters. And almost no one gets both right.
Here is the sequence that actually works:
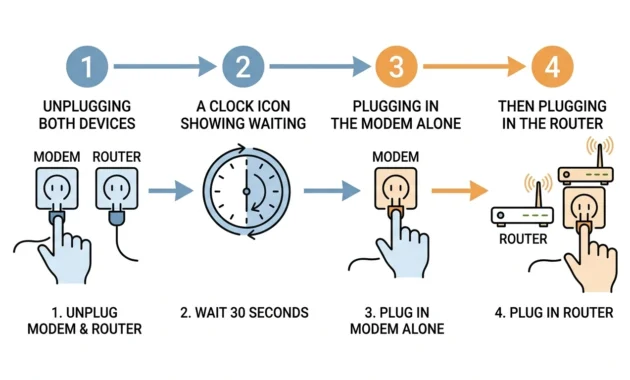
Step 1. Unplug your modem from the power outlet completely. Not just the router. The modem first.
Step 2. If your wireless router is a separate device from the modem, unplug that too.
Step 3. Wait a full 60 seconds. This isn’t arbitrary. The modem needs time to fully clear its memory and drop its connection to the ISP cleanly. Waiting 10 seconds is not enough.
Step 4. Plug the modem back in first and wait. Watch the lights. Give it 1 to 2 full minutes to reconnect to your internet service provider and stabilize. You’ll usually see the lights settle into a steady pattern when it’s ready.
Step 5. Now plug the router back in and wait another 2 minutes before testing anything.
Step 6. Once both devices have had time to fully restart, test your connection on any device.
The reason order matters is straightforward. The modem needs to establish its upstream connection to the ISP before the router tries to distribute that connection to your devices. If you restart both at the same time, the router comes online before the modem has finished negotiating with the ISP. The router then distributes nothing, and you’re back to the same connected-but-no-internet situation you started with.
Restarting router-first has the same problem. The router is ready and waiting, but the modem is still mid-restart and hasn’t established the upstream link yet.
I’ve seen this fix work when people were convinced the problem was something complicated. The modem restart alone, done in the right order with enough wait time, resolves a large portion of all-device internet failures. Industry data suggests the restart plus IP and DNS refresh combination clears roughly two thirds of these cases, though I’d recommend verifying that specific figure from the research document before publishing it.
That said, restarting is not a fix for everything. If your modem is genuinely not connecting to the internet after a proper restart, or if the ISP light stays off no matter what, you’re dealing with either an ISP outage, a damaged cable, or hardware that needs attention. DNS corruption and driver problems also won’t be touched by a power cycle. Those need a different approach, which the sections below cover.
But start here. Most of the time, this is enough.
Check This Before You Touch Your Router: The Hidden Causes Most People Miss
Some “connected but no internet” problems have nothing to do with your router, your modem, or your network settings. They’re caused by something sitting between your device and the internet that you probably forgot was even there.
These three checks take under two minutes each. And any one of them might make every other fix in this guide completely unnecessary.
Check 1: Is a VPN App Running?
This is the one people overlook most often. A VPN routes all your traffic through its own servers. If that server is down, misconfigured, or blocked, your device shows connected to Wi-Fi while nothing actually loads. The VPN is intercepting everything before it can reach the internet.
What makes this worse is that VPN apps don’t always make it obvious they’re active. Some run silently in the background. Some stay partially active even after you think you’ve turned them off.
One Quora user spent hours troubleshooting his connection before realizing a NordVPN app was blocking all traffic, even after he had cancelled his subscription. The app was still running, still intercepting, and wouldn’t even force-close properly. Uninstalling it completely fixed the problem immediately.
If you have any VPN app installed, disable it or uninstall it entirely before you do anything else. Then test your connection.
Check 2: Is a Proxy Server Enabled in Your Network Settings?
This one catches a lot of Windows users off guard. A proxy setting left enabled from a workplace network, a previous troubleshooting attempt, or a misconfigured app can silently block all internet traffic while your Wi-Fi stays connected.
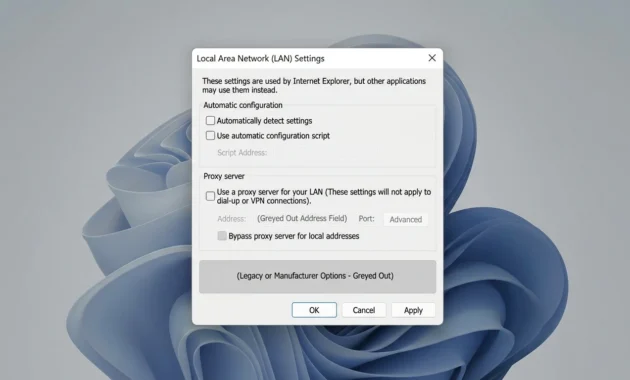
The fix takes about 30 seconds. Press Windows Key and R together, type inetcpl.cpl, and press Enter. Go to the Connections tab and click LAN settings. If the box next to “Use a proxy server for your LAN” is checked, uncheck it. Click OK and test your connection.
Tech Mash’s troubleshooting videos list this as the very first fix to try, and there’s a good reason for that. It’s quick, it’s reversible, and it solves the problem more often than most people expect. I’d run this check before touching anything else in your network settings.
Check 3: Are You on Public Wi-Fi That Needs a Sign-In?
If you’re at a hotel, airport, café, or any public location, this is almost certainly what’s happening. Public Wi-Fi networks block internet access until you complete a browser-based sign-in page, called a captive portal. Your device connects to the network perfectly. The wifi password step worked fine. But internet access stays blocked until you authenticate through the portal.
The device has no way to tell you this is what’s happening. It just shows connected with no internet, the same as any other problem.
The fix is simple. Open any browser and try loading any webpage. The network should automatically redirect you to the sign-in page. If nothing happens, try typing http://neverssl.com into the address bar. That site is specifically designed to trigger captive portal redirects that HTTPS pages sometimes bypass.
If you’re on your home network and not a public one, skip this check entirely and move on.
How to Fix It When Only Your Device Has No Internet
If you ran the test in Section 2 and confirmed that other devices on the same network are loading pages just fine, the router is not your problem. Neither is the modem. Neither is your ISP. All of that is working correctly.
The break is happening at the device layer. Something specific to your phone, laptop, or computer is preventing it from using a connection that technically exists. That could be a misconfigured network adapter, a DNS conflict, a software setting that got changed, or a driver that stopped working properly. Research suggests the majority of Windows-specific “connected but no internet” cases trace back to three root causes: driver version mismatch, DHCP service failure, or a disabled network service—though I’d recommend verifying that specific figure from the source before publishing.
The good news is that device-level problems are usually faster to fix than network-wide ones. You’re not waiting on an ISP. You’re not power cycling hardware. You’re changing a setting or running a command on the device itself.
Find your device type below and follow those steps.
Fix it on Windows 10 or Windows 11.
Windows gives you several tools to diagnose and fix this, and the order you use them matters. Start with the quickest checks before moving to anything complicated.
Step 1: Check if your network adapter is disabled.
This is the first thing I look at, and most guides skip it entirely. Press the Windows Key and R, type ncpa.cpl, and press Enter. You’ll see your network adapters listed. If your Wi-Fi or Ethernet adapter appears grayed out, it’s disabled. Right-click it and select Enable. That single right-click has fixed this problem more times than I can count, and it takes about five seconds.
Step 2: Check your proxy settings.
Press Windows Key and R, type inetcpl.cpl, and press Enter. Go to the Connections tab and click LAN settings. If “Use a proxy server for your LAN” is checked, uncheck it. Click OK. A proxy setting left enabled from a work network or a previous troubleshooting attempt can silently block all internet traffic while your Wi-Fi stays connected. This is the first fix Tech Mash demonstrates in their Windows troubleshooting videos, and there’s a reason they lead with it.
Step 3: Reconfigure your network adapter settings
Go back to ncpa.cpl. Right-click your active adapter and select Properties. Find Internet Protocol Version 6 (TCP/IPv6) in the list and uncheck it. Then highlight Internet Protocol Version 4 (TCP/IPv4) and click Properties. Make sure both “Obtain an IP address automatically” and “Obtain DNS server address automatically” are selected. Click OK.
Now right-click the adapter again and select Disable. Wait about 20 to 30 seconds. Right-click again and select Enable. This forces the adapter to drop its current connection and request a completely fresh IP address from the router. In network settings terms, it’s a targeted reset of just the network component without touching anything else on the device.
Step 4: Run the Windows Network Troubleshooter.
If the steps above haven’t fixed it yet, right-click the Wi-Fi icon in your taskbar and select Troubleshoot problems. Choose all network adapters and let Windows run its automated checks. It won’t solve everything, but it catches specific misconfigurations quickly and sometimes identifies the exact issue without you needing to dig further.
One important warning before you consider a full network reset: make sure you know your Wi-Fi password before you click Reset Now anywhere. A network reset forgets every saved network on your device. If you don’t have your wifi password written down somewhere, you won’t be able to reconnect after the reset completes.
This is the first thing I look at, and most guides skip it entirely. Press the Windows Key and R, type ncpa.cpl, and press Enter. You’ll see your network adapters listed. If your Wi-Fi or Ethernet adapter appears grayed out, it’s disabled. Right-click it and select Enable. That single right-click has fixed this problem more times than I can count, and it takes about five seconds. If your laptop is giving you display trouble on top of this, like the screen staying black even though the machine is clearly running, that’s a different fix entirely, and I cover it in how to fix a HP laptop black screen.
Fix It on Android
Android handles this problem differently from Windows, and the fix that works on a laptop usually won’t apply to your phone. The Android-specific sequence below comes directly from hands-on troubleshooting demonstrated in the Information Host video on this exact issue.
Step 1: Forget the network and reconnect
Open Settings and tap Connections, then Wi-Fi. Find your connected network showing the “connected without internet” warning. Tap the gear icon next to the network name and tap Forget. Then select the network again from the list, enter your password, and reconnect. This clears any cached connection data that might be causing the conflict. It solves the problem more often than you’d expect.
Step 2: Switch from DHCP to a static IP.
If forgetting and reconnecting didn’t fix it, the issue is likely that your Android phone isn’t receiving a valid IP address from the router through DHCP. You can work around this by assigning a static IP manually.
Tap the gear icon next to your network again. Tap View more or Advanced settings depending on your Android version. Tap IP settings and change it from DHCP to static.
Enter these values:
IP address: 192.168.1.128
Gateway: 192.168.1.1
DNS 1: leave as is or use 8.8.8.8.
DNS 2: 8.8.4.4
Tap Save. These addresses work for most standard home router setups. The gateway address tells your phone where the router is. The DNS server address tells it where to look up websites. Setting these manually bypasses whatever DHCP failure was preventing automatic assignment.
Step 3: Restart your router if the problem persists.
If both steps above haven’t worked, the Android wifi no internet issue may actually be on the router side despite other devices working. Restart your router using the sequence from Section 3 and test your phone again after it fully restarts.
Fix it on iPhone or iPad.
iOS is more locked down than Android, which means fewer settings to adjust but also fewer things that can go wrong. The fix sequence here is shorter.
Step 1: Forget and rejoin the network.
Go to Settings and tap Wi-Fi. Tap the information icon next to your network name. Tap Forget This Network, confirm, then reconnect by selecting the network and entering your password. This clears the stored connection data and forces a fresh connection attempt.
Step 2: Toggle Wi-Fi off and back on
If forgetting and reconnecting didn’t work, go to Settings and toggle Wi-Fi off. Wait about 15 seconds. Toggle it back on and reconnect. Simple, but it forces the Wi-Fi radio to reset and sometimes clears whatever state was causing the problem.
Step 3: Check for an active VPN profile.
Go to Settings, then General, then VPN and Device Management. If a VPN is listed as Connected, tap it and disconnect or delete it. A VPN profile active on iOS will intercept all traffic, and the device will show connected to Wi-Fi while the VPN blocks everything else. Use your cellular data to confirm whether the problem is isolated to Wi-Fi on this device—if websites load on cellular but not Wi-Fi, the network settings on the device are the issue.
Step 4: Reset network settings as a last resort
If nothing above has worked, go to Settings, then General, then Transfer or Reset iPhone, then Reset, then Reset Network Settings. This clears all saved Wi-Fi networks, VPN profiles, and cellular settings and returns network configuration to factory defaults. Have your Wi-Fi password ready before you do this.
Fix It on a Wired Ethernet Connection
A lot of people assume that plugging in an Ethernet cable eliminates the router as a possible cause. It doesn’t. What Ethernet does eliminate is the Wi-Fi signal as a variable. The router still handles the connection to your ISP for both wired and wireless devices. If the router can’t reach upstream, you’ll see the same connected-but-no-internet problem through a cable that you see over Wi-Fi.
That said, Ethernet has its own specific checks.
Check the cable first. Press the connector firmly into both ends until it clicks. A partially seated Ethernet cable will show as connected while delivering no actual traffic. Try a different cable if you have one, and try a different port on the router. Physical cable failures and faulty ports are more common than people expect.
Then run the same Windows fix sequence. The proxy check, the adapter reconfiguration, and the disable-and-re-enable steps from the Windows section above apply equally to Ethernet connections. In ncpa.cpl, right-click your Ethernet adapter instead of your Wi-Fi adapter and follow the same steps. The 10- to 30-second wait between disabling and re-enabling the Ethernet connection problems adapter matters just as much for wired adapters as it does for wireless ones—give it that time before re-enabling.
If the cable is fine, the port is fine, and the Windows adapter steps haven’t fixed it, move to the Command Prompt section next.
The Command Prompt Fixes That Solve What Everything Else Can’t
If you’ve worked through the previous sections and still have no internet, the problem is deeper than a simple setting or a restart can reach. This is where {Command Prompt} comes in. These commands reset the parts of Windows networking that control how your device talks to the internet at a fundamental level, and they fix cases that nothing else touches.
Before anything else, you must run {Command Prompt} as administrator. This is the single most common mistake people make with these fixes. The commands will appear to run normally without administrator privileges. No error messages. No warnings. They just won’t actually do anything. Right-click the Start button, select Windows Terminal (Admin), or search for CMD, right-click the result, and select Run as administrator. Click Yes when Windows asks for confirmation.
The Complete Command Sequence (Run These in Order)
Type or paste each command and press Enter after each one. Wait for each command to finish before moving to the next.
Command 1:
textnetsh winsock reset catalog
This resets the Winsock catalog, which is the Windows component that manages how applications communicate over the network. Corruption here breaks internet access for every app simultaneously while Wi-Fi stays connected.
Command 2:
textnetsh int ip reset
This rebuilds the {TCP/IP reset} stack from scratch. This command clears accumulated errors in the core internet protocol settings that Windows uses to send and receive all data.
Command 3:
textipconfig /release
This tells your {network adapter} to release its current IP address back to the router. {IP address renewal} starts here.
Command 4:
textipconfig /renew
This requests a completely fresh IP address from the router’s DHCP server. Running release before renewal ensures you’re getting a clean new address, not just renewing a potentially corrupted one.
Command 5:
textipconfig /flushdns
This clears the {DNS server} cache on your device. When you {flush DNS cache}, Windows discards every stored website address it has looked up previously. Corrupted or outdated DNS entries cause pages to fail loading even when the internet route itself is working.
Command 6:
textipconfig /registerdns
This one is missing from most guides, and that’s a problem. The registerdns command re-registers your device’s DNS records and refreshes all DHCP leases. It solves specific cases where flushdns alone doesn’t restore connectivity because the DNS registration itself became inconsistent. FIXsage includes this in their sequence, and it’s worth running every time.
After all six commands complete, restart your computer. Don’t skip the restart. Some of these changes don’t take full effect until Windows reloads its {network settings} fresh.
Test your connection after the restart. For a large proportion of persistent “connected but no internet” cases, this sequence is what finally fixes it.
Change Your {DNS Settings} When Your ISP’s DNS Is the Problem
Here is something most people don’t know. Your internet service provider doesn’t just give you an internet connection. It also gives you a {DNS server} that translates website names into the {IP address} your device actually uses to reach them. And that {DNS server} can fail completely while your internet connection stays active.
When ISP DNS fails, you’re technically connected to the internet. Data can flow. But no website will load because nothing can translate “google.com” into an address your device can reach. It looks exactly like a no-internet situation. And it is, effectively. But the fix is different.
Switching your {DNS settings} to a public server bypasses your ISP’s DNS entirely. I treat this as a permanent change rather than a temporary fix because public DNS servers are consistently more reliable than what most ISPs provide by default.
Here’s how to change it on Windows:
Press the Windows Key and R, type ncpa.cpl, and press Enter. Right-click your active adapter and select Properties. Highlight Internet Protocol Version 4 (TCP/IPv4) and click Properties. Select “Use the following DNS server addresses.”
Try Cloudflare DNS first:
Preferred {DNS server}: 1.1.1.1
Alternate {DNS server}: 1.0.0.1
Click OK, close the windows, and test your connection. RPM Tech Tips specifically recommends Cloudflare as the first option, and their reasoning is sound. Cloudflare’s DNS is built with privacy as a priority and performs well across most regions.
If Cloudflare doesn’t restore your connection, switch to {Google DNS}:
Preferred {DNS server}: 8.8.8.8
Alternate {DNS server}: 8.8.4.4
Open the same IPv4 Properties window, replace the Cloudflare addresses with the {Google DNS} addresses above, click OK, and test again.
Both are free, reliable, and significantly more stable than ISP default {DNS server} options. One user reported their ISP’s DNS was down for an entire month. Everything came back the moment they set a fixed DNS to 8.8.8.8. That’s not an edge case. ISP DNS failures happen more often than ISPs acknowledge, and switching to a public {DNS server} means you stop being affected when they do.
Both of these are free, reliable, and significantly more stable than most ISP default DNS servers. If you want to dig into why Google’s DNS performs the way it does, their public DNS documentation breaks down the actual infrastructure behind those 8.8.8.8 and 8.8.4.4 addresses. One user reported their ISP’s DNS was down for an entire month. Everything came back the moment they set a fixed DNS to 8.8.8.8. That’s not an edge case. ISP DNS failures happen more often than ISPs acknowledge, and switching to a public DNS server means you stop being affected when they do.
What to Check If You’re on Public Wi-Fi
If you’re at a hotel, airport, café, or university campus, stop before you change a single {network setting} or restart anything. The fix for public Wi-Fi “connected but no internet” is almost never technical. And if you treat it like a technical problem, you’ll waste time on solutions that have no chance of working.
Here’s what’s actually happening. When you connect to a public Wi-Fi network, the access point connects your device to its local network immediately. That’s why your device shows {wifi connected without internet}. But the network blocks all internet traffic until you complete a browser-based sign-in page called a captive portal. Hotels use them for room authentication. Airports use them for terms-of-service agreements. Campuses use them for student login. The connection works perfectly. What’s missing is authentication, not internet access.
The fix takes about ten seconds.
Open any browser on your device and try loading any webpage. In most cases the network will automatically redirect you to the sign-in or terms page. Read it, click accept or log in, and your internet access opens immediately.
If nothing happens when you open the browser, type this address directly into the address bar:
texthttp://neverssl.com
That site exists specifically for this situation. Most modern browsers default to HTTPS connections, which some captive portals can’t redirect properly. NeverSSL forces a plain HTTP request that the portal can intercept and redirect to the sign-in page without any issues.
Two other things worth knowing about public networks. First, if the venue has a device limit per room or account, your device may be blocked even after you sign in because another device already used the allocation. Log out on the other device first. Second, public networks with many simultaneous users sometimes drop individual connections under heavy load. If your access cuts out after working briefly, that’s congestion, not a settings problem, and there’s nothing on your end to fix.
But in the vast majority of public Wi-Fi situations where the device shows connected with no internet, opening a browser is all it takes.
Why Does This Keep Happening? The Real Root Causes of Recurring Problems
If you fix your connection today and it breaks again tomorrow, the problem probably isn’t something you’re doing wrong. It’s usually your hardware telling you it can’t keep up anymore.
I see this pattern constantly. Someone restarts their router; everything works for a few hours or a day, then the same “connected but no internet” message shows up again. That cycle is a strong sign the issue lives in the hardware itself, not in a setting you forgot to change.
Aging routers struggle with modern loads. A router that’s five or six years old was built for a home with a few devices. Now you’ve got phones, laptops, smart TVs, and a handful of smart home gadgets all pulling from the same box. It still powers on. It still shows lights. But it’s straining.
Your modem might not meet current standards. DOCSIS 3.1 is the minimum most ISPs now expect from a modem. If yours is still running DOCSIS 3.0, it can work fine most of the time and then randomly drop out when the network pushes past what it can handle.
ISP DNS servers fail more often than people realize. This one catches people off guard. Switching to a public DNS, something like 8.8.8.8, has permanently solved this exact issue for people who’d been troubleshooting for weeks.
Outdated firmware quietly causes instability. Manufacturers patch bugs that cause random disconnects. If you’ve never checked, there’s a decent chance you’re running old firmware right now.
Here’s the mistake I see most: someone buys a brand new router when the modem was the actual problem all along. New router, same symptoms, because nobody diagnosed which piece was actually failing first.
Aging routers struggle with modern loads. A router that’s five or six years old was built for a home with a few devices. Now you’ve got phones, laptops, smart TVs, and a handful of smart home gadgets all pulling from the same box. It still powers on. It still shows lights. But it’s straining. And if your own computer feels the same way lately—sluggish, lagging, taking forever to open anything—that’s usually a separate issue worth looking at on its own. I’ve written a full breakdown on how to fix a PC running slow if that sounds familiar.
Hardware isn’t binary. It can work, sort of, while still being the reason your connection keeps dropping.
3 Things to Do Right Now So This Never Happens Again
You just spent thirty minutes fixing this. Do these three things and you probably won’t have to again.
1. Switch your DNS permanently, not just for today.
Go into your network settings and change your DNS to Google DNS (8.8.8.8) or Cloudflare (1.1.1.1). Don’t treat this as a one-time fix. I’ve seen people switch DNS to solve a problem, then switch back to their ISP’s default a week later out of habit. Leave it changed. Public DNS is just more stable than what most ISPs hand you by default.
2. Turn on automatic firmware updates.
Open your router’s admin panel and look for a firmware or update section. Most routers have an option to check and install updates automatically. Almost nobody turns this on. And that’s exactly why so many routers are running months, sometimes years, behind on bug fixes that would’ve prevented random drops.
3. Restart your router and modem once a month. On purpose.
Not when something breaks. On a schedule. Set a reminder on your phone. Routers accumulate small memory issues over weeks of nonstop uptime, and a restart clears that out before it turns into a real problem.
Some newer routers now handle firmware updates and restarts on their own. If you’re due for an upgrade anyway, that’s worth factoring in.
Three small habits. That’s the whole list.
Frequently Asked Questions
Why does my Wi-Fi show “connected” but I still can’t open any website?
“Connected” just means your device joined the router; that’s the local link. Internet access is a separate step, and when that fails, the break is between your router and your ISP, not your device.
What does “No Internet, Secured” mean on Windows?
“Secured” only refers to your Wi-Fi being password protected; it has nothing to do with your internet working. Windows is really just saying your network is encrypted but can’t reach the internet.
My whole family has no internet, but Wi-Fi shows connected. What do I do?
When every device is affected, the problem is your router, modem, or ISP, not any single device. Check for an outage first, then restart the modem, wait, and restart the router after.
I restarted my router, and it still says no internet. What now?
Check if your ISP is down before touching anything technical; that takes two minutes and rules out the biggest cause. If it’s not an outage, run a Winsock and IP reset in Command Prompt, then switch your DNS to Google or Cloudflare.
Why does my Android phone say “connected without internet”?
Usually it’s the same router-to-ISP break every other device sees, but sometimes it’s a DHCP or DNS conflict specific to your phone. Forget and rejoin the network first, and if that doesn’t fix it, switch to a static IP.
Can a VPN cause “connected but no internet access”?
Yes, a VPN routes all your traffic through its own servers, and if that server is down or misconfigured, your internet breaks while Wi-Fi still shows connected. This even happens with leftover VPN apps after you’ve cancelled the subscription, so disable or uninstall it before anything else.
2 comments