
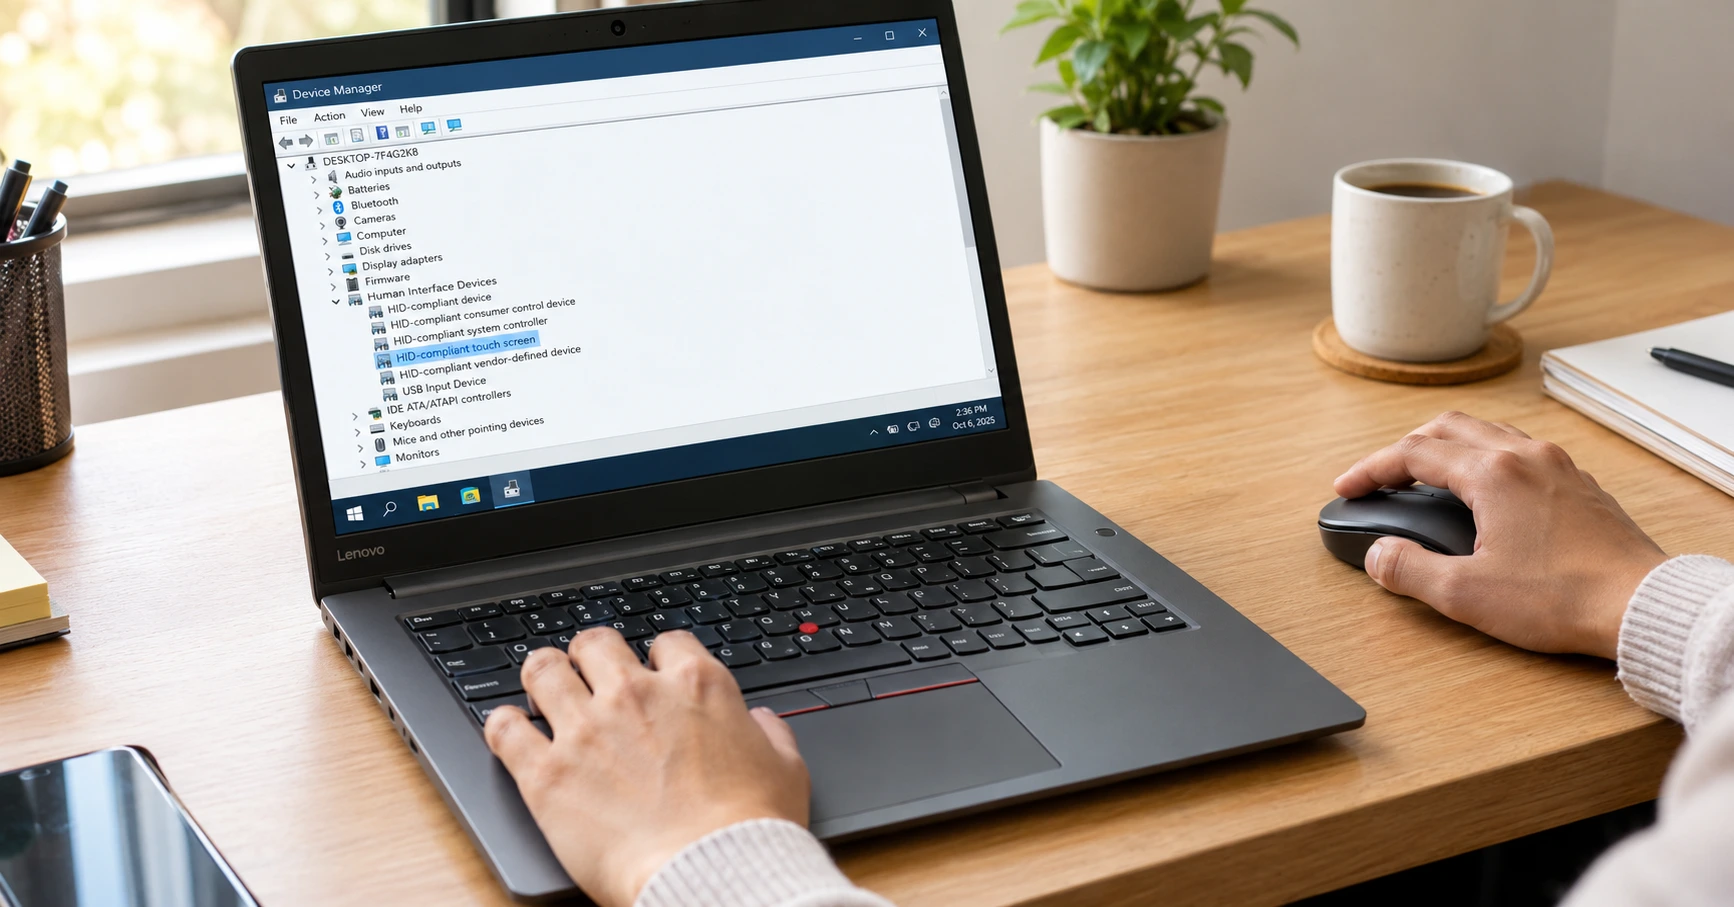
Your touchscreen is driving you crazy. Maybe your kids keep tapping random things. Maybe phantom touches are clicking on their own without you even touching the screen. Or perhaps you simply prefer using your trackpad and keep accidentally brushing the display while typing at your desk.
Whatever brought you here, I understand the frustration, and learning how to turn off the touch screen on a Lenovo laptop is one of the most practical solutions you can implement right now. The good news is that disabling your touchscreen is actually straightforward once you understand the process, and I’m going to walk you through exactly how to do it, whether you want a quick temporary fix or a permanent solution that persists across restarts.
Before we get started with the actual steps for how to turn off the touch screen on a Lenovo laptop, there’s something important you need to know upfront about how this actually works, because most people don’t realize that the basic
Device Manager method I’m about to show you it’s temporary—meaning when you restart your computer, the touchscreen automatically turns back on. Understanding this distinction helps you decide which method is right for your situation, whether you need to test if disabling the touchscreen solves your problem, or whether you want it to stay off permanently, and I’ll show you both options so you’re completely prepared to take control of your Lenovo touchscreen experience.
Why You Might Want to Disable Your Lenovo Touchscreen (And What You Need to Know First)
Let me start by being completely honest about something that confuses most people: the basic method I’m about to show you is temporary. When you restart your laptop, the touchscreen turns back on automatically.
This isn’t a bug. This isn’t something broken with your system. This is how Windows is actually designed to work. But most people don’t realize this until they follow the Device Manager steps, feel satisfied for a day, restart their computer, and get frustrated when everything’s back to normal.
So let’s be crystal clear from the start about what to expect and why it happens this way.
Understanding the Temporary Nature of Device Manager Disable
Here’s what’s happening behind the scenes. Windows treats changes made through Device Manager as session-level settings, not permanent system configurations. Think of it like adjusting the volume on a speaker. When you turn the volume down, it stays down until you turn it back up or restart. Once you restart, the speaker goes back to its default state.
If you want to document the process before and after you make changes, or capture your Device Manager settings for troubleshooting later, knowing how to screen record on your laptop is helpful. While our guide focuses on HP laptops, the general screen recording principles apply to Lenovo as well.
This design has a purpose. Windows assumes that if you disabled a device temporarily, you might have done it for troubleshooting reasons or to test something out. After a restart, the system resets to factory defaults because the assumption is that you’ve either fixed the underlying issue or moved on to something else.
The key phrase here is “most of the time this is fine.” But if you need the touchscreen to stay permanently disabled, we’ll talk about those options in a later section. For now, just know that Device Manager gives you a quick temporary solution that’s completely reversible with zero risk.
Common Reasons People Disable Their Touchscreen
Before you make the change, let me walk through the reasons people usually end up here, because understanding your specific situation helps you decide which method is right for you.
Ghost touches or phantom clicking is probably the most common reason. Your screen is clicking on its own. Your cursor is jumping around. Windows is opening folders and closing windows without your input. This isn’t dirt. This is your digitizer getting confused and registering false input. Disabling the touchscreen driver stops these false signals completely.
Kids and accidental touches come in second. You have young children around, and they keep tapping the screen while you’re trying to work. Every tap opens something unexpected or interrupts what you’re doing. The touchscreen just adds chaos to your workflow.
Preference for trackpad input is another big one. Some people simply prefer the precision and control of a trackpad or the feel of a trackpoint (those little red nubs on ThinkPads). For them, the touchscreen is just extra. It gets in the way. It doesn’t add any value to how they work.
Battery concerns also come up. Some people think that disabling power-consuming features will help their battery last longer. The touchscreen does use power, but honestly, it’s a tiny amount. Your display brightness, your processor speed, and how many programs you have running all have much bigger impacts on battery life.
Screen cleaning difficulties are surprisingly common too. The touchscreen can be annoying when you’re trying to clean your display because you have to be careful not to accidentally tap things while you’re wiping it down. Some people disable it before cleaning, then re-enable it after.
Whatever your reason, the solution is the same, and it takes about five minutes from start to finish.
The Good News About Reversibility
I want to emphasize this because it matters for your confidence in making this change: this is completely reversible. Nothing breaks. Nothing gets damaged. Nothing becomes permanent unless you specifically take steps to make it permanent.
You can turn off the touchscreen, use it that way for a week, and turn it back on in seconds if you change your mind. You can test it to see if disabling it actually solves your problem. You can turn it off when your kids are around and turn it back on when they’re done. This is one of those Windows settings that was specifically designed to be toggled on and off without any consequences or risks.
How to Turn Off Your Lenovo Touchscreen in 5 Minutes
The fastest and most straightforward way to disable your touchscreen is through Device Manager, which is a built-in Windows tool that controls all of your hardware devices. This method works the same way on every single Lenovo laptop I’ve worked with or heard about, whether you own a Yoga, IdeaPad, ThinkPad, or any other model in their lineup.
I’m going to walk you through exactly where to click and what to look for. I’ll also give you multiple pathways to the same destination because different people prefer different navigation styles, and there’s no wrong way to get there.
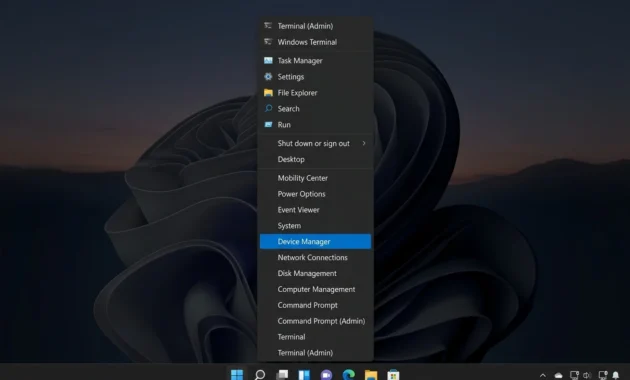
Step 1: Open Device Manager (Choose Your Preferred Method)
You have three different ways to get to Device Manager. Pick whichever one feels most comfortable for you. All three methods open the exact same program and get you to the exact same place.
Method A—The Fastest Route: This is the quickest way if you just want to get there. Look at your Windows taskbar and find the search icon (usually a magnifying glass). Click it. Type “Device Manager” into the search box. Device Manager should appear right at the top of the results. Click it, and you’re in.
Method B—The Right-Click Alternative: If you prefer not using the search function, you can right-click directly on the Windows Start menu button (the Windows logo) on your taskbar. A menu will pop up showing you several options. Look for “Device Manager” in that menu and click it. This gets you there just as fast as the search method, maybe even faster if you’re quick with a mouse.
Method C – The Traditional Approach: This is the method that’s documented in older Lenovo manuals, and it still works perfectly. Open File Explorer (the folder icon on your taskbar). In the left panel, find “This PC” or “My Computer.” Right-click on it. A menu appears. Select “Manage.” A larger window opens up called Computer Management. Look at the left sidebar in that window and click on “Device Manager.” You’re now in the same place as the other two methods.
All three get you to Device Manager. Use whichever one feels most natural to your workflow. There’s genuinely no advantage to one over the others except personal preference.
Step 2: Locate Human Interface Devices
Once Device Manager opens in front of you, you’ll see a window that looks a bit overwhelming at first. There’s a long list of hardware categories with names like “Disk drives,” “Display adapters,” “Keyboards,” “Mice and other pointing devices,” and dozens more.
What you’re looking for is a category called “Human Interface Devices.” This is where Windows groups all your input devices together: your keyboard, your touchpad, your mouse, your touchscreen, and other similar devices.
Scroll down through the list until you find “Human Interface Devices.” It’s usually somewhere in the middle of the list. Once you find it, you’ll notice there’s a small arrow or triangle next to the text. Click that arrow to expand the category and see all the devices inside it.
When you click it, the category expands and shows you a list of all the input devices connected to or built into your laptop.
Step 3: Find “HID-Compliant Touch Screen” (The Critical Step)
Now here’s where I need you to pay very close attention, because this is the step where most people make a mistake that causes problems.
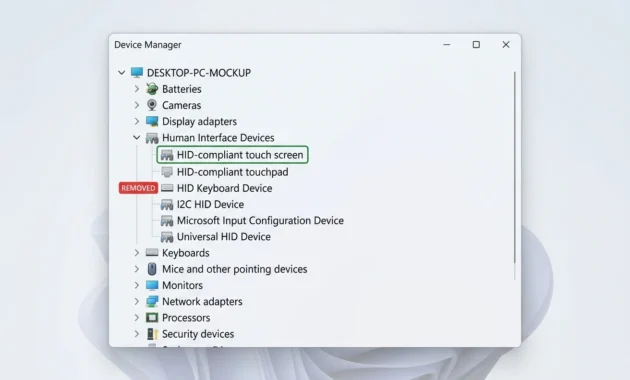
When you expand Human Interface Devices, you’re going to see several items with similar-sounding names. This is where the confusion usually happens. You might see:
- “HID-compliant device” (this is generic and could be many things)
- “HID-compliant touchpad” (this is your trackpad, NOT what you want)
- “HID-compliant touch screen” (this is what you want)
- Possibly other HID devices depending on your laptop’s specific configuration
The one you want to disable is specifically the one labeled “HID-compliant touch screen.” Nothing else. Not “HID-compliant device.” Not “HID-compliant touchpad.” The one that specifically says “touch screen.”
Why is this so important? Because if you disable the wrong device, you’ll disable your keyboard or your touchpad instead of your touchscreen. You’d then have to reverse that change to get your keyboard or trackpad working again. It’s not permanent or dangerous, but it’s an annoying mistake that adds extra steps.
If you have a 2-in-1 convertible laptop like a Lenovo Yoga, you might actually see multiple “HID-compliant touch screen” entries in the list. This is completely normal and not a problem. Some convertibles and 2-in-1 models have separate components for detecting regular finger touches and stylus touches. They each get their own driver entry. If you see multiple entries, you can disable all of them if you want, or just disable the main one. Both approaches will turn off your touchscreen.
Double-check the label before you move to the next step. Make absolutely sure it says “touch screen” in the name.
Step 4: Disable the Device
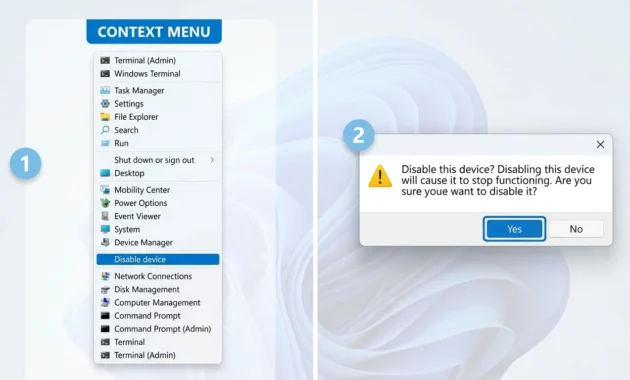
Once you’ve located the correct “HID-compliant touch screen” device, right-click directly on it. A context menu appears with several options.
Look for and click the option that says “Disable device.” In some versions of Windows, it might say “Disable” or “Disable Device.” Click it.
After you click, Windows asks you to confirm what you’re doing. A dialog box appears asking if you’re sure you want to disable this device. Click “Yes” to confirm.
That’s it. Your touchscreen is now off. It should stop responding to touch input immediately. You don’t need to restart your computer for this to take effect. The change happens right away. Try touching your screen now if you want to confirm it’s not responding. You can tap it, swipe it, whatever you want. Nothing should happen. Your cursor won’t move. No windows will open. Nothing.
If you find that disabling the touchscreen reveals other input device issues, such as your trackpad becoming unresponsive, check out our guide on fixing Lenovo touchpad problems. Sometimes isolating one device helps identify issues with others.
Pro Tip: This Disable is Temporary (Resets After Restart)
Here’s the critical thing I mentioned at the very beginning, and I want to make sure it’s crystal clear now that you’ve completed the steps.
If you restart your computer, Windows will automatically re-enable the touchscreen device. The disable you just made is not permanent. It persists as long as your computer is on, but once you shut down and turn it back on, everything goes back to normal.
This happens because Windows treats Device Manager changes as session-level settings, not permanent system configurations. When you shut down, Windows erases these temporary changes. When it boots back up, it reloads all your devices in their default state, which is enabled.
This is actually intentional design, not a bug. Windows assumes that temporary disables in Device Manager are usually for troubleshooting purposes. It expects you to either fix the underlying issue or move on to something else, and when you restart, it resets everything to normal.
So to be absolutely clear: your touchscreen will work again after you restart your laptop without you having to do anything. You don’t need to reverse the change before restarting. You don’t need to enable it again manually. When your computer boots up, the device will be enabled again automatically.
If you need the touchscreen to stay permanently disabled, that’s a different process that I cover later in this guide. But for most people who just want to disable it temporarily while they test it or while certain situations require it, Device Manager is the perfect solution.
How to Turn Your Lenovo Touchscreen Back On
Getting your touchscreen working again is incredibly simple, and it’s important that you know how easy this reversal is.
Open Device Manager again using any of the three methods I showed you earlier. Navigate back to Human Interface Devices and expand it. Find “HID-compliant touch screen” again.
Right-click on it. This time, instead of clicking “Disable device,” click “Enable device.”
A confirmation dialog appears. Click “Yes.”
That’s it. Your touchscreen is working again immediately. You don’t need to restart. You don’t need to do anything else. The change is instant.
This is what I mean about this being completely reversible with zero consequences. You’re just toggling a device on and off, the same way you might toggle an external speaker or a printer. Nothing gets damaged. No settings get corrupted. No drivers get uninstalled. You’re just changing the power state of the device through Windows’ hardware management system.
Once you’ve done this once, you can move much faster. The second time you do it, your hands will be faster because you already know exactly where to go and what to look for. It becomes a 30-second process instead of five minutes.
Some people end up disabling and re-enabling their touchscreen multiple times as they figure out if it’s actually causing the problems they thought it was. That’s completely fine. There’s no limit to how many times you can toggle it. Do it as many times as you need to until you’re comfortable with your decision.
Understanding Temporary vs Permanent: Why Your Touchscreen Keeps Coming Back On
The most common question I get after people try the Device Manager method is: “Why did my touchscreen turn back on after I restarted?”
Let me explain exactly what’s happening and why Windows is designed this way.
How Windows Manages Driver States
When you disable a device in Device Manager, you’re changing what’s called a session state. A session state is a temporary setting that applies only to your current Windows session. A session is the period of time from when you turn on your computer until when you shut it down.
Think of it like adjusting the volume on a speaker. When you turn down the volume, it stays down. But if someone turns off the speaker and turns it back on, the volume resets to its default level. Windows driver states work the same way.
The actual device drivers and their permanent configurations are stored in the Windows registry and in firmware, which persist across restarts. When you disable a device in Device Manager, you’re temporarily changing its state for this session only, not making a permanent registry change.
So when you restart your computer, here’s what happens: Windows shuts down, which ends your current session and discards all session-level changes. When it boots back up and loads a fresh session, it loads the device drivers from their stored configurations, which still have the device enabled. The device comes back to life automatically.
Why This Design Exists
You might be wondering why Windows works this way instead of making Device Manager changes permanent. The answer is that Windows is designed to be reversible by default.
The idea behind this design is that if you disabled something in Device Manager, you probably had a reason. Maybe you were troubleshooting a problem. Maybe you were testing something. Maybe something was behaving strangely and you wanted to isolate the cause.
After you restart and the device comes back on, Windows figures one of two things has happened: either you figured out what the problem was and fixed it (in which case the device being back on is correct), or you’ve moved on to something else and forgot you disabled it (in which case having it on is also correct).
By making Device Manager changes temporary, Windows ensures that you can’t accidentally break your system with a change you made days ago and forgot about. Everything resets to known-good defaults each time you boot up.
What This Means for You
For most purposes, the temporary nature of Device Manager disable is fine. If you just want to test whether your touchscreen is causing a problem, the temporary nature is actually helpful. You disable it, test for a day or two, see if the problem goes away, and then restart and everything comes back to normal.
But what if you actually want the touchscreen to stay permanently disabled? What if you’ve determined that you never use it and you want it off all the time, even after restarts?
That requires a different approach.
Making the Disable Permanent
There are a few ways to make a touchscreen disable permanent, but they’re progressively more complex and less reversible than the Device Manager method.
Option 1: Lenovo Quick Fix Tool – Lenovo offers an official utility specifically designed for Lenovo laptops called the Quick Fix tool. It creates a permanent disable that persists across restarts. This is the official Lenovo solution.
However, and this is important, the Quick Fix tool officially only supports Windows 10 as of 2025. Windows 11 is not officially listed as supported. Some people report that it works on Windows 11 anyway, but if you’re on Windows 11 and you download it expecting official support, you might be disappointed.
The advantage of the Quick Fix tool is that it’s Lenovo’s own solution, so it’s specifically designed for their hardware. The disadvantage is the Windows 11 compatibility question.
Option 2: PowerShell and Registry Edits – More technically advanced users can create permanent disables through PowerShell scripts or direct registry edits. These are reliable and work on both Windows 10 and Windows 11, but they require some technical knowledge and they’re not reversible through the normal GUI interface.
Option 3: Accept the Temporary Nature – For most people, the temporary nature of the Device Manager disable is actually fine. You disable it, restart occasionally, and re-disable it if needed. It’s not inconvenient, and it’s completely safe.
Which option is right for you depends on your specific situation and comfort level with more complex methods.
How to Fix Ghost Touches and Phantom Clicking on Your Lenovo
This is the problem that brings more people to me looking for solutions than anything else. And I’m glad you’re here because this is one issue that you can actually solve completely without expensive hardware repairs.
Here’s what happens: Your screen is clicking on its own. You’re not touching it. Your kids aren’t touching it. The mouse cursor is moving by itself. Folders are opening. Windows are closing. Text is being selected and deleted. Your typing is getting interrupted.
And when you look at the screen to figure out what’s happening, you don’t see anyone touching it. Nothing is making contact. Yet the screen keeps registering input as if someone is constantly tapping it.
This is called ghost touching or phantom clicking, and it’s incredibly frustrating because it feels like your computer is broken or possessed. But I’m here to tell you that this is fixable, and most of the time it’s not a hardware failure at all.
What Causes Ghost Touches and Why Cleaning Isn’t Always the Solution
Ghost touches happen when your digitizer, which is the layer underneath your screen that detects touch input, starts registering phantom touches that don’t actually exist.
Now, sometimes this is because there’s genuine dirt or moisture on the screen, and cleaning it helps. But here’s the thing that most people don’t realize: a lot of the time, ghost touches are caused by digitizer driver issues or sensitivity settings, not by physical dirt.
Your digitizer is constantly analyzing electrical signals to figure out where you’re touching. Sometimes this hardware gets confused. Sometimes the driver misinterprets sensor data. Sometimes the firmware version gets out of sync with your operating system. When any of these things happen, the digitizer starts registering false input.
Cleaning the screen doesn’t fix these problems because the problem isn’t dirt. The problem is the device is receiving confusing input signals.
Here’s the really good part though: you can fix most of these issues by disabling the touchscreen driver. Disabling it stops all the confused signals from causing problems. And you definitely don’t need a $200 digitizer replacement or to send your laptop away for repairs.
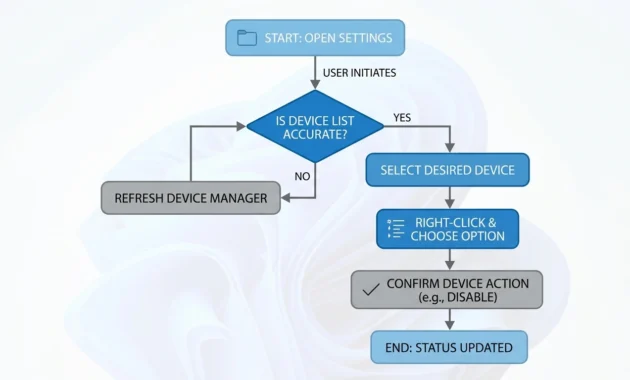
Step 1: Connect an External Mouse (Do This First)
The tricky part about fixing ghost touches is that the phantom clicks make it incredibly difficult to use your computer normally while you’re trying to navigate Device Manager.
Imagine trying to click exactly where you need to while the screen keeps randomly clicking other places. You’d miss your target constantly. It’s like trying to draw a line while someone keeps bumping your hand.
Before you do anything else, connect an external mouse to your laptop. This could be a USB mouse connected directly, or a wireless mouse connected via a USB receiver, or a Bluetooth mouse paired to your laptop. It doesn’t matter what kind. What matters is having input from a source that’s not your touchscreen.
Once you have external mouse control working, you have reliable cursor control that the phantom touches can’t interfere with.
Here’s a trick that makes the actual disabling step even easier: hold your finger on the opposite side of the display from where the phantom touches are happening. If the ghost clicks are happening on the left side of the screen, hold your finger on the right side. Your actual touch input will counteract the phantom touches just enough to let you navigate to Device Manager and click the disable button.
It’s like balancing one input against another. It’s not perfect, but it gives you enough stability to do what you need to do.
Step 2: Follow the Device Manager Method to Disable
Now that you have an external mouse working and you’ve got the phantom touches counteracted enough to navigate, follow the exact steps I showed you in the previous section.
Open Device Manager using any of the three methods. Navigate to Human Interface Devices. Find “HID-compliant touch screen.” Right-click it. Click “Disable device.” Confirm.
The phantom touches stop immediately. Completely. Your screen becomes responsive again. Everything works normally.
Pro Tip: This Solves the Problem Without Hardware Replacement
I want you to know something important, and I want to say it clearly because it’s one of the biggest misconceptions out there.
When you search online for “ghost touches laptop” or “phantom clicking,” a lot of results talk about hardware failure. They talk about digitizer damage. They talk about needing expensive repairs. They suggest sending your laptop to a repair facility.
Some of them are probably trying to sell you something.
Here’s the reality: disabling the touchscreen driver solves the ghost touch problem completely for most people. No hardware replacement. No repairs. No expensive technician visit. Just disabling a device.
This tells you something important: most ghost touch issues are driver or firmware issues, not hardware issues. If the problem goes away completely when you disable the driver, then the hardware is fine. The problem was the driver getting confused.
Does this mean ghost touches never indicate hardware problems? No. But it means that before you assume you need a $200 hardware repair, try disabling the device first. You might discover that was all you needed to do.
Learning how to turn off touch screen on Lenovo laptop is one of the quickest fixes you can make when your touchscreen is causing problems, whether it’s phantom clicks driving you crazy, kids constantly tapping the display, or you simply prefer using your trackpad instead.
The good news is that turning off your touchscreen through Windows Device Manager takes just five minutes and works on every Lenovo model, from Yoga convertibles to IdeaPad and ThinkPad laptops, without requiring any technical expertise or software installation.
Understanding how to turn off touch screen on Lenovo laptop empowers you to disable the feature temporarily whenever you need to test if it’s actually causing your issues, or to leave it off permanently if you decide you never use it, all while knowing that the process is completely reversible and won’t damage your system in any way.
The basic method using Device Manager is temporary and resets when you restart your computer, but if you need how to turn off touch screen on Lenovo laptop to work permanently across reboots, you have additional options like the official Lenovo Quick Fix tool for Windows 10 users, and I’ll walk you through each method so you can choose the approach that works best for your situation.
Troubleshooting: If Your Touchscreen Stopped Working After a Windows 11 Update
This specific problem shows up constantly in tech support forums, and there’s a good reason for that: Windows 11 changed how some drivers work compared to Windows 10, and touchscreen drivers sometimes struggle with that transition.
Here’s the scenario: You update to Windows 11. You restart your laptop. Windows comes back up. You touch your screen and nothing happens. The touchscreen is completely unresponsive.
Sometimes the driver is disabled. Sometimes it’s missing entirely. Sometimes it’s conflicted with the new system. Sometimes it’s there but corrupted.
Here’s the escalation process I would follow to diagnose and fix the issue.
If you’ve gone through all the troubleshooting steps and your touchscreen still isn’t working, Lenovo’s official support page for Human Interface Devices provides additional diagnostic resources and documentation specific to your laptop model.
You can also access Lenovo’s driver download center directly to find the latest touchscreen drivers for your exact device model—just enter your serial number or model number and download the most current version available. For persistent issues that even fresh driver installation doesn’t resolve, Lenovo’s support team can often provide remote assistance or escalate your case to their hardware specialists.
Step 1: Check Device Manager for the Device
First, let’s figure out if the device is even visible in Device Manager.
Open Device Manager using any of the three methods from earlier. Navigate to Human Interface Devices and expand it.
Ask yourself these questions: Is “HID-compliant touch screen” there at all? If yes, does it have a downward-pointing arrow on the icon, which would indicate it’s disabled?
Your answers determine what you do next.
If the device is there and it’s enabled (no arrow), but it’s just not working, skip ahead to Step 4.
If the device is there and disabled (it has a downward arrow), go to Step 2 immediately.
If the device is not there at all, go to Step 3.
Step 2: If Device is Disabled, Enable It First
If you see “HID-compliant touch screen” in the list with a downward arrow, Windows has disabled it. This sometimes happens during major updates if the driver didn’t load properly during the installation process.
Right-click the device and select “Enable device.” Click yes to confirm. Restart your computer.
Very often, this is all you need to do. The update probably just disabled it, and re-enabling it plus a restart fixes the whole thing.
Test your touchscreen after the restart. If it works, you’re done. Move on with your life.
Step 3: If Device is Missing Entirely, Reinstall the Driver
If you expand Human Interface Devices and “HID-compliant touch screen” isn’t there at all, the driver is missing or Windows didn’t install it during the update.
When Windows updates, it usually installs new drivers for all your hardware automatically. But sometimes the installation process misses something, or it installs the wrong driver, or it installs a driver that’s not compatible with your specific Lenovo model.
You need to install the correct driver manually.
Go to the Lenovo Support website. Find your laptop’s model number (it’s usually on a sticker on the bottom of your laptop or in your system information). Look up the drivers for your specific model. Find the touchscreen driver in the driver list. Download it.
Run the installer and follow the prompts. It should install the driver to the correct location.
After installation is complete, restart your laptop.
Once you restart, open Device Manager again and check Human Interface Devices. The “HID-compliant touch screen” device should now be there. If it is, your touchscreen should be working.
If it’s still not there after the manual driver installation and restart, there’s something more complex going on. Move on to Step 4.
Step 4: Run a Complete Windows Update
Sometimes the initial touchscreen driver incompatibility with Windows 11 doesn’t get fixed by manually installing the driver. What fixes it is a complete Windows system update that includes newer patches and compatibility fixes that roll out after the major update.
Click on the Windows Start menu. Go to Settings. Navigate to System. Click “Windows Update.” Click “Check for updates.”
Windows will check for available updates. Install anything it finds. This might include not just driver updates but also system patches and security updates.
After all updates are installed, restart your computer.
Check your touchscreen. If it’s working now, great. The update included the fix you needed.
If it’s still not working after all these steps, there’s probably something specific to your hardware that needs professional attention.
Step 5: When to Seek Professional Help
If you’ve gone through all these steps and your touchscreen still isn’t working, something more complex is happening.
At this point, reaching out to Lenovo Support directly is your best option. They can access your device information and potentially do remote diagnostics. You can also take your laptop to a local tech support center if you prefer in-person help.
When you contact them, be clear about what you’ve already tried. Tell them: “I’ve checked Device Manager, enabled the device, reinstalled the driver manually, and run Windows Update. The touchscreen still isn’t working.” This information helps them skip the basic troubleshooting and focus on your specific issue.
Can You Disable Your Lenovo Touchscreen in BIOS? (The Answer Might Surprise You)
I’m going to save you about 15 minutes of your time right here.
The answer is no. You absolutely cannot disable the touchscreen in BIOS on Lenovo Yoga, IdeaPad, or ThinkPad laptops.
The BIOS touchscreen disable option exists only on Lenovo ThinkCentre All-in-One desktops. Not on any laptop model. Not on convertibles. Not on 2-in-1s. Only on the desktop all-in-ones.
Why Does This Myth Exist?
This myth exists because of a combination of factors that all reinforce each other.
First, some Lenovo desktops do have this BIOS option. If you search for “disable touchscreen BIOS Lenovo,” you’ll find some ThinkCentre documentation that shows you exactly how to do it.
Second, generic tech advice sites often say something like “check BIOS for hardware toggles” as a catch-all solution. People see this advice and assume it applies everywhere.
Third, people own different Lenovo devices. Someone with a ThinkCentre All-in-One disables their touchscreen in BIOS, then tells their friend “just go to BIOS and turn off the touchscreen.” Their friend has a ThinkPad, searches BIOS for an option that’s not there, and spends 15 minutes confused.
Before you know it, the myth is widespread and people are regularly searching BIOS menus on their laptops for an option that doesn’t exist.
Why BIOS Doesn’t Have This Option on Laptops
BIOS settings are different on laptops versus desktops because of how the hardware is configured differently. Desktop all-in-ones have simpler, more standardized configurations. Lenovo built them with BIOS controls for major hardware components like touchscreen, keyboard, and network adapters.
Laptops are more complex and more varied. Different laptop models have different hardware configurations. Building BIOS controls for every possible hardware component on every model would be incredibly complicated. Instead, Windows drivers handle most hardware control on laptops.
That’s why the Device Manager method is the right approach for laptops. It’s where Windows manages the drivers, and it’s where the touchscreen control actually lives on laptop systems.
What This Means for You
Skip BIOS entirely. Don’t waste your time searching for a setting that isn’t there.
Use the Device Manager method I showed you earlier. It’s more reliable anyway because it actually controls the driver, which is the proper place to manage the touchscreen on a laptop.
Touchscreen Disable on Different Lenovo Models: Yoga, IdeaPad, ThinkPad
The Device Manager method works on every Lenovo laptop model. But different model lines have a few specific characteristics you should be aware of.
Lenovo Yoga Series: The 2-in-1 Convertibles
The Yoga is Lenovo’s 2-in-1 convertible line. These laptops are specifically designed to flip backward 360 degrees so they can work in tablet mode, tent mode, or standard laptop mode.
Because of this convertible design, Yoga laptops have more complex touchscreen hardware configurations than standard laptops. They often have multiple touch-sensitive components.
When you open Human Interface Devices, you might see multiple entries labeled “HID-compliant touch screen” instead of just one single entry. This is completely normal and not something to worry about.
Some Yoga models have separate digitizers for detecting regular finger touches and for detecting stylus input. Each one gets its own driver entry in Device Manager. If you see two or three touch-related entries, don’t be confused. Some are probably for different types of touch input.
You can disable just the main touchscreen entry if you want, or you can disable all of them if you want to disable all touch functionality completely. Both approaches work fine.
The steps are exactly the same as I showed you earlier. Find the HID-compliant touch screen device, right-click it, and disable it.
Lenovo IdeaPad Series: Standard Everyday Laptops
IdeaPad is Lenovo’s mainstream consumer laptop line. Most IdeaPads are standard clamshell designs with a touchscreen as an optional feature.
The Device Manager method works exactly as I described it: one “HID-compliant touch screen” entry, straightforward disable.
But here’s where I need to give you an important warning that could save you from a bigger problem.
Some tech support articles recommend uninstalling the touchscreen driver as a troubleshooting step. Do not do this on IdeaPad models, especially the IdeaPad Flex line.
Here’s why: on some IdeaPad models, uninstalling the driver causes the driver to not reinstall automatically when you restart. You end up with the touchscreen completely broken until you manually download and reinstall the driver from the Lenovo website.
This is different from disabling it. When you disable the device in Device Manager, the device resets on restart and stays perfectly fine. When you uninstall the driver, Windows might not be able to find it and reinstall it automatically.
So for IdeaPad: use disable, not uninstall. Use the Device Manager method I showed you. Don’t venture into uninstalling drivers unless you’re specifically directed to do so by Lenovo Support and you’re prepared to manually reinstall from their website.
Lenovo ThinkPad Series: Business Laptops
ThinkPad is Lenovo’s business and professional line. ThinkPads are known for their reliability, security features, and build quality.
From a touchscreen perspective, ThinkPads are straightforward. The Device Manager method works exactly as I described it. You’ll find one “HID-compliant touch screen” entry. You disable it. It stays disabled until you restart or manually re-enable it.
No special complications. No multiple touch entries. No driver uninstall warnings. Just standard, predictable behavior.
If you have a ThinkPad, the process is as simple as it gets.
Tablet Mode vs Touchscreen: What’s the Difference?
I need to clear up a confusion that I see come up constantly, and I’m glad we’re addressing it here because it prevents you from potentially solving the wrong problem.
Tablet Mode and touchscreen are completely, totally separate things. They’re different features that work independently. You can have one on while the other is off. You can have both on. You can have both off. They don’t depend on each other at all.
What is Tablet Mode?
Tablet Mode is a Windows feature, not a hardware feature. It’s a software setting that changes how your Windows interface looks and behaves when you’re using your computer in a touch-focused way.
When Tablet Mode is enabled, Windows automatically optimizes the interface for touch input. The Start menu becomes full-screen and touch-friendly. Apps open in full-screen mode by default. The whole layout adapts to be more suitable for touching with your fingers instead of using a keyboard and mouse.
Tablet Mode is especially useful on 2-in-1 convertible laptops like the Yoga because when you flip the screen around or rotate it, you’re physically switching from a laptop orientation to a tablet orientation. Tablet Mode detects this and automatically switches the interface to match.
You control Tablet Mode through Windows Settings. Go to Settings > System > Tablet. There you can set what happens when you sign in, whether automatic switching is enabled, and other tablet-related UI preferences.
What is Touchscreen?
Touchscreen is actual hardware. It’s the physical layer on top of your display that detects your finger and lets you input commands by touching the glass.
You control the touchscreen hardware through Device Manager. It’s a driver issue, not a settings issue.
Here’s the Critical Difference
You can disable Tablet Mode and your touchscreen will still work perfectly. You can touch your screen and everything responds normally. Tablet Mode just controls how the interface looks, not whether the hardware works.
Conversely, you can have Tablet Mode enabled but the touchscreen hardware disabled through Device Manager. The UI might be in tablet layout, but it’s not responsive to touch because the device driver is disabled.
They’re independent systems that happen to work together but don’t depend on each other.
Which Problem Do You Actually Have?
If your actual problem is “I hate that Windows keeps automatically switching to that full-screen touch UI when I rotate my screen,” then you don’t need to disable the touchscreen hardware. You need to disable Tablet Mode in Settings.
The steps would be: Settings > System > Tablet. Then change “When I sign in” to “Use desktop mode” and toggle off “Automatically switch to tablet mode when using your device as a tablet.”
That leaves your touchscreen working perfectly for actual touch input, but the automatic UI switching goes away.
But if your actual problem is “I keep accidentally touching the screen while I’m typing and it’s messing up my work,” then yes, you want to disable the actual touchscreen hardware through Device Manager.
Ask yourself: am I frustrated with the automatic interface changes, or am I frustrated with touch input not working the way I want it to?
One problem needs Tablet Mode settings. The other needs Device Manager. They’re completely different fixes for completely different problems.
Frequently Asked Questions
Will disabling the touchscreen improve my battery life?
Not significantly. The digitizer uses power, but it’s a tiny amount. If battery life is your main concern, focus on other settings first. Screen brightness makes a bigger difference. Disabling the touchscreen helps if you want to eliminate accidental touches or if your digitizer is causing phantom clicks. Battery improvement is a bonus at best.
What if I don’t see “HID-compliant touch screen” in Device Manager at all?
A few possibilities. First, right-click in the Device Manager window and select “Show hidden devices.” Sometimes Windows hides devices that aren’t currently detected. If it still doesn’t show up, the device name might be slightly different, especially on Surface devices or older Lenovo models. Look for anything with “touch” in the name in the display adapters section at the bottom. If nothing appears, download the latest driver from the Lenovo Support website and install it.
Can I disable just the stylus/pen input but keep finger touch working?
The Device Manager method disables all touch input. You can’t selectively disable just the stylus through Device Manager. If you have specific touch feature needs, check Lenovo Vantage software. It sometimes offers granular control over touch features and intelligent gesture settings that the basic Device Manager disable doesn’t provide.
I uninstalled the driver and now my touchscreen won’t come back. Can I fix this?
Yes, probably. Go to Device Manager, right-click in an empty area, and select “Scan for hardware changes.” Windows will look for the device again. If it reappears, great. If not, download the driver from the Lenovo Support website and install it manually. If you’re still stuck, system restore to before the update is your last option, though that reverts other changes too.
Does this work the same way on Windows 10 vs Windows 11?
Completely the same. The Device Manager method is identical on both. The main difference is that Windows 11 separated Tablet Mode settings more clearly from touchscreen hardware settings. On Windows 10, they felt more connected. But the actual touchscreen disable process is the same procedure on both operating systems.
Final Thoughts: You’ve Got This
I know that technical processes can feel intimidating, especially when it involves touching settings in your operating system that you’re not familiar with.
But here’s what I want you to know: disabling your touchscreen is one of the safest possible changes you can make to your Windows system. Nothing breaks. Nothing becomes unfixable. You can reverse it in seconds if you need to.
You’ve now got three different pathways to get to Device Manager, so you can use whichever method feels most comfortable. You know exactly what device to look for. You understand why it resets on restart and how to make it permanent if you need to. You know how to fix ghost touches. You know how to handle Windows 11 compatibility issues. And you know when seeking professional help makes sense.
Your touchscreen doesn’t have to control your experience anymore. You’re in control now.