
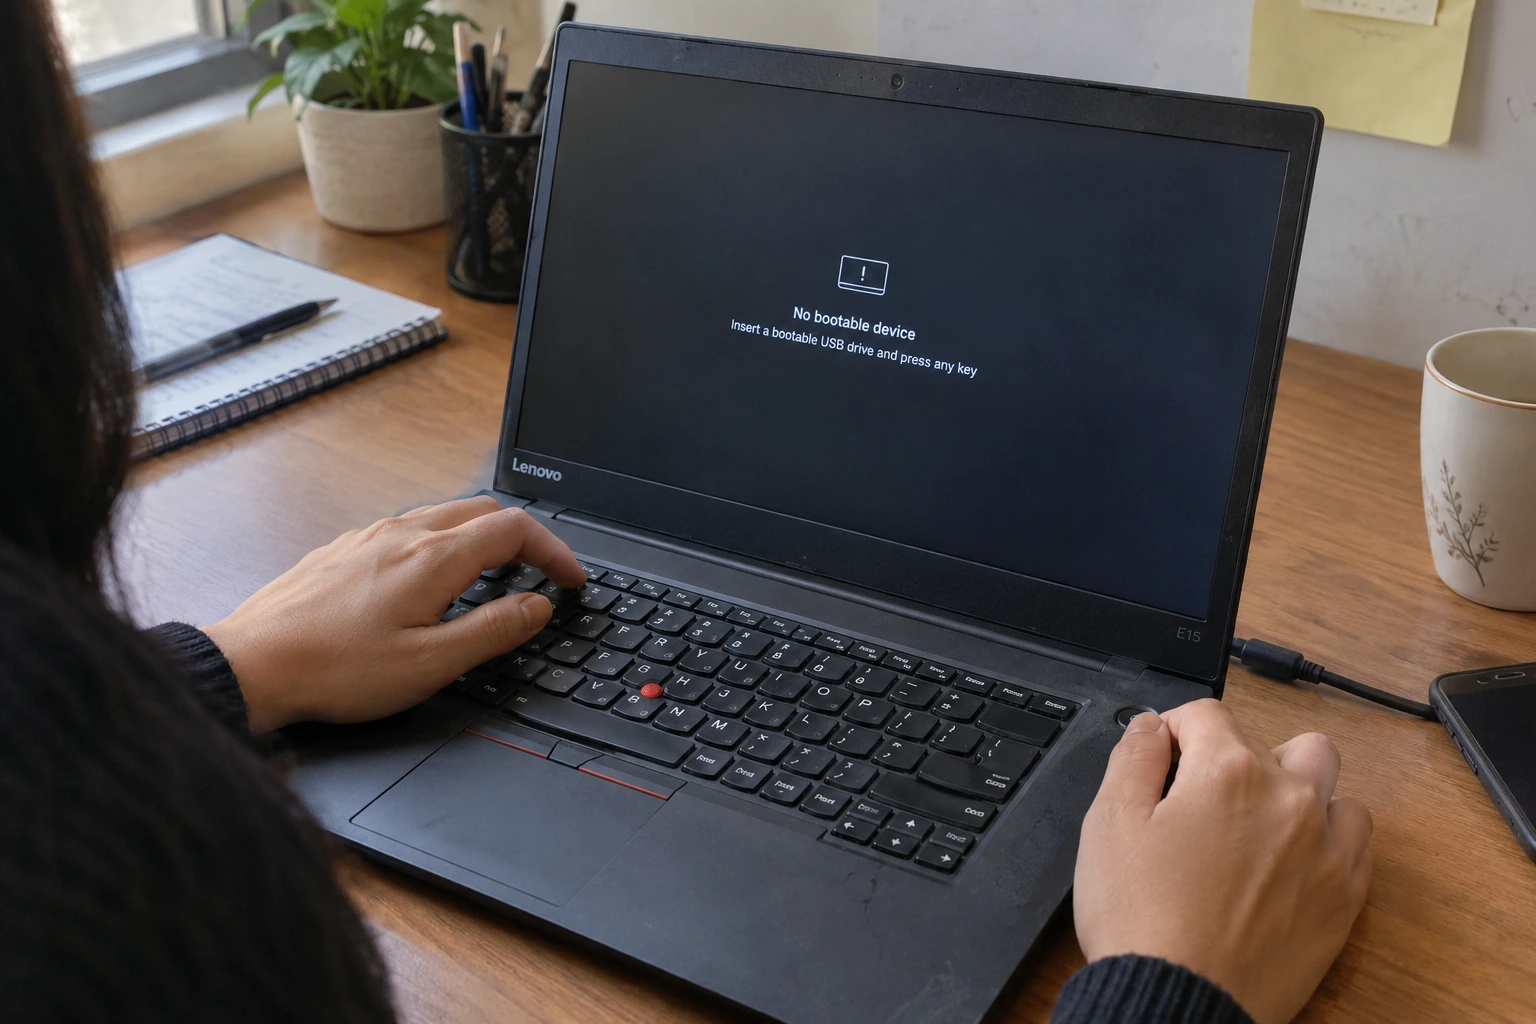
Stop Panicking—Your Lenovo Touchpad Probably Isn’t Broken
I’m going to start by saying something that might seem obvious but actually isn’t: most Lenovo touchpad problems are not hardware failures. They just feel like it when nothing responds to your finger.
The vast majority of touchpad failures happen because of driver issues, Windows settings getting flipped, or your computer getting stuck in a weird state. Not because the physical touchpad died. I’ve seen people send their laptops for repairs when the fix was literally pressing two keys or unchecking a hidden setting.
Here’s what makes this frustrating. When your touchpad stops working, the symptom is total. It’s not like a partially broken screen where you can see something is wrong. The touchpad just completely stops responding. Your brain immediately goes to “hardware must be broken.” But that’s not how software problems work. A corrupted driver or a stuck firmware state can make hardware completely unresponsive.
This matters because if you think your touchpad is broken hardware, you’ll probably give up too early. You might even pay for a repair you don’t need. But if you know that 95% of these problems are fixable with software troubleshooting, you’ll actually try the fixes that work. And most of them take less than five minutes.
I’ve been troubleshooting Lenovo laptops for years. And I can tell you the pattern is almost always the same. Someone’s touchpad stops working. They panic. They try one thing that doesn’t work. They give up and assume it’s broken. But if they’d just tried the next thing on the list, it would have been fixed.
Here’s what I’m going to walk you through. You’ll start with the fastest fixes first—things that take 30 seconds. Then move to slightly more involved solutions if those don’t work. By the time you finish this guide, you’ll either have your touchpad working again or you’ll know exactly what’s wrong with it. And that second part is just as valuable.
The three fastest wins are the Fn key shortcut, Windows Settings, and Lenovo Vantage. Most people fix it in one of these three steps. Seriously. I’d estimate 70% of people who follow through on those three alone have their touchpad working again. If you’re reading this because nothing worked yet, we’ll get to the deeper fixes next. But start here first because you might be done in minutes.
Why Most People Miss the Obvious Fixes
There’s a reason these problems persist. It’s not that the fixes are hard. It’s that nobody tells people they exist. Lenovo’s support pages mention these things in passing. YouTube videos show them but don’t explain why they work. And most importantly, people don’t think to look for them because the problem seems like hardware failure.
The Fn key toggle is the perfect example. Your Lenovo has a physical hardware-level switch for the touchpad that’s completely separate from Windows. But if you don’t know it exists, you’ll never look for it. You’ll just assume the touchpad is broken and spiral into panic mode.
Same with Lenovo Vantage. I’d guess less than half of Lenovo owners even know this app exists. But if you open it and click “Check Updates,” it often installs the exact driver fix you need. One person on Reddit said they spent two weeks trying everything, then opened Vantage, installed the update, and restarted, and their touchpad worked. Two weeks versus five minutes.
That’s what this guide fixes. You’re about to learn what most people don’t know. And that knowledge is the difference between frustrated and fixed.
What You’ll Learn in the Rest of This Guide
Section 2 covers the Fn key shortcut. This is the fastest possible fix. It takes 30 seconds. If your touchpad was accidentally disabled by pressing the wrong key combination, pressing the right one turns it back on.
Section 3 walks through Windows Settings. Even if the Fn key isn’t the problem, Windows has its own toggle. Plus, there’s a hidden setting that automatically disables your touchpad when you plug in a mouse. This section explains all three toggles and how they interact.
Section 4 is about Lenovo Vantage. This is the easiest path if the above doesn’t work. Open one app. Click Check Updates. Install the driver. Restart. Done.
Section 5 goes into Device Manager. This is more involved. But it’s the most reliable fix when software issues run deeper. You completely remove the driver and let Windows reinstall it fresh.
Section 6 explains the I2C HID Device. This is where it gets technical. But understanding this saves you hours. Modern Lenovo touchpads don’t work through a simple driver. They use a communication protocol that can fail independently from the driver. This section explains what that means and how to fix it.
Section 7 covers the EC reset. This is the nuclear option. But it works for situations where everything else failed. Holding the power button for 60 seconds resets a microcontroller that normal restarts don’t touch.
Section 8 is System Restore. This is your final software option. If everything above didn’t work, System Restore reverts your system to an earlier date when the touchpad was working.
Section 9 tells you how to know when it’s actually hardware broken. Because sometimes after all of this, the answer really is hardware failure. And knowing that for certain saves you from wasting more time.
Section 10 addresses model-specific differences. ThinkPad, IdeaPad, and Yoga models have different Fn keys and different BIOS access keys. This section tells you which is which.
Section 11 covers partial failures. What if your cursor moves but clicking doesn’t work? Or scrolling is broken? These have slightly different fixes.
Section 12 is a FAQ with quick answers to the most common questions people ask about this problem.
The Real Cost of Not Fixing This Quickly
I want to be honest about something. The longer your touchpad is broken, the more frustrated you get. And frustrated people make bad decisions.
I’ve seen people pay $200 for repairs when the problem was a driver; they could update themselves. I’ve seen people buy an external mouse and think they’ve solved the problem, then get frustrated with the external mouse and give up using their laptop entirely.
But more than that, a broken touchpad usually means something else is also slightly wrong. If your drivers are corrupted enough to break the touchpad, they might be affecting other things too. If your I2C controller is failing, it might be causing battery drain or other weird behavior. Fixing the touchpad often improves other things you didn’t realize were wrong.
So this guide isn’t just about getting your touchpad back. It’s about fixing the underlying issue properly instead of giving up or settling for a workaround.
Corrupted drivers rarely cause just one symptom. They can also contribute to slow Windows performance, so fixing the touchpad properly may help other things too.
The 30-second fix—The Fn Key Trap: Why Your Lenovo Touchpad Is Disabled Without You Knowing
Your Lenovo has a physical hardware toggle for the touchpad that’s completely separate from anything Windows does. Press Fn plus a function key, and your touchpad can turn off while Windows still thinks it’s on. This is simultaneously the most common and most unknown reason touchpads stop working.
Let me explain what’s happening here because it’s genuinely confusing if you don’t understand the architecture.
Your laptop has a main CPU that runs Windows. But it also has a separate firmware layer that manages hardware independently. This firmware layer includes toggles for various hardware features. The touchpad toggle at this level is completely independent from Windows Settings.
This means one thing can be true: Windows says your touchpad is enabled. But the firmware says it’s disabled. And when firmware disagrees with Windows, firmware wins. Your touchpad won’t work.
This is why people end up totally confused. They open Windows Settings, see the touchpad toggle is ON, and think everything should be fine, but the touchpad still doesn’t work. They don’t realize there’s a separate hardware toggle that can contradict Windows Settings.
How to Identify Which Key Is Your Toggle
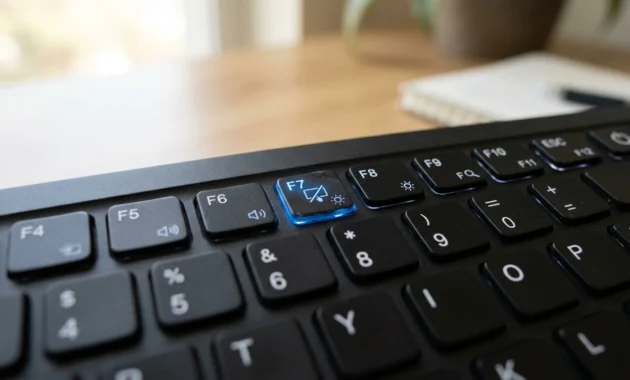
Look at your keyboard. The top row has F1 through F12. One of them has a small icon that’s different from the others. Usually it’s a rectangle with a line through it. That’s your touchpad toggle icon.
The key varies by model. On most ThinkPads, it’s F10. On some IdeaPads, it’s F8. On older models, it might be F6. Some newer models use F9 or even a dedicated key that’s not a function key.
The best way to find it is to look at the F keys and find one with a touchpad icon. If you can’t see it clearly, you can also try them. Press Fn + F6, and watch the screen. Did you see an icon pop up? No? Try Fn + F8. Keep trying until one of them shows an icon on your screen.
How to Press It Correctly
This is important because I’ve had people tell me they pressed the key and it didn’t work. But they pressed it wrong.
Hold down the Fn key. While holding it, press the function key with the touchpad icon. Hold both down for a second. Then release.
You’ll see a small notification appear on your screen briefly. It will show an icon with or without a line through it. If there’s a line through the icon, the touchpad is now disabled. If there’s no line, it’s enabled.
If it was disabled, press the same combination again, and it’ll enable. If it was enabled, you’ve just disabled it. Do it again to re-enable.
The reason I’m specific about this is because Fn key combinations are finicky. You have to actually hold Fn while pressing the other key. You can’t press them in sequence. It has to be simultaneous.
Why This Is So Common
People disable their touchpad by accident more often than you’d think. You’re sitting at your desk. Your hand brushes the keyboard while you’re reaching for something. You happen to hit Fn and F10 at the same time. Boom. Touchpad disabled.
Then you panic because you didn’t realize you did it. You have no idea why the touchpad suddenly stopped working. You spend 20 minutes troubleshooting. You restart your computer. Nothing works. Because the problem isn’t software. It’s a hardware toggle that you don’t even know exists.
I’ve also seen people who used keyboard shortcuts from another laptop. On their old Dell, they used Alt+F something for another function. They do the same thing on their Lenovo and accidentally hit Fn+F10. Suddenly their touchpad is off. Then they’re confused because they didn’t think they did anything.
What Happens If This Doesn’t Work
If you press the Fn key combo and no icon appears on your screen, then it’s not the hardware toggle that’s causing your problem. Don’t keep trying the same thing repeatedly. You’re not going to stumble on the right key by accident.
This means your touchpad problem is somewhere else. And knowing that is valuable. You’ve now ruled out the most common cause. You can move to the next fix with confidence that you’re dealing with a different problem.
If you do see the icon appear and it shows the touchpad is disabled, press the combo again to enable it. If the touchpad immediately starts working, you’re done. This whole problem took 30 seconds to fix.
But here’s the thing I need to emphasize. If you see the icon and toggle it ON, but the touchpad still doesn’t work, that’s actually important information. It means you’ve got both the hardware toggle on AND something else is still broken. So move to the next section. But you know at least one thing has been ruled out.
The Psychological Relief of the 30-Second Fix
I’m mentioning this because I think it matters.
If the Fn key combo fixes your problem, the relief you feel is real. Your touchpad works again. Problem solved. Done.
But even if it doesn’t fix it, there’s a different kind of relief. You tried the fastest possible fix. You didn’t waste hours troubleshooting something that turned out to be a simple toggle. You’ve moved past the panic stage.
Either way, you’re in a better place mentally and practically. You’ve eliminated the most obvious possibility. Now you can move forward methodically.
Windows Settings Check: Enable Your Touchpad in 3 Steps
Here’s the second place your touchpad can get disabled. Windows Settings has its own toggle, completely independent from the Fn key. And if that wasn’t confusing enough, there’s a hidden setting that makes things worse.
Even if the Fn key is on, Windows can still turn it off. This is why people say “my touchpad shows enabled in Settings but still doesn’t work.” It’s infuriating until you realize there are actually three separate toggles that all need to be on simultaneously.
Understanding the Three Toggles
I want to be clear about what you’re dealing with here. There are three independent places your touchpad can be disabled.
First is the hardware Fn key toggle we covered in the last section. Second is the Windows Settings toggle. Third is the hidden setting about external mice. All three have to be on for your touchpad to work.
This matters because most guides only mention one or two of them. So you fix the first one, think you’ve fixed the problem, but the third one is still off and your touchpad still doesn’t work.
The Windows Settings toggle is straightforward. Either it’s on or it’s off.
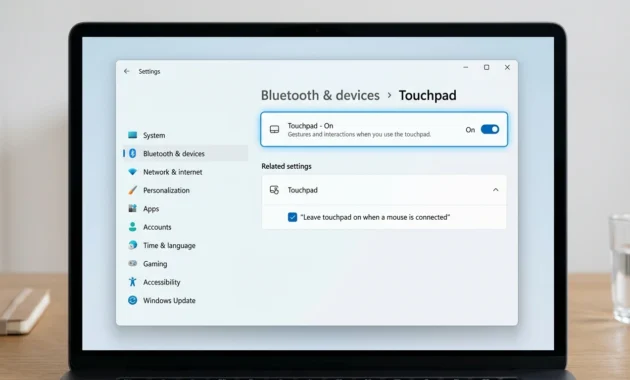
But the hidden setting is where people get stuck. It says “Leave touchpad on when a mouse is connected.” If this is OFF and you plug in an external mouse, Windows automatically disables your touchpad. No warning. No message. No “are you sure?” prompt. It just turns off silently.
Then you plug in a mouse to troubleshoot. And suddenly your touchpad doesn’t work. You think something broke. But actually Windows just disabled it because you plugged something in.
Step 1: Open Windows Settings and Navigate to Touchpad
Press the Windows Key on your keyboard. The Start menu opens.
Type “Settings” in the search box. Click on the Settings app.
Once Settings is open, click “Bluetooth & devices” from the left menu. This might be labeled “Devices” on some versions of Windows 11.
Scroll down in the main panel. You’ll see various device options. Keep scrolling until you see “Touchpad” listed.
Click on Touchpad.
You’re now in the Touchpad settings page.
Step 2: Enable the Main Touchpad Toggle
At the top of the Touchpad settings, you’ll see a toggle switch. It says either “On” or “Off” right next to it.
If it says “Off,” click the toggle to turn it “On.”
Wait a second. Look at it again. Make sure it clearly says “On” before you move forward. Sometimes it takes a moment for Windows to register the change.
If it already said “On,” you haven’t found the problem here yet. But don’t worry. Move to step 3. There’s another setting.
Step 3: Find and Enable the Hidden “Leave Touchpad On When a Mouse Is Connected” Setting
Below the main toggle, you’ll see several options. Look for a section that says something like “Related settings” or has an expand arrow. Click on it to expand the menu.
You’re looking for the setting that says “Leave touchpad on when a mouse is connected.” This is the hidden setting that breaks everything.
If this setting is turned OFF and you plugged in an external mouse for troubleshooting, your touchpad automatically disabled. Windows did this silently. No notification. No warning.
Make sure this setting is turned ON.
Even if you use an external mouse sometimes, keep this on. You want your touchpad to stay available even when another device is connected.
Why This Setting Exists and Why It Breaks Things
Microsoft added this setting because some people prefer to have their touchpad completely disabled when they use an external mouse. Makes sense in theory. No accidental touchpad touches while you’re using a mouse. Clean workflow.
But in practice, this setting catches people off guard. They plug in a mouse to troubleshoot their touchpad problem (standard troubleshooting move). Windows automatically disables the touchpad. They think they made things worse. They unplug the mouse, panicked. The touchpad still doesn’t work because now the setting is off and they have something else broken.
It’s a domino effect of confusion. And it’s completely avoidable if you just know this setting exists and turn it on.
The Reset Button Option
Below those toggles, you might see a “Reset” button. This button resets all touchpad settings to Windows defaults.
If your touchpad is acting weird — the sensitivity is wrong, gestures are broken, scrolling is sluggish — click this Reset button. It won’t uninstall the driver. It just resets all the behavioral settings to default.
This works more often than you’d expect. Sometimes Windows Settings get corrupted in small ways that a full driver reinstall isn’t necessary to fix. A Reset cleans up that corruption.
But only do this if your touchpad is acting weird. If it’s not responding at all, a Reset probably won’t help. Move to the next section instead.
When to Move Forward to the Next Fix
If you’ve now:
- Checked the Fn key toggle and it’s ON
- Checked Windows Settings and the main toggle is ON
- Checked the hidden “leave on with mouse” setting and it’s ON
And your touchpad still doesn’t work… then we’re dealing with a driver issue. Software at a deeper level than Settings. The next section is where we fix that.
Don’t get discouraged. You’ve now checked every user-facing toggle. You’ve ruled out configuration issues. This means the problem is software corruption or a driver failure. And that’s the realm of the next fix.
The One-Click Fix: Use Lenovo Vantage (Most Users Don’t Know This Exists)
I’m putting this here because it’s the easiest path most people don’t know about. And it needs to be said clearly: if the above Settings fixes didn’t work, Lenovo Vantage is the next thing to try before you go digging into Device Manager.
Lenovo Vantage is an app that comes preinstalled on many Lenovo laptops. It’s basically your control center for system management. It handles driver updates, BIOS updates, system monitoring, and hardware settings all from one place. But most people never open it. They don’t even know it exists.
And that’s a shame because Lenovo Vantage is designed specifically for Lenovo hardware. It knows your exact model. It knows what drivers you need. It bundles them properly. It installs them correctly.
Here’s why I’m telling you this. Multiple people on Reddit solved their touchpad problem in one step by using Lenovo Vantage. They opened it, clicked “Check Updates,” installed the driver and BIOS updates, restarted, and their touchpad worked. Done. Five minutes total.
This is radically easier than manually navigating Device Manager. It’s simpler than downloading drivers from a website and installing them yourself. Vantage bundles your driver and BIOS updates together in one official package that’s guaranteed to work with your exact model.
Why Vantage Works When Manual Fixes Don’t
When you use Device Manager to update drivers, you’re asking Windows to find the driver. Windows searches its own database and Windows Update. It usually finds something. But it’s not always the optimal driver for your specific hardware.
Lenovo Vantage is different. It connects directly to Lenovo’s servers. It identifies your laptop’s exact model. It fetches the drivers and BIOS updates specifically tested for your hardware. These are the same updates Lenovo would send if you contacted support directly.
Plus, Vantage bundles the BIOS update with the driver. The BIOS controls firmware-level settings. Sometimes a firmware update is necessary for a driver to work properly. Vantage handles both at the same time. Device Manager just handles the driver.
This is why some people fail with Device Manager but succeed with Vantage. The driver alone isn’t enough. The BIOS update was necessary too. Vantage installs both.
How to Find and Open Lenovo Vantage
Search for “Lenovo Vantage” in your Windows search bar. The app appears in the results. Click it to open.
If Vantage isn’t installed on your laptop for some reason, you can download it from the Microsoft Store. Search for Lenovo Vantage in the Store and install it.
When Vantage opens, you’ll see various sections and options. Don’t get overwhelmed. You only need to find one button.
Look for “Check Updates” or “My Device” or “Device Updates.” The exact name varies depending on your version of Vantage. It’s usually prominent on the main screen or in the upper right area.
Click on it.
What Happens When You Check for Updates
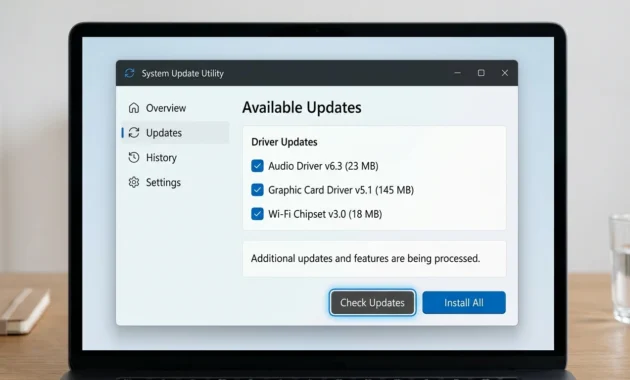
Vantage scans your laptop. It talks to Lenovo’s servers. It compares what you have installed with what Vantage thinks you should have.
After a few seconds, Vantage shows you a list of available updates. You might see driver updates listed. You might see BIOS updates. Sometimes both.
The Critical Part: Install ALL Updates
This is important. Don’t pick and choose. Don’t skip the BIOS update because you’re nervous about it. Install everything Vantage recommends.
Vantage only shows updates that Lenovo has tested and verified for your specific model. These aren’t random updates. They’re the official updates Lenovo created for your laptop.
Click “Install All” or select each update and click Install.
You’ll see a series of prompts. Accept them. Vantage is asking permission to modify system files. This is normal. This is what you want.
Let the installation complete. It might take several minutes. Don’t close Vantage. Don’t turn off your computer. Let it finish.
The Restart
When installation is complete, Vantage will ask you to restart your computer. Do it immediately. Don’t put it off.
When your computer comes back on, Windows and your drivers are now updated to what Lenovo officially recommends for your hardware.
In many cases, this alone fixes the touchpad problem.
When This Works and When It Doesn’t
Vantage works best when the problem is a driver issue, a BIOS issue, or both. If Windows installed the wrong driver and Vantage installs the right one, your touchpad comes back to life.
But Vantage doesn’t work if the problem is something deeper. If your I2C controller is failing, if there’s a hardware conflict, if the EC reset is needed… Vantage won’t fix those things.
So if you update through Vantage and your touchpad still doesn’t work, don’t give up. It just means the problem is more complex. It means you need to move to the next fix.
Why You Should Try This Before Device Manager
Vantage is easier. It’s less risky. It’s designed specifically for your hardware. Device Manager is more manual, more complex, and more prone to user error.
So try Vantage first. If it works, you’re done in five minutes. If it doesn’t work, you haven’t lost anything. You’ve just updated to the latest official drivers, which will help with the next steps anyway.
I’ve seen people skip straight to Device Manager and spend an hour troubleshooting, when five minutes in Vantage would have solved it. Don’t be that person.
Device Manager Fix: Uninstall and Restart (Let Windows Auto-Reinstall)
Your computer has a built-in recovery system that automatically reinstalls missing devices when you restart. Most people don’t know this exists. This is the fix that unlocks it.
When a driver gets corrupted (which happens more often than you’d think), completely removing it and letting Windows reinstall from scratch often fixes the problem. The reason is straightforward but important to understand.
A corrupted driver doesn’t uninstall cleanly. Parts of it stay on your system. You try to update it. Windows sees something’s already there. It tries to update instead of replacing. The corruption persists.
Full removal forces a complete clean slate. When you restart, Windows doesn’t see the device. It searches for it. It finds it. It installs a fresh driver. Everything works from that clean state.
Step 1: Open Device Manager
Right-click your Start menu button. A context menu appears. Select “Device Manager” from the list.
Alternatively, you can search for Device Manager in your Windows search bar. Type “Device Manager” and click the app.
Device Manager opens. You’ll see a list of device categories.
Step 2: Find Your Touchpad (Two Possible Locations)
Expand “Mice and other pointing devices” by clicking the arrow next to it.
Look through the list. Your touchpad might be named:
- HID-compliant mouse
- Touchpad
- Synaptics TouchPad (or Synaptics Clickpad)
- ELAN Touchpad
- Lenovo Pointing Device
- Or sometimes just “Mouse”
If you don’t see anything that looks like a touchpad there, try this.
Collapse that category. Expand “Human Interface Devices.”
Look through that list. Sometimes touchpad drivers hide here instead.
Still can’t find it? Try this last thing.
Go to the View menu at the top of Device Manager. Click “Show hidden devices.”
Now look through both Mice and other pointing devices AND Human Interface Devices again. Sometimes the device is hidden and won’t show until you enable this option.
Why It Might Be Hidden or Hard to Find
Windows sometimes hides devices that have problems. It’s trying to help by not showing you broken devices. But this actually makes troubleshooting harder because you can’t see the device to uninstall it.
The “Show hidden devices” option reveals those hidden devices so you can work with them.
Also, different touchpad manufacturers use different driver names. Synaptics and ELAN are the two most common. But Lenovo has also used proprietary names. So what you’re looking for isn’t always obvious.
Step 3: Right-Click and Uninstall
Once you’ve found what looks like your touchpad device, right-click it.
A context menu appears. Click “Uninstall device.”
A dialog box appears asking if you want to delete the driver software. Check the box that says “Delete the driver software for this device.”
This is important. You want to uninstall not just the device but the driver that goes with it. Only checking this box ensures a complete removal.
Click “Uninstall” to confirm.
Watch your screen. You might see a brief notification that the device has been uninstalled. This is normal. This is what you wanted.
Step 4: Restart Your Computer IMMEDIATELY
This is the critical part. Restart right now. Don’t wait. Don’t do other things first. Restart.
When you restart, Windows boots up and immediately starts looking for hardware it expects to find. It checks your touchpad device. It’s not there. Windows searches for it. It finds it. It searches for a driver.
Windows looks in its internal database. Or it reaches out to Windows Update. It finds a driver. It installs it automatically.
You don’t do any of this. Windows handles it automatically. That’s the whole point.
When Windows finishes the reinstall, your system is back to having a touchpad driver. And because it’s a fresh install, any corruption from the old driver is gone.
Why This Works But Seems Too Simple
This fix feels like it shouldn’t work because it’s so simple. You removed the driver. You restarted. Windows put it back. How does that fix anything?
The answer is in the word “fresh.” A fresh driver install doesn’t include any of the corruption from the old one. It doesn’t try to preserve broken settings. It doesn’t keep outdated code. It starts completely clean.
This is why manual updates sometimes don’t work. Updates try to preserve your existing configuration. If the configuration is corrupted, the update doesn’t help. But a fresh install ignores the old configuration completely.
The same power-drain method is also used when a laptop won’t turn on at all, because a stuck Embedded Controller can block normal startup too.
What to Do If It Still Doesn’t Work
If your touchpad still doesn’t work after the restart, that’s actually okay. You’ve now confirmed that the problem isn’t a simple driver corruption. The problem is something deeper.
This means moving to the next section. But you haven’t wasted time. You’ve learned something important. You’ve eliminated a possibility. You’ve confirmed the basic driver infrastructure is working (Windows found it and reinstalled it automatically).
Now it’s time to address what’s actually broken, which is usually an I2C HID Device issue.
The I2C HID Device Problem: What Happens When the Standard Fix Fails
This is where it gets technical. But understanding this will save you hours of frustration and probably save you from unnecessary repair costs.
Modern Lenovo touchpads don’t work through a simple driver. They use something called I2C (Inter-Integrated Circuit). Think of I2C as a communication protocol. Your touchpad hardware connects to Windows through a device called the I2C HID Device.
Here’s the architecture that matters:
Your touchpad is physical hardware.
The I2C HID Device is a virtual device that manages the I2C protocol.
The touchpad driver tells Windows how to interpret signals from the touchpad.
All three have to work together. If any one breaks, your touchpad stops completely.
When people say “I reinstalled the driver and it still doesn’t work,” the problem is usually the I2C HID Device, not the driver itself.
Understanding I2C and Why It’s Important
I2C stands for Inter-Integrated Circuit. It’s a communication protocol that lets small devices talk to each other. Your touchpad uses I2C to send signals to your computer.
When Windows 11 came out, and especially with the 24H2 update, the way I2C devices are managed changed. Some Lenovo models suddenly started having problems. The I2C controller would fail. The protocol would break. The touchpad would stop.
This is why some people’s touchpads suddenly broke after a Windows update. It wasn’t the driver. It was the communication protocol underneath the driver.
The Two Most Common I2C Failure Symptoms
Symptom 1: Your touchpad doesn’t appear in Device Manager at all.
You go to Device Manager. You look under Mice and other pointing devices. It’s not there. You check Human Interface Devices. Not there. You enable Show hidden devices. Still nothing.
This means Windows doesn’t even see the device. The I2C protocol isn’t communicating properly.
Symptom 2: Your touchpad appears in Device Manager but shows an error.
You find it in the list. But it has a yellow exclamation mark or a red X. You right-click and check properties. It shows Code 12 error: “Device cannot find enough free resources.”
Code 12 means something else is using the resources this device needs. The I2C controller needs specific system resources. If something else is using them, the I2C device fails.
Common Causes of I2C HID Device Failure
Resource conflicts: Multiple external devices (USB mouse, external keyboard, game controller) are competing for the same I2C bandwidth. Windows has to choose which one gets resources. Sometimes it chooses wrong.
Driver conflicts: An old driver or a third-party software is interfering with the I2C protocol.
Windows updates: Windows 11 24H2 changed I2C management. Older drivers aren’t compatible. Newer drivers are needed.
Power management: Windows puts the I2C controller into sleep mode to save power. Sometimes when it wakes up, the communication protocol doesn’t restart cleanly.
BIOS settings: Your laptop’s BIOS can disable the I2C controller at a firmware level.
Fix 1: Check Device Manager for I2C HID Device and Conflicts
Open Device Manager again.
Expand “HID Devices.”
Look for “I2C HID Device” in the list. Right-click it.
Select “Properties.”
Go to the “Resources” tab.
If you see any devices listed under “Conflicting device list,” that’s your problem. Another device is competing for resources.
Try disabling other external devices one at a time. Unplug your USB mouse. Unplug other USB devices. Restart after each removal.
If the touchpad works after you unplug something, that was causing the conflict.
If you can’t figure out which device is the problem, disable all external USB devices except keyboard. Restart. See if the touchpad works.
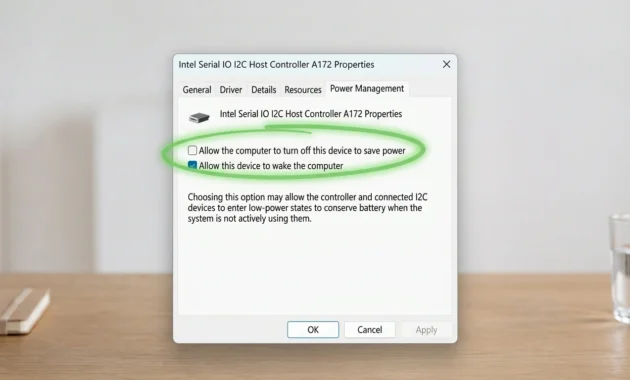
Fix 2: Disable Power Management on the I2C Controller
This is the fix that worked for multiple Reddit users and was confirmed by GeeksQuad technicians.
Open Device Manager.
Expand “System Devices.”
Look for “Intel Serial IO I2C Host Controller.” You might see multiple entries if your laptop has multiple I2C controllers.
Right-click it.
Select “Properties.”
Go to the “Power Management” tab.
You’ll see a checkbox that says “Allow the computer to turn off this device to save power.”
Uncheck this box. This tells Windows to never put this device to sleep.
Click OK.
Do this for EVERY Intel Serial IO I2C Host Controller in your System Devices list.
Restart your computer.
The reason this works is specific but important. Windows was putting the I2C controller into sleep mode to save battery power. But when the controller woke up, the I2C communication protocol wasn’t restarting cleanly. Devices were losing their connection. Keeping the controller always on prevents this wake-up failure.
This fix solved multiple people’s problems who had tried everything else. It’s worth trying even if nothing else worked.
Fix 3: Manually Update the I2C HID Device Driver
If the resource conflict and power management fixes don’t work, try specifically updating the I2C HID Device driver.
Open Device Manager.
Expand “HID Devices.”
Right-click “I2C HID Device.”
Select “Update driver.”
Click “Browse my computer for drivers.”
Click “Let me pick from a list of available drivers on my computer.”
Select “I2C HID Device” from the list.
Click Next.
Click Finish.
Let Windows finish installing.
Restart.
This is different from a generic driver update. You’re specifically targeting the I2C HID Device and forcing Windows to reinstall that particular driver.
Fix 4: Check BIOS for I2C Controller Settings
This is the last software option for I2C issues.
Restart your computer.
Immediately after restarting (before Windows loads), press F2 (for IdeaPad/Yoga) or F1 (for ThinkPad).
You’ll enter your laptop’s BIOS settings. This is a blue menu that looks different from Windows.
Navigate to “Advanced” settings. Look for “Peripherals” or “Onboard Devices.”
Find “I2C Controller” or “I2C Device.”
Make sure it’s set to “Enabled.”
If it says “Disabled,” use arrow keys to highlight it and press Enter to change it to Enabled.
Press F10 to save and exit.
If the I2C controller was disabled at the BIOS level, no amount of driver troubleshooting will help. Windows can’t enable something that the firmware has turned off.
When to Move to the Next Fix
If you’ve tried all four of these and your touchpad still doesn’t work, the problem is either:
- A stuck firmware state that can’t be fixed by software alone
- A hardware failure below the I2C protocol level
- Some other system-level corruption
The next section covers the final software option: the EC reset.
The 60-90 Second Power Reset: The Powerful Fix That Took Users Months to Discover
This fix sounds like magic until you understand what’s actually happening underneath.
Your laptop has a separate microcontroller called the Embedded Controller (EC). It’s a completely separate computer from your main CPU. The EC manages power, hardware interfaces, and low-level operations.
Your main CPU runs Windows. Your EC runs firmware. They communicate but operate independently.
When things go wrong at the firmware level, the EC can get stuck. And when the EC is stuck, software troubleshooting can’t reach it. Normal restarts don’t touch it. Even hard reboots don’t reset it.
The only way to reset the EC is to completely drain power for long enough that the EC’s memory fully discharges. That’s what this fix does.
Why This Works When Everything Else Fails
Everything you’ve tried so far operates at the Windows or driver level. The EC operates below that.
A driver reinstall talks to Windows. The EC doesn’t care.
BIOS settings are one thing. The EC can override them.
A normal restart doesn’t fully discharge the EC’s memory.
A power drain forces a complete reset of the EC’s firmware state.
Multiple Reddit users reported this was the only thing that worked after weeks of trying everything else. And it worked immediately.
The Exact Procedure
This procedure is very specific. The timing matters. The sequence matters.
Step 1: Shut down your computer completely.
Not sleep mode. Not restart. A full shutdown where the screen goes dark and the power light goes off.
Step 2: Unplug the AC power adapter.
Physical removal. Take the charging cable out of the laptop. Make sure there’s no power going into the device.
Step 3: Press and hold the power button for 60 to 90 seconds.
This is the critical part. Hold it continuously. Don’t let go. Even if nothing happens. Even if the screen flickers. Even if it looks like nothing’s changing. Keep holding.
The reason it’s 60 to 90 seconds and not just 30 seconds is because the EC’s capacitors need time to fully discharge. If you only hold it 30 seconds, you haven’t completely drained the EC’s memory. It won’t reset properly.
Step 4: Release the power button.
Step 5: Wait 1 to 2 minutes.
Don’t do anything. Let the device sit. The EC’s capacitors are fully discharging. The firmware is clearing its memory. This takes time.
Step 6: Plug the AC adapter back in.
Physically insert the charging cable.
Step 7: Press the power button to restart normally.
Your computer boots up with a completely reset EC. Everything should be clean.
Why People Often Get This Wrong
Most guides say “hold the power button for 30 seconds.” That’s not enough.
Most guides don’t mention waiting 1-2 minutes. People plug the charger back in immediately and restart. The EC hasn’t fully discharged.
Some people restart without unplugging the charger first. Battery power maintains some charge in the EC. The reset doesn’t work.
Following the exact sequence above increases your chances of success significantly.
What Success Looks Like
If this fixes your touchpad, you’ll know it immediately.
Your computer restarts. Windows boots normally. You move your finger on the touchpad. It responds. The cursor moves. Clicking works.
If it works, you’re done. Your touchpad is fixed.
If It Doesn’t Work
If the EC reset doesn’t fix your touchpad, you haven’t lost anything. You’ve now confirmed that the problem isn’t a stuck firmware state.
This means moving to the next section. System Restore. This is the final software option.
Why This Matters Psychologically
At this point in the troubleshooting process, you’ve done serious work. You’ve tried multiple approaches. You’ve gotten technical.
If the EC reset works, it validates all that effort. You fixed it yourself.
If it doesn’t work, it’s actually okay. You’ve now exhausted the software options. Whatever comes next, you’ll know it with certainty.
System Restore: Reverting to When the Touchpad Worked
System Restore reverts your Windows system to an earlier point in time. Not your files. Not your programs. Just system files and drivers.
Here’s how it works. Windows automatically creates restore points at regular intervals. When you update Windows, when you install software, when certain system events happen.
If your touchpad worked before a specific date and stopped working after, System Restore can take you back to that earlier point.
Why This Works
If your touchpad stopped working right after a Windows update, System Restore can undo that update at the system level. Your driver reverts to the version from before the update.
If your touchpad stopped working after you installed third-party software, System Restore removes the system changes that software made.
It’s not a cure-all. But it’s worth trying because sometimes it’s exactly what you need.
How to Use System Restore
Press Windows Key + R to open the Run dialog.
Type “rstrui.exe” and press Enter.
System Restore opens. Click “Next.”
You’ll see a list of restore points with dates. Find a restore point from before your touchpad stopped working.
Click on it. Click “Next.” Confirm.
Windows restarts and applies the restore. Your system reverts to that earlier date.
Your files and programs stay where they are. Only system configuration and drivers change.
What to Expect During Restore
Your computer will restart several times. This is normal.
The restoration might take 5 to 15 minutes.
When it’s done, your system will be in the state it was on the date you selected.
If your touchpad worked then, it might work now.
If This Fixes It
If your touchpad works after System Restore, you need to figure out what broke it so you don’t break it again.
Was it a Windows update? If so, you can control when/if future updates install.
Was it a specific program? If so, uninstall that program or disable whatever it does to your system.
Was it BIOS settings? If so, be careful about changing BIOS in the future.
If This Doesn’t Work
At this point, you’ve tried:
- Fn key toggle
- Windows Settings
- Lenovo Vantage driver update
- Device Manager driver reinstall
- I2C HID Device fixes (all four variants)
- EC reset
- System Restore
You’ve exhausted every legitimate software troubleshooting option.
This means moving to the next section. Determining if it’s actually hardware broken.
Know When to Stop: Hardware Failure vs. Software Failure (Diagnostic Flowchart)
At this point, you’ve tried everything software can do. So how do you know if it’s actually hardware broken instead of just a complex software issue?
There are specific diagnostic signals that indicate hardware failure. But they’re not obvious unless you know what to look for.
First Signal: Device Never Appears in Device Manager
Not just missing when you restart. Never appears even after you enable Show hidden devices, scan for hardware changes multiple times, and restart.
If the device doesn’t exist in Device Manager at all, Windows doesn’t see it. The hardware isn’t being recognized by the system.
This could mean:
- The touchpad hardware is physically broken
- The connection between the touchpad and the motherboard is loose (fixable by technician)
- The I2C protocol is broken at a level below Windows (not easily fixable)
- The firmware is corrupted in a way that prevents hardware detection
Second Signal: Fails Consistently After Wake-From-Sleep
Your touchpad works fine until your laptop sleeps. You wake it up. Touchpad doesn’t work.
You restart your computer. Touchpad works again. You let it sleep. You wake it. Touchpad stops again.
This is a very specific pattern. It usually indicates a power management issue in the firmware or hardware. The device isn’t waking up cleanly from sleep state.
This is more likely to be fixable than total failure. But it’s definitely a hardware or firmware issue, not a driver issue.
Third Signal: Works in BIOS But Not in Windows
This is actually good news.
You’re in the BIOS setup menu (before Windows loads). You interact with your keyboard. You can feel the touchpad responding. It works.
But once Windows fully loads, the touchpad completely stops.
This is a clear indication that the hardware is fine. The BIOS proves it. Something between the hardware and Windows is broken.
That “something” is usually the driver or Windows Settings or I2C HID Device. All software. Not hardware.
Hardware-versus-software confusion is not unique to touchpads. The same logic applies to laptop black screen problems, where checking whether the display works in BIOS helps you rule out a failed component.
Fourth Signal: Appears in Device Manager With Code 12 Error Persistently
Code 12 means resource conflict.
You’ve tried the fixes in Section 6. You’ve disabled conflicting devices. You’ve changed power management settings. The Code 12 error comes back.
This might indicate hardware resource issues below the driver level. But it could also just be a stubborn software conflict.
Run Lenovo Diagnostics
This is the official tool. It’s the most reliable way to know if hardware is actually broken.
Go to Lenovo’s website. Search for Lenovo Diagnostics for your model.
Download it. Run it.
Lenovo Diagnostics has a dedicated Touchpad Devices test. Run that specific test.
If the test passes, the hardware is fine. Any failure is software.
If the test fails, the hardware isn’t detecting properly. This indicates hardware failure.
The Interpretation
If Lenovo Diagnostics test passes but your touchpad doesn’t work in Windows, it’s software. The hardware is fine. Something in Windows or drivers is broken.
If Lenovo Diagnostics test fails and the touchpad also never worked in BIOS, it’s hardware. The device isn’t being detected at a system level.
When to Contact Support
If your laptop is still under warranty, contact Lenovo before paying for repairs. They can run additional diagnostics and might repair it for free.
If warranty is expired, you can:
- Take it to a local computer repair shop and get an estimate
- Contact Lenovo support for paid repair options
- Try to replace the touchpad yourself (if you’re comfortable with hardware repairs)
Touchpad replacement costs vary. Usually $100 to $300 depending on labor and parts.
Permission to Stop Trying
If you’ve gotten this far in the guide and nothing worked, stop.
You’ve done legitimate troubleshooting. You’ve tried every software option. You understand your problem better than most technicians understand it.
You haven’t failed. Lenovo touchpad issues are genuinely complex. Some of them require professional help.
Professional repair is not giving up. It’s knowing when to call someone qualified.
Model Matters: ThinkPad, IdeaPad, and Yoga Specific Solutions
Different Lenovo models have different Fn keys for the touchpad toggle. They have different BIOS access keys. Sometimes they have different driver sources or different default settings.
If you’re troubleshooting, knowing your specific model helps enormously.
ThinkPad Models (T-series, X-series, P-series, E-series)
Your Fn key toggle is usually Fn + F10.
Some older ThinkPads use Fn + F6 instead. If F10 doesn’t work, try F6.
To enter BIOS, press F1 when your computer boots (before Windows loads).
Official ThinkPad drivers come from the ThinkPad support page on Lenovo’s website. Search for your specific model number.
ThinkPads typically have a TrackPoint button above the touchpad (a red nub in the middle of the keyboard). This is unique to ThinkPad and is a different device from the touchpad. If you have a TrackPoint, make sure it’s working too. Sometimes troubleshooting one fixes both.
If you use a ThinkPad, it’s worth comparing these steps with Lenovo’s official ThinkPad touchpad troubleshooting guide. It covers installing the latest touchpad driver, rolling back a driver that stopped working, and testing the touchpad in Safe Mode. That last test is a quick way to tell the cause apart: if the touchpad works in Safe Mode, the problem is almost certainly a driver or software conflict, not a hardware failure.
IdeaPad Models
IdeaPad typically uses Fn + F8 or Fn + F10 for the touchpad toggle. It varies by model year.
Some newer IdeaPads might use a different combination. Try F8 first. If that doesn’t work, try F10.
To enter BIOS, press F2 when your computer boots.
IdeaPad drivers can come from Lenovo Vantage or from the IdeaPad support page on Lenovo’s website.
Lenovo Vantage often works better for IdeaPad models than manual driver downloads. The Vantage app is specifically optimized for IdeaPad hardware.
Yoga Models (ThinkPad Yoga, IdeaPad Yoga)
Yoga models use Fn + F8 or Fn + M for the touchpad toggle, depending on your specific model.
Some Yoga models have a dedicated touchpad toggle key instead of using F8 or F10. Look for a button with a touchpad icon on it.
To enter BIOS, press F2 when your computer boots.
Yoga models usually benefit most from Lenovo Vantage driver updates. Yoga hardware is newer and Vantage handles it better than generic Windows Update drivers.
How to Find Your Exact Model
Check the bottom of your laptop. There’s usually a sticker with your model information.
Look for text like “ThinkPad T14,” “IdeaPad 5,” or “Yoga 6.” This tells you what model you have.
If you can’t see the sticker, you can find your model in Windows.
Open Settings > System > About. Look for “Device name” or “System model.”
Or right-click Start > System > scroll down to find your device name.
Why Model Matters
Different models have different hardware configurations. A fix that works for ThinkPad T14 might not work for IdeaPad 5.
Different models have different driver availability. Some models have more recent driver support than others.
Knowing your exact model helps you download the right drivers and follow model-specific instructions.
My Lenovo touchpad not working — is it hardware broken or can I fix it myself?
A: The vast majority of Lenovo touchpad problems are fixable without professional repair. In fact, I’d estimate that 95% of these issues are software-related, not hardware failure. The touchpad feels completely broken because it’s unresponsive, but that doesn’t mean the physical hardware is damaged.
Here’s what usually happens. A driver gets corrupted. Windows Settings gets flipped. The Fn key toggle gets accidentally pressed. The I2C communication protocol fails. Or the firmware gets stuck. All of these are software problems that you can fix yourself without taking your laptop apart.
Start with the fastest fixes first:
1. Check Your Fn Key Shortcut (30 seconds)
Look at your function keys. Find the one with a touchpad icon (usually F10 on ThinkPad, F8 on IdeaPad). Press Fn + that key simultaneously. If your touchpad was accidentally disabled by this hardware toggle, pressing it again turns it back on. This alone fixes about 20% of all touchpad problems.
2. Check Windows Settings (1 minute)
Press Windows Key + I. Go to Bluetooth & devices > Touchpad. Make sure the main toggle is ON. But here’s the hidden part: expand the menu and check “Leave touchpad on when a mouse is connected.” This setting auto-disables your touchpad if you plug in an external mouse. If this is off and you connected a mouse for troubleshooting, that’s why your touchpad stopped working.
3. Use Lenovo Vantage (5 minutes)
Search for “Lenovo Vantage” in Windows. Open it. Click “Check Updates.” Install any driver or BIOS updates shown. Restart. This works for many people because Vantage installs official Lenovo driver bundles specifically tested for your hardware. It’s easier than Device Manager and more reliable than generic Windows Update drivers.
If those three don’t work, move to more advanced fixes:
4. Reinstall the Driver via Device Manager (10 minutes)
Right-click Start > Device Manager. Expand “Mice and other pointing devices.” Find your touchpad. Right-click > Uninstall device (check the box to delete driver software). Restart immediately. Windows automatically reinstalls a fresh driver on boot. Corrupted drivers often don’t uninstall cleanly, but a full removal forces a clean reinstall.
5. Fix I2C HID Device Issues (15 minutes)
Modern Lenovo touchpads use I2C communication protocol. If this fails, your touchpad stops completely. Two specific fixes work:
First: Open Device Manager > expand System Devices > find “Intel Serial IO I2C Host Controller” > right-click > Properties > Power Management tab > uncheck “Allow computer to turn off this device” > OK. This prevents Windows from putting the I2C controller into sleep mode, which was breaking wake-up communication.
Second: Device Manager > HID Devices > I2C HID Device > right-click > Update driver > Browse computer > Let me pick from list > select “I2C HID Device” > Next > Finish. This specifically targets the I2C communication layer instead of just the touchpad driver.
6. Do an EC Reset (2 minutes, but requires patience)
This is the nuclear option. Shut down completely. Unplug AC adapter. Press and hold power button for 60-90 seconds (keep holding even after screen goes dark). Release. Wait 1-2 minutes. Plug in adapter. Restart. This resets your laptop’s Embedded Controller firmware. Multiple Reddit users reported this was the only fix that worked when everything else failed.
7. Try System Restore (10 minutes)
If your touchpad worked before a certain date and stopped after, System Restore can take you back. Press Windows Key + R > type “rstrui.exe” > Next > select a restore point from before the problem > Next > Confirm. Your system reverts to that date. Files stay where they are; only drivers and system files change.
How to Know If It’s Actually Hardware Broken:
If you’ve tried all seven of the above and nothing worked, run Lenovo Diagnostics (download from Lenovo’s website for your model). It has a dedicated Touchpad Devices test. If the test passes, the hardware is fine and your problem is some complex software issue. If the test fails, the hardware isn’t being detected at the system level, indicating actual hardware failure.
When to Contact Support or Get Professional Help:
If your warranty is active, contact Lenovo support before paying for repairs. If warranty is expired and hardware diagnostics show failure, get a local repair estimate (usually $100-$300 for touchpad replacement).
The Bottom Line:
Your Lenovo touchpad not working probably doesn’t mean your touchpad is broken. It probably means a driver needs updating, a setting needs adjusting, or firmware needs resetting. Start with the Fn key and Windows Settings (takes two minutes). Move through Vantage, Device Manager, and I2C fixes if those don’t work. Only conclude it’s hardware failure after you’ve actually run diagnostics and confirmed it.
You can fix this yourself in most cases. And if you can’t, at least you’ll have documented exactly what you tried, which makes professional repair faster and cheaper.
What If Only Part of Your Touchpad Works? (Buttons, Scrolling, Cursor)
Sometimes touchpads fail partially instead of completely. Your cursor moves but clicking doesn’t work. Scrolling is broken. The cursor disappeared. These partial failures usually have different causes than total failure.
Scenario 1: Cursor Moves But Clicking Doesn’t Work
The movement part of the touchpad works. The clicking part doesn’t.
This is usually either a pointer settings issue or a click mechanism problem.
Try this first: Open Control Panel > Mouse > Pointer Options tab.
Look for “Hide pointer while typing.” This setting can sometimes interfere with click detection.
Try toggling it off. Restart and test.
If that doesn’t work, the click mechanism might be a separate driver component. Try reinstalling the driver (Section 5) and specifically look for a “click” or “button” component when updating.
Or the physical click mechanism might be worn out. This is a hardware issue that requires replacement.
Scenario 2: Scrolling Doesn’t Work But Movement Does
The cursor moves. You can click. But two-finger scrolling or edge scrolling doesn’t work.
This is a gesture settings issue.
Go to Windows Settings > Bluetooth & devices > Touchpad.
Expand the menu. Look for scroll gesture settings.
Make sure scrolling is enabled.
Or click the Reset button in Touchpad Settings to restore all default gesture settings.
This is almost always a settings issue, not a driver issue.
Scenario 3: Cursor Disappeared But Touchpad Responds
You can move your finger on the touchpad and things happen (menus open, etc.), but you don’t see a cursor.
This might be the “Hide pointer while typing” setting. Open Control Panel > Mouse > Pointer Options. Toggle this setting off.
Or your pointer visibility might be set to invisible. Look for pointer visibility or transparency settings in the same menu.
Or the mouse pointer image might be corrupted. Search for “Mouse properties” in Windows Settings and look for a Pointer tab where you can change the pointer image.
Scenario 4: Touchpad Works Sometimes But Not Always
This is intermittent failure. It works, then stops, then works again.
Intermittent failures usually indicate:
- A driver that’s unstable (try reinstalling per Section 5)
- A power management issue (try Section 6 Fix 2)
- A hardware connection that’s loose (requires technician)
- An I2C conflict that’s not constant (try Section 6 all four fixes)Intermittent failures are harder to troubleshoot because you can’t recreate the problem consistently. But the same fixes apply.
QUICK ANSWERS TO YOUR MOST COMMON QUESTIONS
Is my Lenovo touchpad hardware broken or software broken?
If it appears in Device Manager, it’s almost certainly software. If it never appears even with Show hidden devices enabled, hardware is more likely. Run Lenovo Diagnostics to be sure. The diagnostic test will tell you definitively whether the hardware detects properly or not.
Why does my touchpad work in BIOS but not in Windows?
That’s actually good news. If it works in BIOS, the hardware is fine. Something in Windows or your drivers is preventing it from working. Reinstall the driver or try System Restore. The problem is software, not the device itself.
Why did my touchpad stop working when I plugged in a mouse?
Check Windows Settings > Bluetooth & devices > Touchpad > expand menu > make sure “Leave touchpad on when a mouse is connected” is enabled. If this setting is off, your touchpad automatically disables when Windows detects an external mouse.
Which Fn key disables the touchpad on my Lenovo?
Depends on your model. ThinkPad is usually Fn + F10. IdeaPad is usually Fn + F8 or Fn + F10. Yoga is usually Fn + F8 or Fn + M. Check your model section above or look for a touchpad icon on your function keys.
Will System Restore delete my files?
No. System Restore only reverts system files and drivers. Your documents, photos, and programs stay exactly where they are. It’s completely safe to use.
CONCLUSION: YOU HAVE EVERYTHING YOU NEED TO FIX THIS
You now know every realistic fix for a Lenovo touchpad that stopped working. You understand how the hardware and software interact. You know what causes these failures. You know how to diagnose which type of failure you’re dealing with.
Start with the quick wins. The Fn key. Windows Settings. Lenovo Vantage. Most people fix it there.
If those don’t work, Device Manager gives you a clean driver reinstall. Then I2C HID fixes address the deeper architecture issues. The EC reset is the nuclear option that solves stuck firmware states. System Restore is your final software attempt before concluding it’s hardware.
By the time you finish that list, you either have your touchpad working or you know exactly what’s wrong with it. Both outcomes are better than where you started.
If you need professional help, you have documentation of everything you tried. That information is incredibly valuable to a technician. You didn’t waste time. You eliminated possibilities systematically.
Your touchpad is probably fixable. You now have the knowledge and the process to fix it. If it turns out to be hardware failure, at least you know that with certainty.
Either way, you’re in control of the situation instead of panicked about it. That matters.
2 comments